Worx WG117 Manual Download Page 13

13

12

2-in-1 Grass Trimmer/Edger

EN

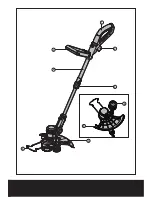
12. REMovING THE CaP

Press and hold in the two Cap Release Latches 
(11) (see Fig. K).
Pull the Cutting Head Cover (10) away from 
the Cutting Head (13).  Keep the Cutting Head 
Cover and the inside of the Cutting Head clean 
from debris.  To replace the Cutting Head 
Cover, press it firmly onto the spool holder.  
ensure that it is correctly connected by trying 
to remove it without depressing the two Cap 
Release Latches.

13. CHaNGING THE lINE SPool

First take off the Cutting Head Cover (10) and 
remove the old spool (12).  Place the new 
spool onto the Cutting Head (13). Feed one 
line through the eyelet (14), and then repeat 
for the second line.  Reattach the Cutting Head 
Cover.

waRNING! your Trimmer is 

designed to only use line with a 

maximum diameter of 0.065” (1.65mm). 

only use nylon line.   

IMPoRTaNT - always wind the line onto 

the upper section of the spool first.

14. To MaNually wINd lINE

Take approximately16ft (5m) of line and insert 
5/8” (15mm) of line into one of the holes in the 
upper section of the spool (12) (see Fig. L1). 
Wind the line in the direction of the arrows 
on the top of the spool.  Repeat process with 
separate piece of line on lower section of 
spool (see Fig. L2&L3).
Leave approximately 4” (100mm) of line 
unwound and place it into the cleat. Repeat on 
the lower section of the spool.
Care should be taken to ensure that the line 
is neatly coiled on the spool (see Fig. L4). 
Failure to do so will impair the efficiency of the 
automatic line feed.
Then fit the spool as described above in 

“Changing the line Spool”.

MAINTENANCE

After use, disconnect the machine from 
the electrical outlet and check for damage. 

Your trimmer requires no additional 

lubrication or maintenance. There are no user 
serviceable parts in your trimmer. electric 
powered trimmers should only be repaired 
by an authorized repairer. Use only WORX 
replacement parts and accessories.
Never use water or chemical cleaners to clean 
your trimmer. Wipe clean with a dry cloth. 
Always store your trimmer in a dry place 
out of the reach of children. Keep the motor 
ventilation slots clean. If you see some sparks 
flashing in the ventilation slots, this is normal 
and will not damage your trimmer.

Summary of Contents for WG117

Page 1: ...WG1 17 HElPlINE NuMBER 1 866 354 woRx 9679 HElPlINE NuMBER P06 P14 P23 2 in 1 Grass Trimmer Edger Coupe gazon Taille bordure 2 en 1 2 en 1 Cortadora de cesped Ribeteadora EN F ES...

Page 2: ......

Page 3: ...8 9 2 1 3 4 5 6 7...

Page 4: ...a b I II A B C1 C2 D E1 E2 E3 E4 F G H1...

Page 5: ...15 10 11 12 13 14 RIGHT WRONG H2 I J K L1 L2 L3 L4...

Page 6: ...6 Telescopic Shaft 7 Auxiliary Handle 8 Edger Wheel 9 Line Cutter 10 Cutting Head Cover See Fig K 11 Cap Release Latch See Fig K 12 Spool See Fig K 13 Cutting Head See Fig K 14 Eyelet See Fig K 15 Lin...

Page 7: ...meter 14 Line diameter 0 065 Line length 2x16ft Machine weight 6 2 lbs Accessories Safety guard 1 Auxiliary handle 1 Edger wheel 1 Flower guard 1 Only use the appropriate accessories intended for this...

Page 8: ...ll outlet only one way If the plug does not fit fully into the wall outlet reverse the plug If the plug still does not fit contact a qualified electrician to install the proper wall outlet Do not chan...

Page 9: ...ng and balance at all times o Stay alert Watch what you are doing Use common sense Do not operate appliance when you are tired p Disconnect appliance Disconnect the appliance from the power supply whe...

Page 10: ...10 2 in 1 Grass Trimmer Edger EN 4 CULTIVATORS GRASS SHEARS a Keep hands away from blades Save these instructions SYMBOLS Edging Trimming...

Page 11: ...ry handle to your desired working position OPERATING INSTRUCTIONS Warning The cutting head continues to rotate after the trimmer has been switched off Wait until it stops before laying the trimmer dow...

Page 12: ...ith the grass Let the trimmer line work at its own pace do not force the trimmer line into the work area 9 EDGING First rotate the Rear Handle 1 90 degree clockwise See Main Handle Rotation Fig E3 E4...

Page 13: ...s in the upper section of the Spool 12 See Fig L1 Wind the line in the direction of the arrows on the top of the Spool Repeat process with separate piece of line on lower section of Spool See Fig L2 L...

Page 14: ...e s curit 8 Roue De Coupe Bordures 9 Coupeur De Cordon De Coupe 10 Couvercle De La T te De Coupe Voir Fig K 11 M canisme De D verrouillage Du Couvercle Voir Fig K 12 Bobine Voir Fig K 13 T te De Coupe...

Page 15: ...coupe 0 065po 1 65mm Longueur des fils 2x5m 2x16ft Poids de la machine 2 8kg 6 2 lbs ACCESSOIRES Garde de s curit 1 Poign e auxiliaire 1 Roue de coupe bordures 1 Garde D Espacement 1 N utilisez que le...

Page 16: ...la fiche ne s accouple toujours pas utilisez une rallonge lectrique polaris e Une rallonge lectrique polaris e n cessite une prise murale polaris e Cette fiche entre seulement d une seule fa on la pr...

Page 17: ...les caract ristiques d un produit de 240Volts Figure 1 M THODE POUR S CURISER LA RALLONGE LECTRIQUE rallonge lectrique cordon lectrique de l appareil A ATTACHEZ LA RALLONGE LECTRIQUE TEL QU ILLUSTR B...

Page 18: ...placez si endommag s Gardez les poign es s ches propres et libres d huile et de graisse s V rifier les pi ces endommag es Avant d employer l appareil une garde ou autre pi ce endommag e devrait tre so...

Page 19: ...position de travail souhait e INSTRUCTIONS D OP RATION AVERTISSEMENT La t te coupante continue de tourner apr s avoir teint l alimentation de la tondeuse attendez que le moteur soit compl tement arr t...

Page 20: ...z l g rement sur la rallonge pour vous assurer qu elle est fermement retenue dans la poign e de l outil Branchez la prise lectrique de la rallonge dans la fiche 3 de l outil 6 AJUSTEMENT DE LA T TE DE...

Page 21: ...ez les d bris du couvercle de la t te de coupe et nettoyez l int rieur de la t te de coupe Appuyez fermement sur le porte bobine pour remettre le couvercle de la t te de coupe Assurez vous qu il soit...

Page 22: ...et accessoires de rechange recommand s par les fabricants N utilisez jamais d eau ou de produits chimiques pour nettoyer votre coupe bordures Nettoyez fond avec un linge sec Rangez toujours votre cou...

Page 23: ...6 Mango Telesc Pico 7 Mango Auxiliar 8 Rueda Bordeadora 9 Cuchilla Del Hilo 10 Cubierta Del Cabezal De Corte Ver Fig k 11 Pestillo Para Extracci N De La Tapa Ver Fig k 12 Bobina Ver Fig k 13 Cabezal D...

Page 24: ...tud del hilo 2x16pies 2x5m Peso de la m quina 6 2 libras 2 8kg Accesorios Guarda protectora de seguridad 1 Mango auxiliar 1 Rueda bordeadora 1 Guarda espaciadora 1 S lo utilice los accesorios apropiad...

Page 25: ...ngador polarizado El enchufe de la herramienta se inserta en el cable prolongador polarizado de un nico modo Si no encaja completamente invierta el enchufe Si a n as no se inserta adquiera un prolonga...

Page 26: ...12 No recomendado NOTA S lo las partes aplicables de la Tabla deben ser tenidas en cuenta Por ejemplo para un producto de 120V no se necesita tener en cuenta lo especificado para 240V Figura 1 M TODO...

Page 27: ...dadosamente antes de cualquier uso futuro de la herramienta a fin de determinar si funcionar n correctamente y realizar n la funci n prevista Compruebe que las piezas m viles se encuentren alineadas y...

Page 28: ...la posici n de trabajo deseada FUNCIONAMIENTO ADVERTENCIA La cabeza de corte contin a girando luego de haber apagado la bordeadora Espere a que se detenga y luego suelte la herramienta Siempre use pro...

Page 29: ...dad sostenga el mango principal y aplique la fuerza adecuada para realizar el ajuste como indica la Fig H2 7 Gatillo de encendido apagado Para poner en funcionamiento la bordeadora presione y sostenga...

Page 30: ...cortadora est dise ada para el empleo de hilos de un di metro m ximo de 1 65mm Emplee hilo de nylon nicamente IMPORTANTE Siempre enrolle el hilo comenzando por la parte superior de la bobina 14 PARA E...

Page 31: ......

Page 32: ...Designed in Italy Made in China Con u en Italie Fabriqu en Chine Dise ado en Italia Fabricado en China Copyright 2012 Positec All Rights Reserved...

Reviews: