background image

Quick reference

EN

28

3.

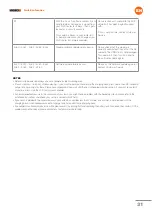
 Adjusting the start mowing time

Landroid is pre-programmed to start mowing at 09:00 every day.
Landroid creates its own automatic schedule and working time based on the size of your lawn and other factors. Our recommendation is 
not to manually adjust these settings.  

However if you want Landroid to start mowing at your desired time, please follow these steps. Please note Landroid will start mowing at 
the time you perform this operation. For example, if you do set the time at 22:00 in the evening, then this is the new time that Landroid 
will start each day.

•  Turn on Landroid
•  Input PIN
•  Press Start Button and Stop button simultaneously
•  You will hear x3 long beeps and x1 short
•  The mowing start time has been set 

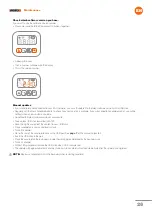
2.


Work area setting

Landroid automotically adjusts its mowing time to the size of your lawn. If you don’t know it, you can easily calculate the area with the 
Lawn Size Calculator feature of the app. 
To manually input the working area size for your Landroid, please follow the instructions.
•  Turn Landroid on and insert the PIN
•  Long press OK for 3 seconds until the clock flashes, then press OK to confirm
•  The letter A will appear for Area with a number value in m² will flash
• Press 

↑ (

Start) or 

↓ (

Home) button to change the value in m²  to the size of your lawn then press OK to confirm.

•  Then you will have successfully set up the mowing area.

ADJUSTING THE MOWING TIME

Landroid creates its own automatic schedule and working time based on the size of your lawn and other factors. Our recommendation is 
not to manually adjust these settings. However there are 3 ways to manually adjust the mowing time depending on your requirements.

1.

 Use the app and follow the simple on-screen menus

Summary of Contents for Landroid WR139E

Page 1: ...Owner s manual WR139E...

Page 2: ...rting Landroid Connecting Landroid to the Internet Using the App Landroid options Maintenance Keep it sharp Keep it clean Keep it charged Keep it stored over the Winter Keep it updated Quick reference...

Page 3: ...gurable agile and efficient Landroid manicures your grass and gives you the best lawn ever This manual will help you get set up Support www worx com support Landroid Owner s Site www worx com mylandro...

Page 4: ...ged Replace worn or damaged blades and bolts in sets Turn off Landroid remove the battery wear protectives gloves and take care when inspecting blades as rotating one blade can cause other blades to r...

Page 5: ...other or be short circuited by conductive materials When the battery pack is not in use keep it away from metal objects like paper clips coins keys nails screws or other small metal objects that can m...

Page 6: ...E F G H I J K L 1 Worx Landroid M 2 wire repair connectors 3 spare blades kits 1 Allen key 1 charging base 8 screws wire pegs x180 1 power supply boundary wire 130m 1 20V 2 0Ah battery 2 boundary wire...

Page 7: ...A B Find My Landroid Radio Link slot Safety stop Rain sensor Charge contact Off Limits slot USB port Voice Control slot Battery slot Cutting height adjustment Opening hood Microphone hole Interface AC...

Page 8: ...on Monday If you want to change this pre set you can modify it via your smartphone or by using the control panel in Work time Customise Work time menus See detailed instructions at the end of this ma...

Page 9: ...shorten the height of your grass it is recommended that you do so progressively by adjusting the cutting height in steps Security PIN Protection To prevent unauthorised people from being able to use...

Page 10: ...r lawn Nearly invisible from the first day it will be engulfed in the soil in a few weeks If you will want to bury the wire it is recommended to first peg it down and test the installation is successf...

Page 11: ...no irrigation sprinklers nearby Plan for the boundary wire The wire has to be placed at a certain distance from the edge of the lawn This distance changes depending on what s on the other side of the...

Page 12: ...n With this you simply surround forbidden areas with the Off Limits digital fence which does not need to be connected to the boundary loop fig 2 The Off Limits digital fence is also great to protect s...

Page 13: ...hard surface fix it with plug and screw fixings not supplied Connect one end of the boundary wire to the charging station Strip the end of the wire with a pair of scissors fig 2 Open the plastic door...

Page 14: ...round the area with the wire keeping 26cm distance until you close the island Always lay the wire clockwise Failing to do so will make the mower drive into the island Return to the edge of the lawn fo...

Page 15: ...to the black right clamp Final steps The boring part is over There are only a few more steps to go Connect the charging station to the AC mains socket fig 11 If everything is fine the LED will light g...

Page 16: ...ee holes of the connector no need to strip the wires Insert the wires fully until both wire ends are visible on the other side of the connector Press the connector firmly by using a pair of pliers Att...

Page 17: ...ill display 0000 Press the START button then press OK Landroid will start mowing You can stop Landroid at any time by pressing the STOP button To send Landroid to the charging station press the Home k...

Page 18: ...and keep it in a safe place For extra security register your Landroid and record your PIN on Worx website We will store it safely and you will always be able to retrieve it from the My Landroid secti...

Page 19: ...NET 1 Dowload the app Download the free Landroid app first Get it from Android 4 4 2 or higher or Apple iOS 11 or higher app stores 2 Ensure you have Your WiFi network password Landroid Serial Number...

Page 20: ...connection Register your Landroid by inputting the Serial Number manually or by scanning the QR code Select your Wi Fi network or you can connect Landroid via Find My Landroid or RadioLink Options Tip...

Page 21: ...ure the exact area of your lawn It s as easy as taking a walk along its border You can use the app to upload information on your grass species soil type and irrigation These inputs in combination with...

Page 22: ...your lawn temporarily off limits For example with seasonal equipment like a trampoline Or you can make a permanent change to your lawn without disturbing your original Landroid boundary wire Protect...

Page 23: ...th cutting edges and minimize the frequency of replacing the blades Each cutting blade will last up to 2 months when it is programmed to mow every day Always check to see if the blades are chipped or...

Page 24: ...t debris and the build up of grass from daily mowing Turn Landroid off before cleaning it For extra safety remove the battery WARNING DO NOT use a hose high pressure washer or otherwise pour running w...

Page 25: ...oundary wire Connect the charging base to a suitable power supply The green light on the charging base will turn on Manually dock Landroid into the charging base while Landroid is powered off The gree...

Page 26: ...s available Download the latest software version at our website Take a blank USB stick formatted in FAT32 Save the zip file and extract the content to your USB stick Place Landroid on a secure and lev...

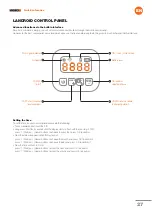
Page 27: ...the display starts to flash with the year e g 2019 press Start or Home buttons to choose the year then press OK to confirm Now the date will appear in Month Day format press Start or Home buttons to...

Page 28: ...ng Landroid automotically adjusts its mowing time to the size of your lawn If you don t know it you can easily calculate the area with the Lawn Size Calculator feature of the app To manually input the...

Page 29: ...If not verify that the charging base is properly connected to the charger and that the charger is connected to a suitable power supply If they are properly connected the boundary wires are clamped in...

Page 30: ...on E6 Error Upside Down tilted Turn Landroid upright E7 Battery charge error 1 Battery s temperature is too high more than 55 C when charging Place the charging base in a shady area or wait until the...

Page 31: ...the charging base If Landroid runs abnormally once in a while please reset it by turning it off and removing the battery for 30 seconds then restart it If the problem cannot be solved please contact o...

Page 32: ...ades and replace them if damaged Remove debris and foreign objects from the blades and blade disc Grass is being cut unevenly Landroid does not work enough hours per day to cut the grass Try adding mo...

Page 33: ...avily because the blade disc is unbalanced Check the blade disc and blades remove debris and foreign objects from the blades and blade disc Replace the blades with a new set The battery may be exhaust...

Page 34: ...dby Software or display fault Restart Landroid Landroid shuts off when docking in the charging base Landroid fails to charge due to over temperature protection and is powered off Place the charging ba...

Page 35: ...enabled when you connect the machine with the app You can close it after you connect successfully Make sure DHCP function is enabled If you changed your Wi Fi network you need to connect Landroid to...

Page 36: ...No load speed 2800 min Cutting area 500m Cutting diameter 18cm Cutting height 30 70mm Cutting height positions 4 Battery type Lithium ion Battery model WA3551 3 Charging time approx 70min Charger mod...

Reviews: