Worldlawn WS2690BSE Operator'S Manual Download Page 6


1. Safety Information 

1.1 Before Operating 

It  is  essential  that  you  read  and  understand  the 

contents  of  this  manual  before  attempting  to  operate 

this piece of power equipment!       

This is the safety alert symbol which means 

caution,  warning  or  danger.  It  is  used  to  alert  you 

to  potential  personal  injury  hazards.  Obey  all 

safety  messages  that  follow  this  symbol  to  avoid 

personal injury. 

Danger:

  signals  an  extreme  hazard  that  will  cause 

serious  injury  or  death  if  the  recommended 

precautions are not followed.


Warning:

  signals  a  hazard  that  may  cause  serious 

injury  or  death  if  recommended  precautions  are  not 

taken. 

Caution:

  signals  a  hazard  that  may  cause  minor  or 

moderate  injury  if  recommended  precautions  are  not 

followed. 

1.2 Training 

1.2.1 

Regard  the  snow  thrower  as  a  piece  of  power 

equipment and the operator needs to be trained before 

operating this unit. 

1.2.2

 Read and follow all instructions on the machine 

and  in  the  manual(s).  Be  thoroughly  familiar  with 

controls  and  the  proper  use  of  the  equipment.  Know 

how to stop the unit and disengage the controls. 

1.2.3

 Never allow children or teenagers to operate the 

equipment. Adults only should operate the equipment 

after reading the manual. 

1.2.4

  Keep  everyone,  especially  children  and  pets, 

away  from  the  area  of  operation.  Remember  that  the 

operator or user is responsible for accidents or hazards 

occurring to other people or their property. 

1.2.5

  Exercise  caution  to  avoid  slipping  or  falling, 

especially  when  operating  the  snow  thrower  in 

reverse. 


1.3 Preparation 

1.3.1

  Thoroughly  inspect  the  area  where  the 

equipment  is to be  used  and remove all  wires, blocks 

and any other foreign objects. 

1.3.2 

Put  the  clutch  and  shifts  into  neutral  before 

starting the engine. 

1.3.3

 Avoid wearing loose fitting clothing that can get 

caught  in  moving  parts.  Wear  footwear  that  will 

improve footing on slippery surfaces. 

1.3.4

 Handle fuel with care. It is highly flammable. 


Use an approved fuel container. 


Never add fuel to a running engine or hot engine. 


Fill  fuel  tank outdoors with  extreme care.  Never 

fill fuel tank indoors. 


Never  fill  containers  inside  a  vehicle  or  on  a 

truck  or  trailer  bed,  because  interior  carpets  or 

plastic truck bed liners may insulate the container 

and slow the loss of any static charge. 


Always  place  containers  on  the  ground,  away 

from your vehicle, before filling. 


When  practical,  remove  gas-powered  equipment 

from  the  truck  or  trailer  and  refuel  it  on  the 

ground.  If  this  is  not  possible,  then  refuel  such 

equipment  on  a  trailer  with  a  portable  container, 

rather than from a gasoline dispenser nozzle. 


Keep  the  nozzle  in  contact  with  the  rim  of  the 

fuel  tank  or  container  opening  at  all  times,  until 

refueling is complete. 


Replace  gasoline  cap  securely  and  wipe  up 

spilled fuel. 


If  fuel  is  spilled  on  clothing,  change  clothing 

immediately. 

1.3.5

 Use extension cords and receptacles as specified 

by the manufacturer for all units with electric starting 

motors. 

1.3.6

  Adjust  the  collector  housing  height  to  clear 

gravel or crushed rock surface. 

1.3.7

  Never  attempt  to  make  any  adjustments  while 

the engine is running. 

1.3.8

 Always wear safety glasses or eye shields during 

operation or while performing an adjustment or repair 

to  protect  eyes  from  foreign  objects  that  may  be 

thrown from the machine. 

Summary of Contents for WS2690BSE

Page 1: ...nstructions Product Overview Controls Operation Maintenance Storage Troubleshooting Snow thrower Operator s Manual Worldlawn Power Equipment Inc Industrial Park 2415 Ashland Ave Beatrice NE 68310 Toll Free Number 1 800 267 4255 ...

Page 2: ......

Page 3: ...st damaged or illegible replace it with a new one through our company s sales department from a dealer or download from our web site www worldlawnpowerequip com For more information contact our sales department or dealer Please also indicate the model and serial numbers of your product For your convenience write your equipment model and serial number below Model No ___________________________ Seri...

Page 4: ... 3 Lower Handle Installation 5 2 4 Upper Handle Installation 6 2 5 Speed Control Rod Installation 6 2 6 Discharge Chute Assembly Installation 6 2 7 Snow Clean out Tool Installation 7 2 8 Fill the Engine with Oil 7 2 9 Check the Tire Pressure 7 2 10 Check the Skids and Scraper 7 3 Product Overview 8 4 Controls 9 4 1 Auger Impeller Drive Control Lever 9 4 2 Traction Control Lever 9 4 3 Speed Control...

Page 5: ...l 13 6 4 Adjusting the Skids and Scraper 13 6 5 Adjusting the Speed Control Handle 13 6 6 Checking the Auger Gearbox Grease 14 6 7 Changing the Engine Oil 14 6 8 Lubricating the Snow Thrower 14 6 9 Inspecting and Replacing the Spark Plug 15 6 10 Adjusting the Traction Drive Belt 15 6 11 Replacing the Traction Drive Belt 15 6 12 Adjusting the Auger Impeller Drive Belt 16 6 13 Replacing the Auger Im...

Page 6: ...oroughly inspect the area where the equipment is to be used and remove all wires blocks and any other foreign objects 1 3 2 Put the clutch and shifts into neutral before starting the engine 1 3 3 Avoid wearing loose fitting clothing that can get caught in moving parts Wear footwear that will improve footing on slippery surfaces 1 3 4 Handle fuel with care It is highly flammable Use an approved fue...

Page 7: ... accessories approved by the manufacturer of the snow thrower 1 4 13 Never operate the snow thrower without good visibility or light Always be sure of your footing and keep a firm hold on the handles Walk never run 1 4 14 Never touch a hot engine or muffler 1 4 15 Always set the throttle lever to the Fast position when throwing snow 1 4 16 If the engine slows down under overload or the wheels slip...

Page 8: ...r repairs are ever needed contact an Authorized Service Dealer 1 7 4 Purchase only genuine replacement parts and accessories 1 7 5 Before leaving the operating position stop the engine remove the ignition key and wait for all moving parts to stop 1 7 6 If a shield safety device or decal is damaged illegible or lost repair or replace it before beginning operation 1 7 7 Do not smoke while handling g...

Page 9: ...w thrower 2 Engage 4 Auger drive 6 Do not place your hand in the 8 Keep away from moving parts chute Stop the engine before Remove the ignition key and read leaving the operator s position the instructions before servicing Use the tool to clear the chute or performing maintenance 1 Forward drive speed settings 2 Speed selector 3 Reverse drive speed setting ...

Page 10: ... installing handle assembly connect eyelet end of Auger Impeller Cable Assembly to threaded stud located on right hand drive handle with M6 acorn nut and washer Connect hook end of cable assembly to auger impeller drive assembly control arm FIG 1 FIG 1 2 3 Lower Handle Installation 1 Lower Handle 4 Hex Hd Bolt M8 18 4 Lock Washer M8 4 Flat Washer M8 Procedure 2 3 1 Insert M8x18 bolts in combinatio...

Page 11: ...e Assembly Installation 1 Discharge Chute Assembly 4 Hex Hd Bolt M6 x 20 2 Hex Hd Bolt M6 x 16 6 Lock Nut M6 1 Flat Washer M6 1 Hair pin cotter pin Procedure 2 6 1 Place discharge chute assembly on top of opening of Auger Impeller housing Attach connector plate of gear assembly weldment to connector plate of bottom chute mounting bracket weldment with 4 M6x20 bolts and locknuts tighten 2 6 2 Attac...

Page 12: ...e proper amount of oil 2 8 5 Put the dipstick into the filler neck and then remove Note To ensure an accurate reading you must fully install the dipstick 2 8 6 Read the oil level on the dipstick 2 8 7 If the oil level is below the LOW ADD mark on the dipstick add more oil to raise the oil level to the FULL mark If overfill occurs drain the excess oil until the oil level on the dipstick reads FULL ...

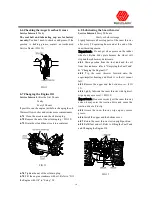
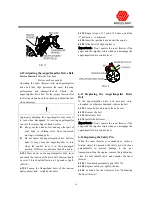
Page 13: ...8 3 Product Overview FIG 5 Refer to engine instruction book FIG 7 FIG 6 ...

Page 14: ...discharge chute control handle and shift the handle left to move the chute to the left and right to move the chute to the right 4 6 Deflector Control Lever Move the lever forward to direct snow stream down and backward to direct snow stream up 4 7 Fuel Shutoff Valve Close the valve by rotating clockwise Open the valve by rotating it counterclockwise Close the valve when you are not using the snow ...

Page 15: ... brand service station Important To reduce starting problems add fuel stabilizer to the fuel all season mixing it with gasoline less than 30 days old Do not add oil to the gasoline 5 2 1 Clean around the fuel tank cap 5 2 2 Remove the fuel tank cap 5 2 3 Fill the fuel tank with unleaded gasoline Important Do not fill the fuel tank too full because the gasoline must have room to expand 5 2 4 Replac...

Page 16: ...ving parts may freeze Do not use excessive force when trying to operate frozen controls If you have difficulty operating any control or part start the engine and let it run for a few minutes 5 5 2 After using the snow thrower let the engine run for a few minutes to prevent moving parts from freezing Engage the auger impeller to clear any remaining snow from inside the housing Rotate the discharge ...

Page 17: ...djust the traction drive belt Inspect and adjust the auger impeller drive belt After the first 2 hours Change the engine oil Before each use or daily Check the engine oil level and add oil if necessary Inspect and adjust or replace the traction drive belt when necessary Inspect and adjust or replace the auger impeller drive belt when necessary Every 20 hours Lubricate the snow thrower Every 25 hou...

Page 18: ...e auger does not contact the paved or gravel surface Also adjust them as needed to compensate for wear FIG 10 6 4 1 Move the snow thrower to a lever surface 6 4 2 Check the tire pressure in the tires Refer to Checking the Tire Pressure in Setup 6 4 3 Loosen the 2 flange nuts that secure both skids to the auger side plates until the skids slide up and down easily 6 4 4 Support the auger blades so t...

Page 19: ...torage Lightly lubricate all moving parts of the snow thrower after every 20 operating hours and at the end of the snow throwing season Important Do not get oil or grease on the rubber wheel or friction drive plate because the wheel will slip and the rubber may deteriorate 6 8 1 Drain gasoline from the fuel tank and the oil from the crankcase refer to Emptying the Fuel Tank Changing the Engine Oil...

Page 20: ...control handle shifts properly but the snow thrower does not drive in the forward or reverse speeds 6 10 1 Adjust the belt with 10 pounds of pressure If the belt moves 1 4 it is all right If not you should adjust the belt FIG 15 6 10 2 Loosen the flange head bolts of the tension pulley adjust and retighten the bolts 6 10 3 Repeat steps 6 10 1 and 6 10 2 above until the deflection is achieved 6 10 ...

Page 21: ...e flange head bolts of the tension pulley adjust and retighten the bolts 6 12 3 Repeat steps 6 12 1 and 6 12 2 above until the deflection is achieved 6 12 4 Insert the ignition key and start the engine 6 12 5 If the belt still slips replace it Important Don t operate the snow thrower if the auger and the impeller rotate when you disengage the auger impeller drive control lever FIG 18 6 13 Replacin...

Page 22: ... it stops Gasoline is highly flammable it can ignite and cause serious personal injury Drain gasoline outdoors Drain gasoline from a cold engine only Wipe up any gasoline that may have spilled Do not drain gasoline near any open flames or where gasoline fumes may be ignited by a spark Do not smoke a cigar a cigarette or a pipe when handling gasoline ...

Page 23: ...ark plug 7 1 9 Squirt 2 teaspoons of oil into the spark plug hole 7 1 9 Install the spark plug by hand and then torque it to 15 ft lb 20 4N m If you do not have a torque wrench tighten the plug firmly Do not connect the wire to the plug 7 1 10 Pull the recoil starter slowly to distribute the oil on the inside of the cylinder 7 1 11 Lubricate the snow thrower Refer to Lubricating the Snow thrower 7...

Page 24: ...ystem contains stale fuel 6 The spark plug wire is loose or disconnected 7 The spark plug is pitted fouled or the gap is incorrect 8 The fuel vent cap is restricted 9 The engine oil level in the engine crankcase is too low or too high 1 Insert the key into the ignition 2 Move the choke to the On position and press the primer 2 times 3 Open the fuel shutoff valve 4 Move the throttle to the Fast pos...

Page 25: ...t position when throwing snow 2 The snow thrower is moving too fast to clear the snow 3 You are trying to remove too much snow per swath 4 You are trying to remove extremely heavy or wet snow 5 The discharge chute is plugged 6 The auger impeller drive belt is loose or is off the pulley 7 The auger impeller drive belt is worn or broken 1 Move the throttle to the Fast position 2 Shift the snow throw...

Page 26: ...at Worldlawn s discretion without charge for parts or labor To take advantage of this warranty the Snow thrower must be returned to an authorized Worldlawn Dealer within the warranty period The cost of delivering the Snow thrower to the authorized Dealer and return delivery shall be the responsibility of the Owner Worldlawn s sole responsibility with any claim made under this warranty is limited o...

Page 27: ......

Page 28: ...Worldlawn Power Equipment Inc Industrial Park 2415 Ashland Ave Beatrice NE 68310 Phone 402 228 4255 Fax 402 223 4103 www worldlawnpowerequip com Form No ST26102 201109 R ...

Reviews: