
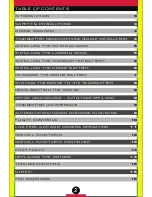


11
VENOM FPV
App Available on Apple &
Android Devices
1. Search your phone’s application store for “
VENOM FPV
” and download
the free app. This application allows you to see a live feed of your
drone’s camera, take photos/videos that can be kept in the app or
saved to your phone as well as other special actions.
2. Turn on the drone, go into the Wi-Fi settings of your phone and select
the network “VenomFPV-XXXXXX” (X’s are the unique ID of your
drone) to establish a connection.
This must be done every time the
drone is first turned on and you want to use the app based
functions.
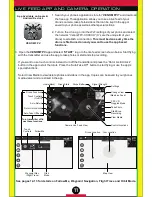
3. Open the
VENOM FPV
app and select “
START
” to go to the live feed screen shown below. Start flying
with the transmitter and use the app to take photos or start and stop recording.
If you want to use touch controls instead, turn off the transmitter and press the “Rotor Lock/Unlock”
button in the app to start the rotors. Press the “Auto-Take Off” button to start flying or use the app's
special functions.
Select View Media to view/delete photos and videos in the app. Copies can be saved to your phones
media viewer and are stored in the app.
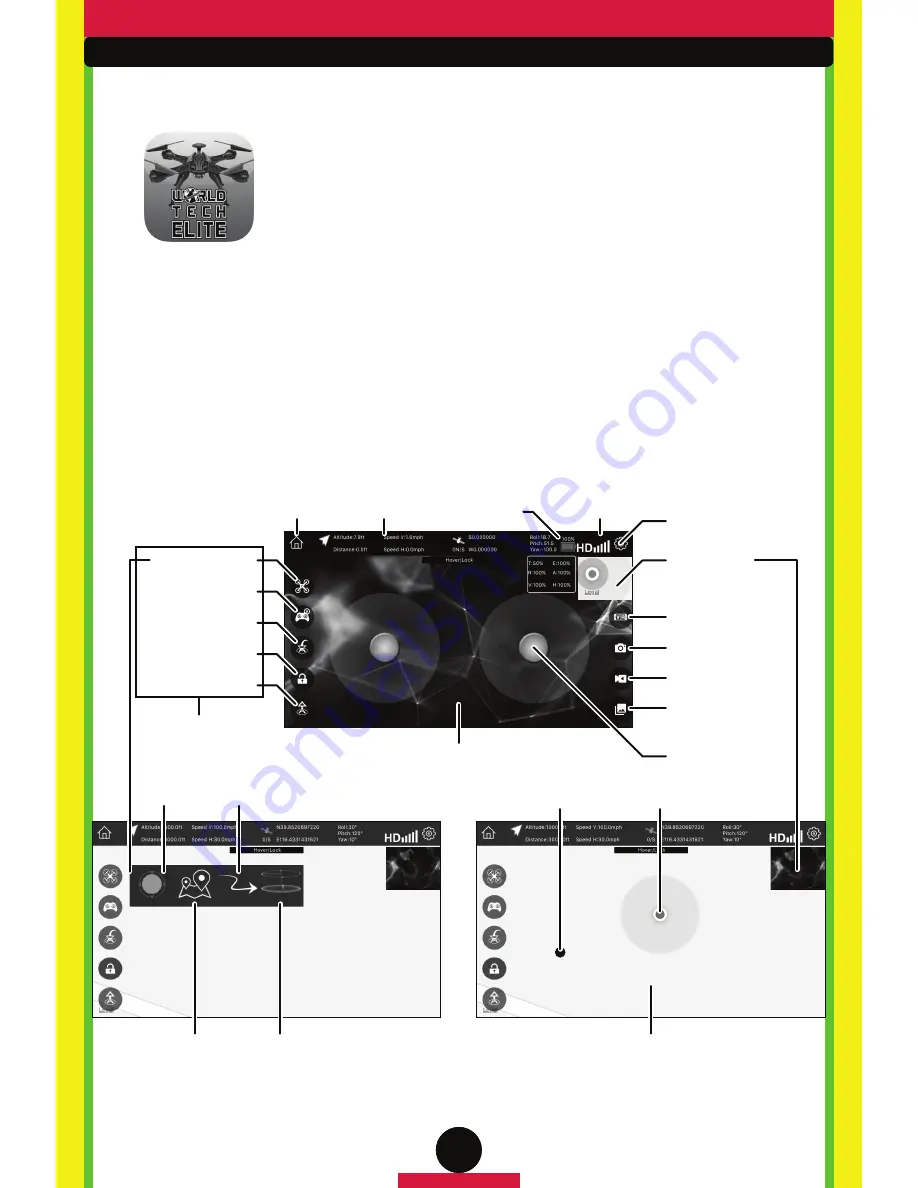
LIVE FEED APP AND CAMERA OPERATION
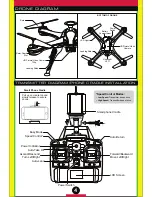
Drone Functions
Drone Battery
Touch
Controls
Home(Back)
Touch Controls
(On/Off)
Auto-Return
Auto-Take Off/Land
Turn transmitter off to
use these functions.
Rotor Unlock/Lock
Camera Live Feed View
Change View
(Map/Live Feed)
Control Joysticks
Settings
Follow Me
Waypoint Nav.
(Flight Trace)
Orbit
Mode
FPV VR
Goggles Mode
Take Photo
View Media
Start/Stop
Recording
Map View
Your Location
Drone Location
Drone Stats
Signal Strength
See pages 12-13 for details on Follow Me, Waypoint Navigation, Flight Trace and Orbit Mode.


