Workrite Ergonomics Sequoia SQ-303 Assembly Instructions Manual Download Page 6

Workrite Sequoia Monitor Arm - Assembly Instructions

6  

Workrite Ergonomics  800.959.9675  www.workriteergo.com

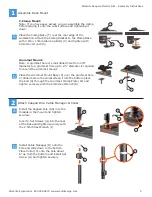
Attach Center Monitor to Pole

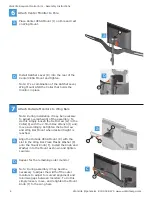
Attach Outside Monitors to Wing Bars

6

7

a

b

a

b

c

Place Center VESA Mount (J) on Pole and rest 

on Wing Mount.

Install Ratchet Lever (D) into the rear of the 

Center VESA Mount and tighten.

Note: It’s a combination of the Ratchet Lever, 

Wing Mount AND the Collar that holds the 

monitor in place.

Note: During installation it may be necessary 

to adjust overall height of the assembly. To 

do this simply loosen the Set Screw (G) in the 

Collar(C) with the 2.5mm Hex Wrench (I) and 

move accordingly. Retighten the Set Screw 

and Wing Bar Mount when desired height is 

reached.

Align the Outside VESA Mount (K) with the 

slot in the Wing Bar. Place Plastic Washer (E) 

onto the Mount Knob (F). Install the Knob and 

Washer into the Mount as shown and tighten 

securely.

Repeat for the remaining outer monitor

Note: During assembly it may become 

necessary to adjust the width of the outer 

monitors to adjust for curved alignment and 

minimize gaps between monitors. To do this 

simply loosen, move, and retighten the Mount 

Knob (F) to the wing bars.

c

a

F

E

K

F

J

D

a

b

Summary of Contents for Sequoia SQ-303

Page 1: ...Workrite Sequoia Assembly Instructions for Model SQ 303 1500205 Rev A ...

Page 2: ... Hex Wrench Qty 1 S 6mm Hex Wrench Qty 1 P M8 50mm Arm Bolt Qty 2 Need Bolt OR Hardware Packs T 2 Piece C Clamp Mount Qty 1 U Grommet Mount Qty 1 G M5 4mm Set Screw for Desk Mount Qty 3 V M6 10mm Alan Cap Bolt Qty 2 WM8 65mm Grommet Bolt Qty 1 I 2 5mm Hex Wrench Qty 1 S 6mm Hex Wrench Qty 1 S 6mm Hex Wrench Qty 1 X Grommet Clamp Plate Qty 1 G M5 4mm Set Screw for Desk Mount Qty 3 I 2 5mm Hex Wrenc...

Page 3: ... Base T over the rear edge of the workstation Attach the Clamp Bracket to the Clamp Base with 4 M6 10mm Alan Cap Bolts V and tighten with 6mm Hex Wrench S Grommet Mount Note A grommet hole or small drilled hole from 3 8 diameter to a grommet hole up to 2 5 diameter is required to mount the grommet mount Place the Grommet Mount Base U over the grommet hole or drilled hole in the worksurface From th...

Page 4: ...he Center Monitor Mount J to the VESA pattern in the monitor Install 4 VESA Monitor Screws H and tighten securely with a 2 Phillips screwdriver Outer Monitor Mount Align the outer mounts K to the VESA pattern in the monitors Install 4 VESA Monitor Screws H and tighten securely with a 2 Phillips screwdriver Note At this time you can chose to install the monitors in landscape or portrait orientation...

Page 5: ...pole to rest on the Right Wing Bar Mount Install Ratchet Levers D into the rear of both Wing Bar Mounts and tighten a b a b c Place 8mm Flat Washers R into recesses into the Wing Arm as shown Hold in place while attaching Wing Arm to Wing Arm Mount Place Steel Spacer Q on M8 5mm Arm Bolt P and attach Wing Bars to Wing Bar Mounts Tighten Securely with 6mm Hex Wrench S Repeat this step for the remai...

Page 6: ...overall height of the assembly To do this simply loosen the Set Screw G in the Collar C with the 2 5mm Hex Wrench I and move accordingly Retighten the Set Screw and Wing Bar Mount when desired height is reached Align the Outside VESA Mount K with the slot in the Wing Bar Place Plastic Washer E onto the Mount Knob F Install the Knob and Washer into the Mount as shown and tighten securely Repeat for...

Page 7: ...ough the Cable Manager B Monitor Tilt Swivel Adjustments Depending on the size of your monitor it may be necessary to adjust the tilt and swivel setting If the monitor doesn t hold its tilt position or is too hard to tilt adjust the tension adjustment on top of the Monitor Mount Use the 2 5mm Hex Wrench I clockwise to increase lift counter clockwise to decrease lift Check the monitor and adjust ag...

Page 8: ......

Reviews: