Woodstock SHOP FOX W1677 Owner'S Manual Download Page 57

-55-

W1677/W1711 10" Table Saw

PA

RT

S

REF

PART

#

DESCRIPTION

REF

PART

#

DESCRIPTION

57

XPB15

HEX

BOLT

5/16-18

X

3/8

201

X1677201

MITER

GAUGE

BODY

57-1

XPW07

FLAT

WASHER

5/16

201-1

X1677201-1

RIVET

2

X

4

60

XPB07

HEX

BOLT

5/16-18

X

3/4

201-2

X1677201-2

MITER

GAUGE

SCALE

61

XPW07

FLAT

WASHER

5/16

202

X1677202

MITER

GAUGE

HANDLE

62

X1677062

BRACKET

203

X1677203

STAR

KNOB

5/16-18

X

1-1/4

72

X1677072

SHAFT

204

XPW07

FLAT

WASHER

5/16

73

X1677073

UPR

BLADE

GUARD

BRACKET

205

X1677205

POINTER

74

X1677074

LWR

BLADE

GUARD

BRACKET

206

XPFH04

FLAT

HD

SCR

1/4-20

X

5/8

140

XPB11

HEX

BOLT

5/16-18

X

1-1/2

207

X1677207

MITER

SLIDE

BAR

141

XPW07

FLAT

WASHER

5/16

208

X1677208

SPECIAL

SCREW

142

XPLW01

LOCK

WASHER

5/16

209

X1677209

SPECIAL

WASHER

143

XPN02

HEX

NUT

5/16-18

210

XPSS31

SET

SCREW

10-24

X

5/8

144

XPB03

HEX

BOLT

5/16-18

X

1

300

X1677300

BLADE

GUARD

ASSEMBLY

145

XPSS02

SET

SCREW

5/16-18

X

3/8

301

X1677301

BLADE

GUARD

LABEL

200

X1677200

COMPLETE

MITER

GAUGE

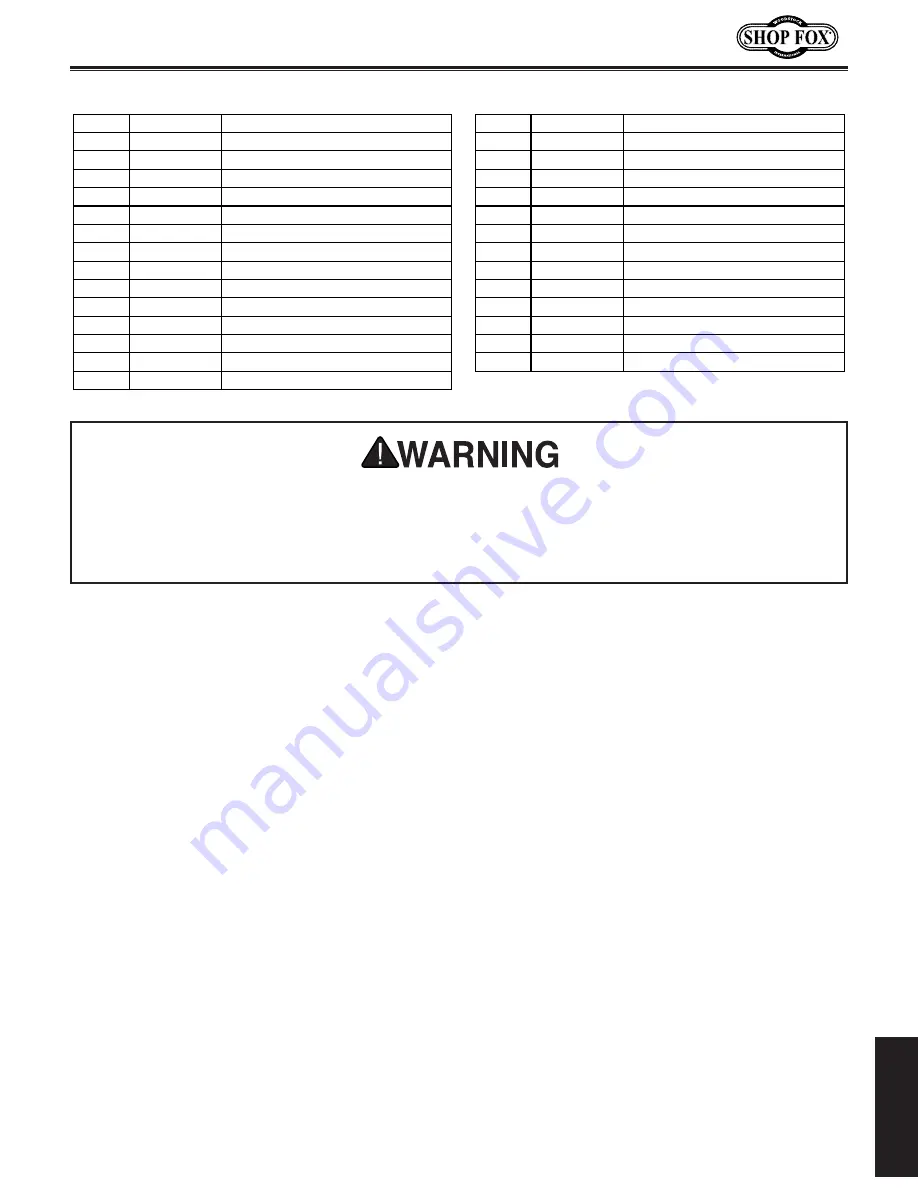
Safety labels warn about machine hazards and how to prevent machine damage or injury. The 

owner of  this machine MUST maintain the original location and readability of all labels  on  this 

machine. If any label is removed or becomes unreadable, REPLACE that label before allowing the 

machine to enter service again. Contact Woodstock International, Inc. at 

(

360

)

 734-3482 or www.

shopfoxtools.com to order new labels. 

Summary of Contents for SHOP FOX W1677

Page 1: ...echnical Support tech support shopfox biz COPYRIGHT JULY 2002 BY WOODSTOCK INTERNATIONAL INC REVISED MAY 2007 TR WARNING NO PORTION OF THIS MANUAL MAY BE REPRODUCED IN ANY SHAPE OR FORM WITHOUT THE WR...

Page 2: ......

Page 3: ...cement 17 Cleaning Machine 17 Mobile Base 18 Assembly 18 Test Run 22 OPERATIONS 23 General 23 Blade Height 23 Feed Rate 23 Blade Selection 24 Changing Blades 25 Through vs Non Through Cuts 26 Rip Cuts...

Page 4: ...up operation maintenance and service of this product We stand behind our machines In the event that questions arise about your machine please contact Woodstock International Technical Support at 360 7...

Page 5: ...s 500 lbs 500 lbs Fence Shop Fox Classic Shop Fox Classic Shop Fox Original Long Rails Extension Table No Yes Yes Maximum Rip Right of Blade 26 52 49 Maximum Rip Left of Blade 8 8 8 Maximum Depth of C...

Page 6: ...p Fox Classic Shop Fox Classic Shop Fox Original Long Rails Extension Table No Yes Yes Yes Included Mobile Base No No Yes Yes Included Steelex Blade No No Yes Yes Maximum Rip Right of Blade 26 52 52 4...

Page 7: ...the better you know your machine the better you can make it perform Figures 1 and 2 point out the key controls and their loca tions For complete details regarding the controls of the Shop Fox Classic...

Page 8: ...oving parts Wear protective hair covering to contain long hair and wear non slip footwear 6 NEVER OPERATE MACHINERY WHEN TIRED OR UNDER THE INFLUENCE OF DRUGS OR ALCOHOL Be mentally alert at all times...

Page 9: ...g for keys and adjusting wrenches before turning machinery ON 18 CHECK FOR DAMAGED PARTS BEFORE USING MACHINERY Check for binding and alignment of parts broken parts part mounting loose bolts and any...

Page 10: ...te support to the rear and sides of the saw table for wide or long workpieces 11 Avoid kickbacks A condition in which a piece of wood is thrown back towards an operator at a high rate of speed Usually...

Page 11: ...otential Injuries Figure 3 Unplug saw before changing blades Figure 6 Do not make through cuts without the blade guard splitter in place Figure 5 Do not freehand cuts Figure 4 Never use the rip fence...

Page 12: ...ng Potential Injuries Figure 10 Do not stand directly behind blade when making a cut Figure 7 Do not make unstable cuts Figure 9 Use a push stick when ripping narrow pieces Figure 8 Use featherboards...

Page 13: ...he table saw The small twists or turns that are inherent with freehand cuts will cause kickback Keep your table saw clean Buildup of wood chips or dust or any other objects that may obstruct an otherw...

Page 14: ...he stock away Miter Cut An angled cut across the face or end of a board Usually cut to match another board of a corre sponding angle so that each cut piece fits per fectly into the other thus changing...

Page 15: ...or 220V operation Always connect this machine to a dedicated circuit with a verified ground using the recommended circuit size and power connection method stated below Never replace a circuit breaker...

Page 16: ...r 1 D Lock Knob 1 E Handwheel 1 F Miter Gauge 1 G Blade Guard Splitter 1 H Dado Table Insert 1 I Standard Table Insert 1 J Dust Port 1 K Arbor Wrench 1 L Support Shaft 1 M Blade Guard Brackets 2 N Han...

Page 17: ...be 84 1 B Extension Table 1 C Legs 2 D Feet 2 E Front Rail 72 1 F Back Rail 72 1 G Fence Assembly 1 H Leg Braces 2 I Scale 1 Figure 14 Classic fence inventory for standard rails A B C D E Figure 15 Cl...

Page 18: ...2 J Rail End Covers 4 Shop Fox Original Fence Inventory Common Rail Table Mounting Hardware Hex Bolts 3 8 16 x 1 R Rail Main Table 2 Low Profile Hex Bolts 3 8 16 x 1 F Rail Main Table 2 Flat Washers...

Page 19: ...tables or other machinery Room to perform maintenance inside the cabinet Lighting Lighting should be bright enough to eliminate shadow and prevent eye strain Electrical Electrical circuits must be ded...

Page 20: ...lled in the table attach the extension wings to the table as shown in Figure 18 Do not completely tighten the bolts at this point 2 Place a straightedge across the table and the exten sion wings and a...

Page 21: ...bottom end Figure 21 Switch brace installed 7 Mount the dust port onto the cabinet stand with the four 10 24 x 3 8 tap screws as shown in Figure 23 6 Install the handwheel over the threads screw the l...

Page 22: ...nut on the arbor with the other 11 Brace the blade with a scrap piece of wood as shown in Figure 25 and tighten the arbor nut with the arbor wrench DO NOT overtighten the nut or it will be difficult t...

Page 23: ...nt for easier installa tion 22 Install the fence and rails as instructed in the owner s manual included with your fence Refer to Pages 15 and 16 to clarify which fence parts are needed for your machin...

Page 24: ...saw to the power source 2 Face the table saw and stand to the left of the blade path 3 Turn the table saw ON The table saw should run smoothly with little or no vibration once it does the machine is...

Page 25: ...Blade Height For optimum cutting on through cuts raise the blade height so it protrudes above the workpiece approximately 1 4 as shown in Figure 32 Ideally you want 5 7 teeth in the workpiece during...

Page 26: ...harpen and are not as expensive as their carbide tipped counterparts Blade Types Rip blades Figure 33 typically have between 30 40 teeth and provide fast feed rates when making long cuts along the gra...

Page 27: ...moderate personal injury when misused Tooth Configuration is another important aspect of blade design There are four main types flat top grind for fast heavy duty ripping alternate top bevel for redu...

Page 28: ...cuts are located on the following pages Rip Cuts Page 27 Cross Cuts Page 28 Miter Cuts Page 28 Blade Tilt Bevel Cuts Page 27 Non Through Cuts A non through cut is a sawing operation where the blade d...

Page 29: ...speed 9 The jointed edge of the workpiece must slide against the fence during the cutting operation 10 Using a push stick feed the workpiece through the saw blade as shown in Figure 40 until the workp...

Page 30: ...ack is a high speed expulsion of stock from the tablesaw toward an operator The operator or bystanders may be struck by flying stock or the operator s hands can be pulled into the blade during the kic...

Page 31: ...as necessary to align the blade with the desired location of the dado 6 Reconnect the power and cut the dado Note When dadoing across a workpiece use the miter gauge and carefully line up the desired...

Page 32: ...esired depth of cut depth of dado channel desired When cutting deep dadoes take more than one pass to reduce the risk of kickback 4 If dadoing across the workpiece use the miter gauge to support the w...

Page 33: ...CT THE SAW FROM POWER 2 Adjust the dado blade to the height needed for the rabbeting operation When cutting deep rabbets take more than one pass to reduce the risk of kick back 3 Adjust the fence and...

Page 34: ...ce to clearly identify the intended cut while it is laying flat on the saw table 3 Raise the blade up to the desired depth of cut depth of rabbet channel desired When cutting deep rabbets take more th...

Page 35: ...cal keeps the workpiece aligned with the fence and keeps your hands away from the blade Components Needed for the Resaw Barrier Hardwood or Plywood 3 4 x 51 2 x 27 1 Hardwood or Plywood 3 4 x 3 x 27 1...

Page 36: ...r Table Saw 1 Jointer and Planer Recommended Clamps 2 Minimum Drilland Drill Bits 1 To build the auxiliary fence do these steps 1 Cut a 3 4 thick board 27 long then cut it no less than 1 2 shorter tha...

Page 37: ...the table top see Figure 55 5 Slide the workpiece over the blade to make sure it moves smoothly 6 Raise the blade approximately an inch or close to half the height of the workpiece whichever is less...

Page 38: ...ces like the Boardbuddies shown in Figure 57 only allow the workpiece to move in one direction If a kickback does occur the wheels lock in place to stop or slow the movement of the workpiece Hold Down...

Page 39: ...ibility of the fingers allow the workpiece to move in one direction and lock up if the workpiece moves backwards Zero Clearance Table Inserts can be pur chased or made from wood and substituted for th...

Page 40: ...quently blow off dust with compressed air Dust build up around the motor and internal working parts will decrease the saw s life span Occasionally it will become necessary to clean the inter nal parts...

Page 41: ...ER 2 Position the blade tilt to zero see indicator on the front of the saw and raise the blade several inches above the table 3 Place a machinist s square flat on the table and slide it alongside the...

Page 42: ...bove adjustments do not resolve the blade alignment situation you need to adjust the geared bear ing housing shown in Figure 65 To adjust the geared bearing housing do these steps 1 Get another person...

Page 43: ...slot to a carbide tip on the blade as shown in Figure 66 Make sure that the face of the adjustable square is even along the miter slot 4 With the end of the adjustable square just touching the tip loc...

Page 44: ...d to be shimmed 13 Place equal sized pieces of metal shim stock under each of the corners that need to be shimmed Repeat this until the distance from the miter slot to the blade is equal at both the f...

Page 45: ...s on the splitter bracket If it is not you need to realign the splitter to the blade 3 To align the splitter to the blade loosen the two adjustment bolts shown in Figure 73 and the two adjustment bolt...

Page 46: ...the workpiece while crosscutting In order to be accurate the miter gauge pointer needs to be adjusted before use To set the miter gauge pointer do these steps 1 Loosen the adjustment knob shown in Fi...

Page 47: ...aster Replacing V Belts Figure 76 Motor mount anatomy The adjustment set screws shown in Figure 78 allow you to pivot the fence left or right to make it parallel with the blade The fence must be paral...

Page 48: ...46 W1677 W1711 10 Table Saw SERVICE W1677 Wiring Diagram...

Page 49: ...47 W1677 W1711 10 Table Saw SERVICE W1711 Wiring Diagram...

Page 50: ...erational and have correct voltage 7 Start capacitor is faulty 7 Replace start capacitor 8 Motor ON button 8 Replace faulty ON button 9 Centrifugal switch is at fault 9 Adjust or repair centrifugal sw...

Page 51: ...e 40 3 Fence is not parallel to blade 3 Make fence parallel to blade Page 45 Fence hits table top when sliding 1 Front rail is bolted too low on table 1 Raise front rail 2 Rear rail is bolted too low...

Page 52: ...50 W1677 W1711 10 Table Saw PARTS PARTS Table Body Breakdown...

Page 53: ...FLAT WASHER 5 16 58 1 X1677058 1 CORD CLAMP PLATE 2 HOLE 88 3 XPN02 HEX NUT 5 16 18 58 2 X1677058 2 CORD CLAMP PLATE 1 HOLE 90 X1677090 W1677 WARNING ID LABEL 79 XPSS07 SET SCREW 1 4 20 X 1 2 90 X1711...

Page 54: ...52 W1677 W1711 10 Table Saw PARTS Motor Trunnion Breakdown...

Page 55: ...18 X 1 4 56 6 X1677056 6 W1677 WIRING BOX 26 X1677026 TILT SHAFT 56 6 X1711056 6 W1711 WIRING BOX 26 1 XPBW02 BRASS WASHER 3 4 56 7 X1677056 7 W1677 MOTOR PLATE 27 X1677027 PIN 56 7 X1711056 7 W1711 M...

Page 56: ...54 W1677 W1711 10 Table Saw PARTS Guard Miter Gauge Breakdown...

Page 57: ...18 X 1 1 2 207 X1677207 MITER SLIDE BAR 141 XPW07 FLAT WASHER 5 16 208 X1677208 SPECIAL SCREW 142 XPLW01 LOCK WASHER 5 16 209 X1677209 SPECIAL WASHER 143 XPN02 HEX NUT 5 16 18 210 XPSS31 SET SCREW 10...

Page 58: ...d from causes not within the scope of Woodstock International Inc s warranty then the original owner must bear the cost of storing and returning the product This is Woodstock International Inc s sole...

Page 59: ......

Page 60: ......

Page 61: ...5 Would you recommend Shop Fox products to a friend _____ Yes ____ No 6 What is your age group _____ 20 29 ____ 30 39 ____ 40 49 _____ 50 59 ____ 60 69 ____ 70 7 What is your annual household income...

Page 62: ...TAPE ALONG EDGES PLEASE DO NOT STAPLE FOLD ALONG DOTTED LINE FOLD ALONG DOTTED LINE WOODSTOCK INTERNATIONAL INC P O BOX 2309 BELLINGHAM WA 98227 2309 Place Stamp Here...

Page 63: ......

Page 64: ......

Reviews: