3 Repairs
Copyright © WOODLEY EQUIPMENT COMPANY LTD.
91
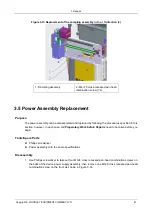
4. Use 2.5mm hex wrench to remove the two M3×8 stainless-steel hex-socket screws affixing the
upper section of WBC counting bath assembly. See Figure 3-24.
Figure 3-24 Dismantling and replacing the WBC bath assembly (3)
1 - WBC counting chamber
assembly
2 - M3×8 stainless-steel inner
hex screw (×2)
5. Carefully and slowly take out the WBC counting bath assembly. Pay attention to the wiring in the
process of moving to avoid breaking the wires.
6. Remove the protective ring from the shield case and open the wire clip to take out the inner wire
along the stretching direction of the wire. Then take out the WBC counting bath assembly as a
whole.
7. The further dismantling of the WBC counting chamber assembly. See Figure 3-25.
Figure 3-25 Dismantling and replacing the WBC bath assembly (4)
1 - LED
2 - Front counting bath
3 - Flat rubber gasket 6*4.5*0.5 4 - WBC aperture
5 - Flat rubber gasket 6*3*0.5
6 - O-shaped ring 5.5*1.0


