background image

Woodley Equipment Company 

 + 44 (0) 1204 669033 

 [email protected]| Page 4 


Q

UICK 

P

ROGRAMME A 

C

YCLE WITHOUT 

S

AVING 

Time and speed for a cycle can be quickly set without entering the programming mode. While quick, this method 
does not allow the cycle to be saved in memory after programming. 


If saving or locking the cycle is desired, follow the instructions in the section on Setting or Modifying a Saved Cycle. 

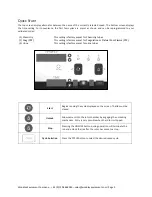
The cycle can be programmed by speed (RPM) or g-force (Best practice).


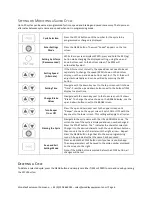
Setting Speed


To change the speed (RPM) shown on the top display, use the up 
and down buttons next to that screen. The CYCLE number is 

replaced with a “

--

 in the display, and the top screen displays the 

speed.


Setting by G-force


Press and hold the RCF (xg) button while changing the displayed 
setting on the top screen, using the up and down buttons next to 
it. The RPM will automatically adjust.


Setting Time


Press the up and down buttons next to the TIME display.


Change Brake 

Values


Enter the Settings mode by pressing the GEAR button.


Press the down key next to the top screen until it shows “Brake”. 

To change the value shown on the BRAKE display, use the up and 
down buttons next to the BRAKE screen.


Press the GEAR button again to save.


Turn Beeper 

On or Off


Enter the Settings mode by pressing the GEAR button.


Press the up and down keys next to the upper screen until 

“Beeper” shows on the upper screen. Switch ON or OFF with the 

keys next to the lower screen. This setting will apply to all cycles.


Press the GEAR button again to save.


Summary of Contents for Clinispin HORIZON 12 Flex

Page 1: ...Clinispin HORIZON 12 Flex 24 Flex Operator s Manual...

Page 2: ......

Page 3: ...e without Saving 4 Cycle Lock 5 Single Cycle Lock 5 Preset Lock 5 Setting or Modifying a Saved Cycle 6 Deleting a Cycle 6 Reset to Factory Settings 7 Settings 7 Operation 7 Balancing Loads 8 Care and...

Page 4: ...dible alert indicates the completion of the cycle The audible alert can bemuted o Cool Flow design prevents overheating of samples by using ambient air to keep specimens at room temperature o The tube...

Page 5: ...energy and if not installed and used in accordance with this operator manual may cause interference to radio communications Operation of this equipment in a residential area may cause interference in...

Page 6: ...or Chemistry tubes 2 Coag PPP This setting is factory preset for Coagulation or Platelet Poor Plasma PPP 3 Urine This setting is factory preset for urine tubes Start Begins running the cycle displayed...

Page 7: ...op screen displays the speed Setting by G force Press and hold the RCF xg button while changing the displayed setting on the top screen using the up and down buttons next to it The RPM will automatica...

Page 8: ...and a flash of the lid light will confirm that cycle selection is locked Cancel Single Cycle Lock To re enable cycle selection with lid open press and hold the UNLOCK button for 5 seconds Two beeps an...

Page 9: ...ons next to the bottom TIME display to adjust time Change Brake Values Navigate with the down key next to the top screen until it shows Brake To change the value shown on the BRAKE display use the up...

Page 10: ...ATION o Place the tubes into the tube holders Be sure to follow the rules for balanced loads as listed in the next section o Close the lid and turn the lid knob clockwise to its complete stop position...

Page 11: ...when loading the rotor If an odd number of samples is to be spun fill a tube with water to match the weight of the unpaired sample and place it across from this sample Opposing tube holders must be e...

Page 12: ...the centrifuge to prevent damage andinjury CLEANING AND DISINFECTION To prolong the life of the centrifuge cleaning and disinfection is recommended every six months or whenever there is a spillage or...

Page 13: ...kets have any damage evenslight safely dispose of them and replace them o If the rotor appears damaged contact Technical Support for further assistance Excessive noise or vibration when the centrifuge...

Page 14: ...If the lid knob still cannot be rotated press the UNLOCK button and tryagain o If no LED light is on the unit is not powered and the lid will not unlock by conventional means Remove the latch label a...

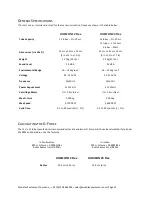
Page 15: ...59 dB A Environmental Range 16 32 degree C 16 32 degree C Voltage 95 253 VAC 95 253 VAC Frequency 50 60 Hz 50 60 Hz Power Requirement 415 Watts 415 Watts Centrifuge Motor H P Brushless H P Brushless M...

Page 16: ...their waste equipment by handing it over to a designated collection point for the recycling of waste electrical and electronic equipment The separate collection and recycling of your waste equipment a...

Reviews: