background image

6

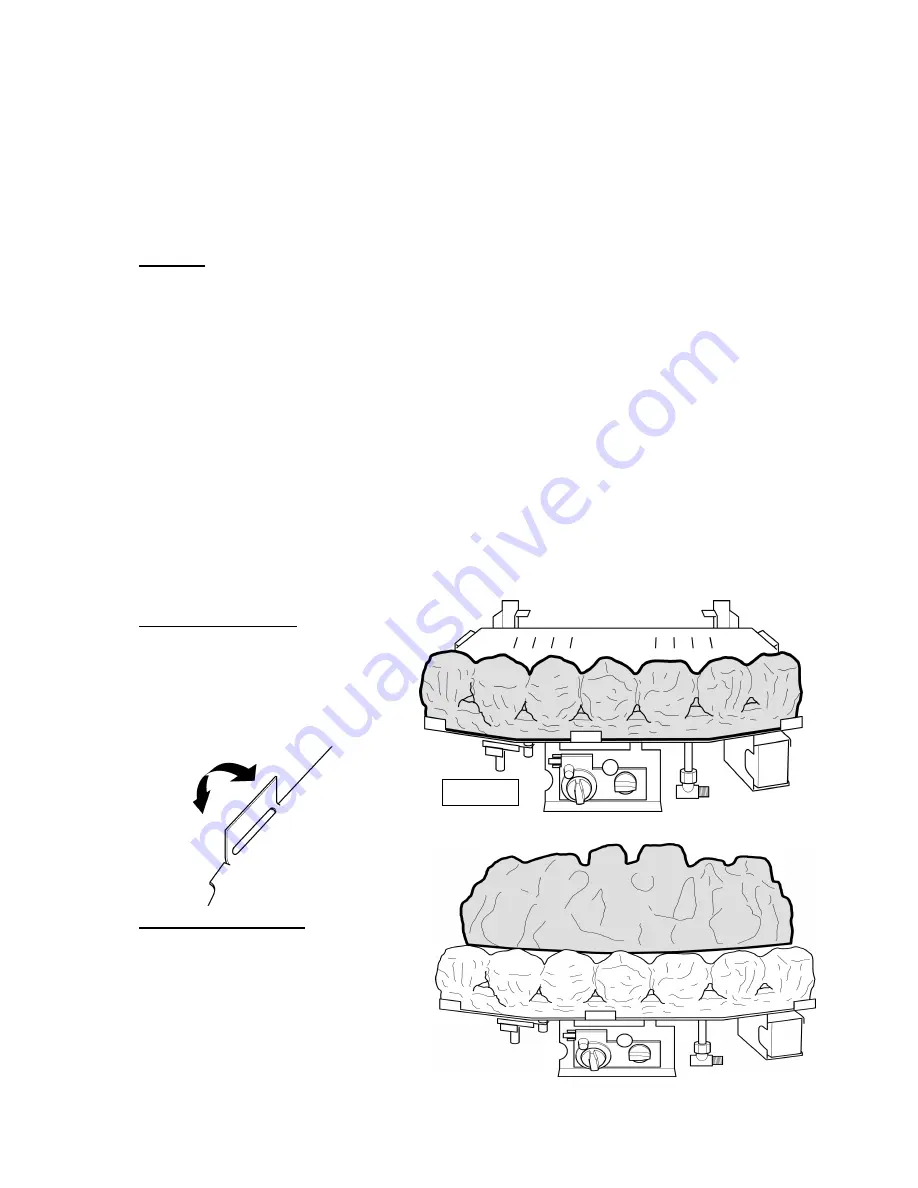
Figure 8


To return to the fully aerated position push the control lever in and slightly
downwards until it rests in its locked position.

Please note : It is advisable to run the fire in its fully aerated mode (control knob
pushed in) at the beginning of each operation and if running at the minimum rate
setting, or to burn off any carbon deposits which may have built up after prolonged
use of the minimum aerated setting.

Cleaning

Note: Before attempting any of the following ensure that the fire has been allowed to
cool completely.
Note: Some discoloration of the coals is normal.

The cast parts of the fire should be carefully cleaned with a lint free damp cloth.  On
no account should any metal polish or similar be used as this may prove harmful to
the surface.

The coals should normally require no maintenance between the annual inspection
described in the installation and maintenance instructions.  However, if your fire is
used frequently the coals may need cleaning.  The coals should be removed and any
sooting carefully removed from the surface with a soft brush.

The burner surface can be carefully vacuumed to remove any loose particles. Note:
Surface cracking is normal and no cause for concern.

To reassemble, take the following steps.

Placing the front coal

Position the front coal in front of
the burner as shown in figure 8. If
necessary, the front tags maybe
adjusted as shown in figure 8a, to
ease the fit of the front coal.

Placing the fuel matrix
Position fuel matrix on top of the
burner as shown in figure 9. The rear
face of the burner should locate into
two cut-outs on the top face of the
rear legs. Ensure that the matrix sits
flatly on the top of the burner.

Figure 8a

Summary of Contents for airflame excel mk.3 ac 18xl rc

Page 1: ...te control AF 18XL RC 9500374 AC 18XL RC 9500375 USERS MANUAL Patent applied for 9860380 03 Please leave these Instructions with the user This Appliance is for use in the United Kingdom GB and the Rep...

Page 2: ...If the appliance shuts down after a period of operation for no apparent reason then stop using the appliance until the installation and the appliance have been thoroughly checked by a competent perso...

Page 3: ...gas valve mounted on the appliance The flame settings may also be controlled by means of the remote control handset To prevent accidental operation of the fire we recommend that the fire be switched...

Page 4: ...f a setting between LOW 4 and HIGH 5 is required then the control knob may be turned to this position Note We recommend you use the appliance at a low setting for the first few hours of use to reduce...

Page 5: ...ace Remove cover from rear of handset remove and discard old battery Replace battery and refit cover See figure 5 Receiver Unit The receiver valve is powered by 4xAA batteries which should be replaced...

Page 6: ...armful to the surface The coals should normally require no maintenance between the annual inspection described in the installation and maintenance instructions However if your fire is used frequently...

Page 7: ...ffect it is important that the coals are evenly spaced and sit 10 15mm from each other Next take five random shaped coals and position as shown in figure 11 This second row of coals should rest on top...

Page 8: ...e 13 a b b c Figure 14 c Finally take the three remaining random shaped coals Place one in the centre of the matrix position a place the other two next to it position b as shown in figure 14 To comple...

Page 9: ...GUARANTEE Every Wonderfire product is warranted for a period of twelve months against manufacturing faults Any part found to be of substandard quality will be replaced free of charge by your supplier...

Page 10: ...rvice department If you require your fire to be serviced or in the unlikely event that it should require repair due to a manufacturing defect then call Wonderfire service department on 0121 386 203 qu...

Reviews: