WolfVision VZ-9.4L Instructions Manual Download Page 12

The working surface of the Visualizer has a special crystalline white color, which is especially designed for 
perfect reproduction of transparencies.
In the following cases, an optional lightbox is recommended:

- If the transparency is very dark
- If the transparency is very wavy and causes reflections
- If the room light causes reflections on a transparency

The optional whiteboard foil can be used for direct annotation with special whiteboard markers. WolfVision 
offers spare whiteboard foils.

More information at 

www.wolfvision.com 

(Products/Accessories)

Working Surface 

(#2)

The  synchronized  laser  markers  make  positioning  of  objects  very 
easy by marking the corners of the picked-up image on the working 
surface. The laser center marker zooms synchronous to the camera 
zoom and shows the 16:9 pick-up area of the camera.

Additionally the built-in LCD monitor eliminates the need for an extra 
control monitor. This monitor can show different signals, like always 
live image from the Visualizer, even when the signal on main output is 
frozen, or always the same than the main output (selectable in the on-
screen menu - 

see page 19

). The on-screen menu is also visible on 

this LCD monitor.

Shooting Area on the Working Surface

Monitor

#9

PRESET

FREEZE

FOCUS-

FOCUS+

EXTERN
MENU

?

AF

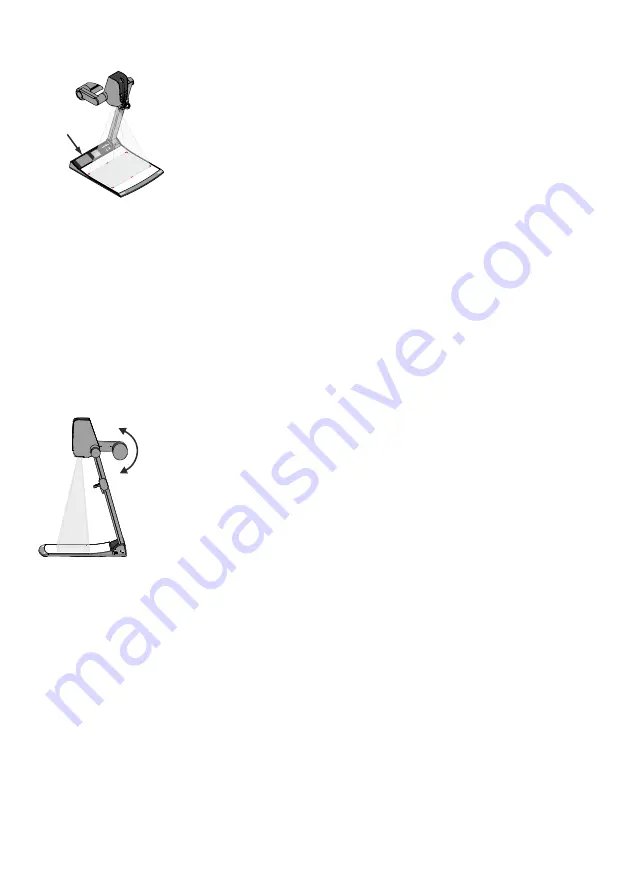
In order to eliminate reflections (on high gloss photographs etc.) just


turn 

the light upwards or downwards slightly (default position is horizontal).
It is also possible to move the document and rotate the camera head to 
the center of the desired pick-up area to eliminate reflections.
The  curvature  of  the  working  plate  is  specially  designed  to  eliminate 
reflections.

Please note that reflections can also be caused by general room lighting 
conditions.

Reflections

11

Summary of Contents for VZ-9.4L

Page 1: ...Check out our Internet Homepage for additional information www wolfvision com support VZ 9 4L INSTRUCTIONS BEDIENUNGSANLEITUNG INSTRUCTIONS BEDIENUNGSANLEITUNG ENGLISH DEUTSCH VZ 9 4L R...

Page 2: ...oid installing the Visualizer in environments where there is radiation This could cause monitor image distortion or damage to the camera sensor Do not pull the plug from the power socket with wet hand...

Page 3: ...nment This equipment generates uses and can radiate radio frequency energy and if not installed and used in accordance with the instruction manual may cause harmful interference to radio communication...

Page 4: ...3...

Page 5: ...4...

Page 6: ...a No part of this document may be copied reproduced or transmitted by any means without prior written permission from WolfVision Except documentation kept by the purchaser for backup purposes In the i...

Page 7: ...onitor see page 11 5 Light field for slides see page 12 6 Connectors on the back and on the side as shown on next page 7 Pull ring to lift the arm up down see page 10 8 Close up lens for camera see pa...

Page 8: ...Host to computer see page 23 27 Power connection 12V DC 28 LAN port see pages 18 23 and 24 29 for external HDMI signals for external HDMI signals for audio signals for audio signals USB port to optio...

Page 9: ...y see page 13 39 MEM key For displaying pictures and videos of the built in memory see page 16 40 LIVE key For displaying the live image of the camera see page 16 41 AUTO FOCUS AF key Pressing this ke...

Page 10: ...s between Visualizer image and external input for more details see page 21 The EXTERN light indicates that a signal from the external input is shown Pressing this key for 2 seconds activates the on sc...

Page 11: ...light automatically move into the working position The Visualizer is switched on automatically Alternatively the Visualizer can be switched on by touching the POWER key IMPORTANT To fold the Visualiz...

Page 12: ...oom and shows the 16 9 pick up area of the camera Additionally the built in LCD monitor eliminates the need for an extra control monitor This monitor can show different signals like always live image...

Page 13: ...e normal working position just fold the arm of the Visualizer as much as required turn the camera head and the light to pick up the desired object By default the unit activates the stand by mode when...

Page 14: ...off switch 41 or 59 The autofocus is also switched off when the manual FOCUS keys 42 or 58 are used 13 The Visualizer offers the possibility to store the current settings as a Preset and recall them b...

Page 15: ...isualizer is Auto Tracking white balance Normally there is no need for a manual white balance adjustment However if the colors on the screen still appear to be wrong the white balance can be adjusted...

Page 16: ...In in the on screen menu and start recording with the REC key 36 The recording can be paused and resumed with the PAUSE key 53 and stopped with the STOPkey 51 Arespective symbol in the left lower corn...

Page 17: ...tion is shown on the bottom of the screen Pressing the LIVE key 40 returns to the camera live image temporarily The presentation will stay at the last pictureshown To continue use the USB key To selec...

Page 18: ...over dissolve effect when switching between the Visualizer image the image from the external input the memory internal and USB stick or the stream vSolution Connect by WolfVision The behavior of the V...

Page 19: ...software vSolution Link by WolfVision and most internet browsers can start the stream automatically In case your browser or third party application media player cannot start the streaming function use...

Page 20: ...affect the color reproduction of the camera e g White Balance settings Color Mode and Positive Negative Hint If the picture on your screen appears to be too light or too dark or the color saturation i...

Page 21: ...utput of the Visualizer to a higher standard than the native resolution of your displayunit Follow the instructionsin the user manual of the connectedunits Please note when the aspect ratio does not m...

Page 22: ...mits 50Hz 60Hz Horizontal range limits 20kHz 75kHz Maximum pixel clock 170MHz Gamma 2 2 Preferred resolution 1080p 1920x1080 60Hz HDMI Content Protection HDCP The Visualizer does not support HDCP High...

Page 23: ...ate 1 1 Volume of audio output can be decreased in steps of 10 affects HDMI audio too Hint Some microphone systems are requiring a pre amplifier In case you encounter hum noise caused due to ground lo...

Page 24: ...with Interactive Whiteboards Please download the latest version of Video Capture Driver from www wolfvision com Support vSolution Link by WolfVision Use the software vSolution Link to control the Visu...

Page 25: ...reen menuAdvanced Settings Ethernet Settings Input the valid admin password to change the settings to restrict the functionality of Ethernet Also the admin password can be changed afterwards Note the...

Page 26: ...teries If you want to work with more than one Visualizer in the same room the units should be set to different infrared codes in order to control them all individually The IR code of the Visualizer ha...

Page 27: ...4 12x1 6 screw M6x35 or screw M6x50 spacer 6 5 12x3 5 The Visualizer can also be fixed onto a table with the supplied table lock bolt in order to minimize the risk of theft Please note that the usabl...

Page 28: ...switch Intelligent folding system CCD 1 3 Progressive Scan 30 frames per second 1280 x 960 1 228 800 ratio 4 3 1280 x 960 1 228 800 ratio 4 3 36 864 000 ratio 4 3 very good colors sRGB color precision...

Page 29: ...make sure that you pack up the Visualizer in the supplied box as explained in the graphic below This is very important to avoid damage to sensitive parts of the unit Packaging Transportation Unpack Re...

Page 30: ...s the MENU key 54 to activate the on screen menu Use the Navigation keys 32 and 53 to navigateand OK key 33 to select For the help function pressthe HELPkey 31 For resettingonly the selecteditem press...

Page 31: ...etzkabel und den Netzstecker niemals mit feuchten H nden ber hren Wird das Ger t l ngere Zeit nicht benutzt so ziehen Sie bitte den Netzstecker Das verwendete Netzteil ben tigt eine europ ische Zertif...

Page 32: ...l interference to radio communications Operation of these equipment in a residential area is likely to cause harmful interference in which case the user will be required to correct the interference at...

Page 33: ...3...

Page 34: ...4...

Page 35: ...e Zustimmung von WolfVision weder als Ganzes noch in Teilen mit irgendwelchen Mitteln kopiert reproduziert oder bertragen werden Ausgenommen sind Kopien die vom Benutzer zu Sicherungszwecken aufbewahr...

Page 36: ...or siehe Seite 11 Leuchtfeld f r Dias siehe Seite 12 Anschl sse auf der Ger ter ckseite und seitlich siehe n chste Seite Ziehvorrichtung f r den Arm siehe Seite 10 Nahlinse f r die Kamera siehe Seite...

Page 37: ...chluss zum Computer Host siehe Seite 23 27 Stromanschluss 12V DC 28 LAN Anschluss siehe Seiten 18 23 und 24 29 Anschluss f r USB Massenspeicherger te Ausgang 15 Pin siehe Seite Eingang f r HDMI Signal...

Page 38: ...13 39 MEM Taste Zur Darstellung der Bilder und Videos des eingebauten Speichers siehe Seite 16 40 LIVE Taste Zur Darstellung des Kameralivebildes siehe Seite 16 41 AUTO FOKUS AF Taste Durch Dr cken de...

Page 39: ...een Men arbeitet dieAF Taste als Taste Durch Dr cken f r 2 Sekunden wird die ausgew hlte Men einstellung zur ck gesetzt siehe Seite 19 MENU Taste Zum Umschalten zwischen Visualizer Bild und externem E...

Page 40: ...betriebsbereit Das Verhalten des Ger tes beim Einschalten oder nach dem Dr cken der POWER Taste kann im On Screen Men ge ndert werden siehe Seite 19 Beim ersten Einschalten des Visualizers startet de...

Page 41: ...rkierung zoomt synchron mit der Kamera und zeigt den 16 9Aufnahmebereich Durch den eingebauten Monitor er brigt sich die Anschaffung eines separaten Kontrollmonitors Dieser Monitor kann unterschiedlic...

Page 42: ...beiten kann der Arm soweit wie gew nscht nach unten geklappt werden Bei Standardeinstellung schaltet der Visualizer in den Standby Modus sobald der Arm zusammengeklappt wird Dieses Verhalten kann im O...

Page 43: ...erden k nnen den PRESET Tasten auch einzelne Funktionen wie z B LIGHT NEGATIVE NEGATIVE BLUE BLACK WHITE FREEZE etc im On Screen Men zugewiesen werden siehe Seite 19 Bei Aufnahme von Dokumenten im Hoc...

Page 44: ...n sich die Lichtbedingungen ndern muss die Kamera des Visualizers einen Wei abgleich durchf hren um korrekte Farben wiedergeben zu k nnen Die Lichtbedingungen Farbtemperatur ndern sich z B wenn zwisch...

Page 45: ...er REC Taste 36 DieAufnahme kann mit der PAUSE Taste 35 pausiert und fortgesetzt werden DieAufnahme wird mit der STOPPTaste 51 beendet Ein entsprechendes Symbol in der linken unteren Ecke informiert b...

Page 46: ...n Sie Ihren Computer zur Organisation des USB Sticks wie Erstellen oder L schen von Verzeichnissen Verschiebenund L schenvon Bildernoder Formatierendes USB Speichermediums Bei einerFormatierungdes USB...

Page 47: ...icht berblendungseffekte wenn zwischen dem Bild des Visualizers dem Bild des externen Einganges den gespeicherten Bildern interne Speicher und USB Stick und dem empfangenen Stream vSolution Connect um...

Page 48: ...Applikation Media Player den Stream nicht starten k nnen kann der Stream manuell mit der STREAM Taste 52 gestartet werden Alternativ sendet der Visualizer den Stream permanent mit der Einstellung Mod...

Page 49: ...igkeit und Gegenlichtkompensation ndert Einstellungen mit Auswirkung auf die Farbwiedergabe der Kamera wie z B Wei abgleich Farbwiedergabemodi und Positiv Negativ Tipp Falls Ihnen das Bild auf Ihrem B...

Page 50: ...chlichen nativen Aufl sung des Visualizers oder Wiedergabeger tes entsprechen so werden schwarze Balken oben unten beziehungsweise links rechts dargestellt Manche Wiedergabeger te bieten die M glichk...

Page 51: ...ler um das digitale HDMI Signal in ein analoges RGB Signal zu wandeln und am HDMI inklusive StereoAudio und RGBAusgang auszugeben Unterst tzte Aufl sungen diverse Aufl sungen im Bereich von VGA 640x48...

Page 52: ...Audio Leitungen hinzugef gt werden LineIn und LineOut bertragungsbereich 20Hz 20kHz bei 3dB 300Hz 10kHz bei 1dB bertragungsrate 1 1 Audio Line In und Line Out 22 und 23 L R GND Das eingebaute Mikrofo...

Page 53: ...mit Grafikanwendungen wie z B Adobe Photoshop und Interaktiven Whiteboards verwendet werden Bitte downloaden Sie die aktuellste Version des Video CaptureTreibers von www wolfvision com Support vSolut...

Page 54: ...4 Den Visualizer wieder am Stromnetz anschlie en einschaltenund im On Screen Men unter ErweiterteEinstellungen NetzwerkEinstellungen WLAN Einstellungenauf Kabellose Verbindung Visualizer agiert als Cl...

Page 55: ...che IR Codes gestellt werden um die Ger te einzeln ansteuern zu k nnen Der IR Code des Ger tes muss mit dem der Fernbedienung bereinstimmen ndern Sie im On Screen Men Erweiterte Einstellungen Diverse...

Page 56: ...e M6x35 oder Schraube M6x50 Scheibe 6 5 12x3 5 Der Visualizer kann mit der mitgelieferten Tisch Fixiereinheit an einem Tisch festgeschraubt werden zur Minimierung des Diebstahlrisikos Beachten Sie das...

Page 57: ...ratur relative Luftfeuchtigkeit Diebstahlschutz Garantie Hergestellt in Bildmischer mit berblendung Digital Scaler eingebaut E LAN Intelligentes Faltsystem 1 CCD 1 3 Progressive Scan 30 Bilder pro Sek...

Page 58: ...acken 2 4 1 3 Bitte vergewissern Sie sich vor dem Transport des Visualizers dass dieser wie unten abgebildet verpackt wurde Dies ist sehr wichtig um eine Besch digung empfindlicherTeile durch denTrans...

Page 59: ...die MENU Taste 54 um das On Screen Men zu aktivieren Benutzen Sie die Navigation Tasten 32 und 53 zum Navigieren und die OK Taste 33 zum Ausw hlen F r die Hilfefunktion dr ckenSie die HILFETaste 31 U...

Page 60: ...o Tel 81 0 3 6233 9465 Fax 81 0 3 6233 9466 E mail wolfvision japan wolfvision com Canada WolfVision Canada Inc Ottawa Tel 1 613 741 9898 Toll free 877 513 2002 Fax 1 613 741 3747 E Mail wolfvision ca...

Reviews: