

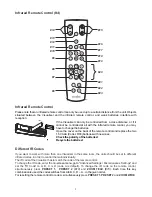


CODES - Short Keys with the remote control
Storing presets:
Keep the desired
PRESET
key
(#10)
pressed for 2 seconds.
Recalling presets:
Press the desired
PRESET
key
(#10)
quickly.
Storing images:
Keep the desired
MEMORY
key
(#20)
pressed for 2 seconds.
Recalling images:
Press the desired
MEMORY
key
(#20)
quickly.
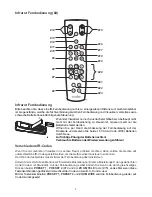
Activating the on-screen menu:
Press the
MENU
key
(#6)
to activate the on-screen menu. Use the
Number
keys
(#8)
to navigate and
Number 5
key
(#21)
to select. For the help function, press the
HELP
key
(#7)
.
Resetting single items of the on-screen menu:
Select the desired item in the on-screen menu and keep the
Number
7
key
(#7)
on the remote control
pressed for 2 seconds.
Change IR code:
Change the IR code in the
"Advanced Settings / Miscellaneous Settings" and set the "IR
Code" to A, B, C or D (code A is default). To change the IR code on the remote control, simultaneously press
both
PRESET 1+2
keys
and the
ZOOM TELE
key
ress
PRESET 1, PRESET 2
and
ZOOM
WIDE
on-screen menu
(#10)
(#15)
. Each time this key combination is used, the
code switches from A to B, C, D ... A ... in the order given.
For resetting the remote control to code A, simultaneously p
.
The LED on the remote control shows the selected code (it flashes one time for code A, two times for code
B, three times for code C and four times for code D).
For regular use of the WolfVision Visualizer, it is not necessary to go into the Visualizer's menu and change
settings. Inexperienced users should not make any adjustments here.
To enter the on-screen menu press the MENU
key
(#21 on the remote control or use the key on the camera
head and keep it pressed until the menu appears)
. Settings of the Visualizer's basic functions and the built-
in camera can be made here using the 4 SELECT
keys on the remote control
(=the numerical keys with
arrows #8)
or navigation keys on the camera head.
If more information on a function in the on-screen menu is required
,
set the cursor in the respective line and
press the HELP / ? key
(#7).
A detailed description of this function appears on the screen
.
The functions of the on-screen menu are not described in detail in this user manual as the help function is
an integrated part of the Visualizer's software (firmware). The information you see on your screen always
belongs to the current Visualizer firmware.
Where you can check the state of Feature Packs
On-Screen Menu
Advanced Settings
USB Settings
Device Info
To store Visualizer settings on a USB stick and to change the basic settings of the USB port.
In this sub-menu you can check the version number of the currently installed firmware and the state of the
enabled Feature Pack functions.
9


