


7
8
Congratulations on your purchase of the Wolfgang Puck
Pie & Pastry Baker. With automatic temperature control and
no buttons to press you will find this one of the easiest, yet
versatile appliances in your kitchen. Make everything from
pies and tarts, to cakes & quiche.
Before Your First Use
Carefully unpack the appliance and remove all packaging materials.
See Care & Cleaning section of this manual for proper cleaning. We
recommend a “trial run” to eliminate any protective substance or oil
that may have been used for packing and shipping. Plug your unit into
a standard 120v wall outlet and let the Pie Maker run for 15 minutes. You
may notice some smoking coming from your Pie Maker during this initial
phase, this is normal.
Season the cooking plates with vegetable oil and rub off excess with a
paper towel. There is no need to season the plates again.
WARNING:
Do not immerse the appliance, cord or plug in water. To
remove any dust that may have accumulated during packaging, wipe the
exterior with a clean, damp cloth. Do not use harsh or abrasive cleansers
on any part of the appliance.
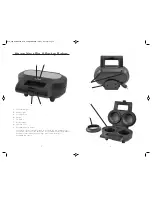
Using Your Pie Maker
Place your pie maker on a stable, level surface. Close the cover and
plug into a 120-volt 60 HZ AC outlet only. The red light will turn on
indicating that the appliance is powered on and preheating. In
approximately 5- 10 minutes the green light will illuminate when the
appliance is preheated and ready for use. The green light will cycle
on and off during the cooking process indicting that the correct
temperature is being maintained. Always keep the cover closed when
preheating or in-between uses.
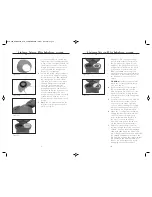
Cakes & Muffins
1
If making cakes and muffins fill the
mold directly approximately 2/3rds
full (see figure 1) unless the recipe
states otherwise. Close the cover and
press the Locking Latch in until it
clicks
Pies & Tarts
1
If making pies and tarts use the
Reversible Pie Cutter to make the
molds. The larger side is for the pie
bottom, and the smaller for the pie
top. If you are using a premade pie
crust from the store you can get
two bottoms from one crust. Make
the first bottom as close to the
edge as possible and firmly press
down (see figure 2).
Figure 1
2
Set a timer for the specified time as indicated in your recipe. You will
notice the green ready light will cycle on and off during the cooking
process indicating that the correct temperature is being maintained.
3
When the cooking time is complete unplug the pie maker from the
wall outlet. Pull the Locking latch up from the bottom and carefully
lift the lid. If you need additional browning simply close the lid and
set the timer to the desired additional time.
4
Carefully remove the cake or muffin from the mold by using a nylon
or wooden spatula. Do not use metal utensils to avoid damaging the
nonstick surface.
Figure 2
HSN_PPB_BPM00020_HSN_PPB_BPM00020 10/6/11 11:27 PM Page 7