background image

25

C A R E

R E C O M M E N D A T I O N S

W O L F D U A L F U E L R A N G E

C A R E

C O M P O N E N T

C A R E R E C O M M E N D A T I O N

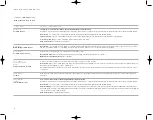
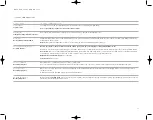
Control Panel

Stainless steel

Use spray cleaners to remove fingerprints and food soils. Spray first on a cloth before wiping panel.

Do not spray directly on panel or around valve stems or knobs.

Oven Gasket

Fiberglass netting /stainless steel wire

Do not hand clean, rub, puncture or remove the oven gasket; this may compromise the tight door seal.

Broiler Pan

Glossy-finish porcelain enamel

Top:

While slightly warm, place in sink. Lay dish towels on top; pour very hot water on towels; allow steam to soften cooked-on residue. Clean with hot water and a

mild detergent. Rinse and dry.

Bottom:

Pour grease into disposable can. When cool, wash in hot water and a mild detergent. Rinse and dry.

Oven Cavity and Interior Door

Porcelain enamel

Never wipe a warm or hot porcelain surface with a damp sponge; it may cause chipping or crazing (tiny hairlike cracks).

Resistant to most stains, but not totally impervious to damage. Salt and some cooking liquids may pit and stain the surface. Always remove these spills immediately.

General care:

When cool, clean splatters and spills immediately. Do not allow food with a high sugar or acid content, such as milk, tomatoes, sauerkraut, fruit juices

or pie filling, to remain on any porcelain enamel surface. Failure to remove these foods may cause a permanent dull spot.

Mild abrasive and abrasive cleaners:

Use sparingly.

Self-clean mode

can be used.

Oven Door Window

Heat-tempered glass

When window is cool, spray glass cleaner on cloth to clean window.
Do not use abrasive cleaners or sharp metal scrapers to clean the oven door since they can scratch the surface, which may result in shattering of the glass.

Oven Light Cover

Heat-tempered glass

When oven is cool, turn light cover counterclockwise and remove. Wash with mild abrasive cleaner. Rinse and dry thoroughly. Replace cover over bulb and turn
clockwise to fasten.

A 20-watt halogen oven light bulb replaces the existing bulb (803816).

Rack and Rack Guides

Nickel-plated steel

Before using the

self-clean mode

, remove oven racks and rack guides. Excess spillage must be removed before cleaning. They will discolor if left in the oven during

this feature. Clean with a mild abrasive cleaner.


Summary of Contents for ICBDF 364G

Page 1: ...USE CARE INFORMATION Model Series This cooktop is approved for use with Natural gas Leave instructions with the owner ICBDF366 ICBDF304 ICBDF364C ICBDF 364G ICBDF486C ICBDF486G ICBDF484CG ICBDF484F ICBDF606CG ICBDF604CF ...

Page 2: ...ated under the control panel for type of gas If this appliance does not correspond to your type of gas contact your Wolf dealer W O L F DUAL FUEL RANGE IMPORTANT NOTE This appliance is not intended for use by persons including children with reduced physical sensory or mental capabilities or lack of experi ence and knowledge unless they have been given supervision or instruction concerning use of t...

Page 3: ... interior surfaces of oven During use the appliance becomes hot Care should be taken to avoid touching heating elements inside the oven Warning Accessible parts may become hot during use To avoid burns young children should be kept away S A F E T Y I N S T R U C T I O N S A N D P R E C A U T I O N S Do not use or store flammable mate rials in the appliance storage drawer or near this appliance Do ...

Page 4: ...Do not allow pans to boil dry Start the ventilation hood approxi mately five minutes before cooking on the range or top surface burners this establishes an air curtain and improves the capture of vapor and moisture Do not cover the burners and grates with anything except properly selected utensils Decorative covers should not be used Wear proper apparel Never let loose clothing or other flammable ...

Page 5: ...ntrol panel Coaxial oven selector knob Dual halogen oven lighting Spring damper door system Control knobs with platinum bezels Removable lower panel Location of rating plate Dual convection oven Stainless steel island trim Infrared griddle optional Infrared grill optional Single convection oven 1219 mm range only Adjustable front legs and rear casters Blue porcelain oven interiors Dual stacked sea...

Page 6: ...e left side Conversely the knobs on the far right regulate the burners on the right side The precision fit of the control knobs requires the use of a nyliner insertion between the knob and bezel When removing knobs for cleaning place the bearing back inside the bezel for easy reinstallation of the knobs Refer to the illustra tion below COOKTOP O P E R AT I O N The cooktop burner uses an electronic...

Page 7: ... on each corner of the burner pan Continuous grates are interchangeable exclud ing the grill grate with burner grate Position the porcelain coated cast iron grates over two burners Rubber pads located under the grate support legs will match up with the dimples on the burner pans The drip pan holds as much as 600 ml of liquid spillover per two burner pan G R I L L O P E R AT I O N IMPORTANT NOTE Th...

Page 8: ... between the grill frame and the burner tray Radiant Burner Use a soft brush to remove any ash particles that have been left on the burner surface the burner surface can be wiped with a soft damp cloth Igniter ceramic Avoid contact with the igniter it is fragile and can chip or break IMPORTANT NOTE Do not use any commer cial cleaners on any part of the grill assembly Be careful when assembling the...

Page 9: ... fat It can become hot enough to ignite Allow the griddle surface to cool suffi ciently before cleaning FRENCH TOP The 3 9 kW 14 0 MJ French Top is an optional feature that provides a 559 mm cooking surface with the hottest temperature under the center plate and the lowest temperature near the edges This design makes it possible to use several pans at once for a variety of cooking tasks For exampl...

Page 10: ...do it on one of the regular burners F R E N C H T O P C A R E It is best to maintain a seasoned surface to protect the cast iron from moisture Clean entire surface after each use while it is slightly warm Wipe the surface with a mild detergent and water Rinse and dry Maintain the French Top as you would a cast iron skillet keep it free from moisture Reapply a light coating of peanut or vegetable o...

Page 11: ... feature and convec tion when using the dehydration feature O V E N P R E H E AT During preheat the oven is heated in a manner unsuitable for cooking Preheat should be used for all cooking modes except broil and convection broil modes In order not to damage food preheating will not occur once the oven reaches its set temperature Increasing oven temperature during cooking will result in the oven ta...

Page 12: ...a S E T T I N G C O N T R O L S 1 Touch and hold on the hidden control panel for 5 seconds 2 Touch to change to F or C 3 Touch TIME OF DAY C L O C K Immediately after the oven is installed set the 24 hour clock to the current time of day It must be reset after a power failure The clock is visible on the panel during all modes except when timer feature is in use or when the hidden control panel is ...

Page 13: ...guide rails Refer to the illustration below The bottom rack of all ovens except the 457 mm oven has a full extension capability With the rack in rack guide position 1 slide it into the door guides Refer to the illustration for rack guide positions This adds stability to the rack when using a heavy pan for large meat and poultry With the rack fully extended it is easier to safely reach the hot food...

Page 14: ...n 1 increments To change the temperature setting from 205 C immediately turn the oven selector knob to the right to increase the oven temperature or to the left to decrease the oven temperature The temperature display alternates between set temperature and actual oven temperature Temperatures below 65 C are displayed by the word Lo 3 Add food when the chime signals that the oven has reached prehea...

Page 15: ... 3 Oven temperature is preset at 1 for 290 C high broil Touch on the control panel or turn the oven selector knob to the left or right to turn on the oven To change the setting immediately turn the oven selector knob to the left to decrease the oven setting to 2 230 C medium broil or 3 175 C low broil 4 If the timer is set the oven will chime when one minute is left on the timer and will chime aga...

Page 16: ...mode setting S E T T I N G C O N T R O L S For convection mode 1 Turn oven selector knob bezel clockwise to Refer to the illustration below 2 Oven temperature is preset at 165 C Touch on the control panel or turn the oven selector knob to the left or right to turn on the oven Temperature can be adjusted in 1 increments To change the temperature setting from 165 C immediately turn the oven selector...

Page 17: ...use dry pot holders when removing hot pans from the oven 7 Turn oven selector knob bezel to to end this mode 190 Convection bake mode setting S E T T I N G C O N T R O L S For convection broil mode 1 Place food in oven at the correct rack position Close oven door 2 Turn oven selector knob bezel clockwise to Refer to the illustration below 3 Oven temperature is preset at br1 for 290 C high convecti...

Page 18: ...457 mm oven 1 Place dough in oven safe dish in oven 2 Turn oven selector knob bezel to Oven temperature is preset at 30 C Touch on the control panel or turn the oven selector knob to the left or right to turn on the oven To change the temperature setting from 30 C immediately turn the oven selector knob to the right to increase the oven temperature The temperature display alter nates between set o...

Page 19: ...ates between set oven temperature and dEH Dehydration temperature is usually 45 C 70 C 7 Leave food in the oven until completely dry to the touch 8 Remove food from racks before completely cool for easy removal If excessive sticking occurs place dehydration trays back in the oven to warm slightly for easier removal 9 Turn oven selector knob bezel to to end this feature DEHYDRATION F E AT U R E How...

Page 20: ...OK TIME will automatically be filled in 5 Touch One chime will ring before the last minute of cooking time Three chimes that repeat every 30 seconds signal the end of cooking time 6 The oven will turn itself off 7 Remove food Always use dry pot holders when removing hot pans from the oven 8 Turn oven selector knob bezel to to end this feature 9 To stop timer before complete touch then S E T T I N ...

Page 21: ...ure reaches 20 C Then the display alter nates between the probe set point and the actual probe temperature 6 When the desired internal temperature has been reached the oven will chime Recheck the internal temperature by removing and then reinserting the probe into the meat 7 Remove probe and food 8 Turn oven selector knob bezel to to end this feature W O L F D U A L F U E L R A N G E OVEN OPERATIO...

Page 22: ... desired amount of cooking time 6 Touch and hold on hidden control panel for 5 seconds SAb will be displayed in the oven selector knob No sound will be heard only the display will flash 7 The oven will turn itself off 8 Remove food Always use dry pot holders when removing hot pans from the oven 9 Turn oven selector knob bezel to to end this feature SABBATH F E AT U R E Star K Certified How the Sab...

Page 23: ...hold the arrow until 3 00 is displayed 3 Touch twice to begin clean cycle 4 To stop the clean cycle turn bezel to the position The door will remain locked until the oven reaches a safe temperature SELF CLEAN M O D E W O L F D U A L F U E L R A N G E OVEN OPERATION Never wipe a warm or hot porcelain surface with a damp sponge It may cause chipping or crazing tiny hairlike lines The oven gasket is i...

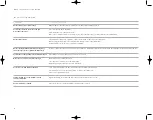
Page 24: ...ve cleaners Use sparingly Control Knobs Oven Selector Knob Bezels Powder coated die cast zinc To remove the knobs pull the knobs forward off the valve stem see page 6 on nylon bearing General care Wipe each knob with damp cloth and mild soap and water rinse and dry Never soak in water or use abrasive cleaners they will scratch the finish and may remove the markings Do not place in dishwasher Hand ...

Page 25: ...nd some cooking liquids may pit and stain the surface Always remove these spills immediately General care When cool clean splatters and spills immediately Do not allow food with a high sugar or acid content such as milk tomatoes sauerkraut fruit juices or pie filling to remain on any porcelain enamel surface Failure to remove these foods may cause a permanent dull spot Mild abrasive and abrasive c...

Page 26: ...when using more than one large roaster or griddle simultaneously Good gas combustion requires the correct amount of airflow to maintain the flame Using two oversized pans simultaneously restricts air movement Food boils over the pan and into the burner drip pan Heat setting is too high or pan size is too small for its contents Water does not come to a boil fast enough Water temperature is colder t...

Page 27: ...d in it Warm air venting into kitchen after oven has been turned off Warm air exhaust is a normal oven function needed to maintain and cool down oven temperatures It turns off automatically when the heat cools to a safe temperature PROBE flashes in the display when using probe feature Touch oven off Push probe into probe receptacle completely until it snaps into place Reset oven temperature and pr...

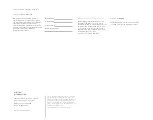
Page 28: ...odel and serial number of your dual fuel range This information is found on the product rating plate located rear of the remov able lower panel Refer to the illustration below Record the rating plate information below for future reference Model Number Serial Number Installation Date Wolf Dealer and Phone B E F O R E C A L L I N G F O R S E R V I C E Before calling your Wolf dealer refer to the tro...

Page 29: ...MF039 Sub Zero Group Australia Pty Ltd Level 10 469 La Trobe Street Melbourne Victoria 3000 Phone 61 3 9600 2218 subzero wolf com au ...

Reviews: