background image


Page 


Sympathetic Vibration 


Sympathetic vibration from other equipment (cables, etc.) in the rack may be 
serious enough to interfere with the unit’s sound quality. If you experience 
sympathetic vibrations, use thin card stock, felt, foam, or weather-stripping 
between the vibrating surfaces. Tie loose cables securely with cable ties. 


Mechanical Bracing 


The 1RU chassis is securely attached to the front panel. In addition, the chassis has 
mounting tabs through which you attach it to the rack rail. This feature will reduce 
or eliminate rear bracing requirements in many mobile/portable applications. The 
weight of internal components is distributed fairly evenly around the unit. 


Electrical Interference 


Be careful to avoid mismatched cable types and other similar causes of undesired 
reflections in digital signal systems. If severe enough, such reflections can result in 
corruption of the digital data stream. As with any audio equipment, maximum 
immunity from electrical interference requires the use of shielded cable; however, 
satisfactory results can sometimes be obtained without it. The internal circuitry 
ground is connected to the chassis. 


Power 


The unit connects to an AC mains power source (100 to 240 VAC, 65W, 50/60Hz) 
using an IEC power cord. 

When the mains plug or appliance coupler is used as the disconnect device, the 
disconnect device should remain operable. 


Compliance 

FCC 


This equipment has been tested and found to comply with the limits for a Class A 
digital device, pursuant to part 15 of the FCC Rules. These limits are designed to 
provide reasonable protection against harmful interference when the equipment is 
operated in a commercial environment. This equipment generates, uses, and can 
radiate radio frequency energy and, if not installed and used in accordance with the 
instruction manual, may cause harmful interference to radio communications. 
Operation of this equipment in a residential area is likely to cause harmful 
interference, in which case the user will be required to correct the interference at 
their own expense. 


ICES-003 


This Class A digital apparatus complies with Canadian ICES-003. 


Cet appareil numérique de la classe A est conforme à la norme NMB-003 du 
Canada. 


Summary of Contents for iVAM1-1

Page 1: ...iVAM1 1 1RU Multi Channel Audio Video Monitor User Guide Part Number 821829 Revision B...

Page 2: ...ss or implied with respect to software documentation their quality performance merchantability or fitness for a particular purpose In no event will Wohler Technologies Inc be liable for direct indirec...

Page 3: ...8 FCC 8 ICES 003 8 CHAPTER 2 Local Operation 9 Operation 9 Startup 9 Front Panel 9 Rear Panel 11 SFP 2022 6 SFP 2110 Address Setup 16 Channel Meters and Touch Operations 17 Video Screen 19 Menu Optio...

Page 4: ...VAM1 1 for Dante 56 DanteTM Device Setup 57 Dante Clock Selection 58 Channel Names 58 AES67 59 Device Lock 61 Dante Firmware Upgrades 62 Additional Information 62 DanteTM Legal Disclosures 62 APPENDIX...

Page 5: ...AN Updating 73 APPENDIX E API Documentation 74 Introduction 74 API 74 Body Content for SDI SMPTE 2022 6 SMPTE 2110 74 Body Content for MADI 74 Body Content for Analog 74 Body Content for AES 75 Status...

Page 6: ...for remote management Setups are created and configured using local menus and a web browser over a network connection to the integral web server of the iVAM1 1 The web server will also allow you to v...

Page 7: ...2 Sides 1 75 Top and Bottom if either radiates heat 0 Top and Bottom if no heat Heat Dissipation The ambient temperature inside the mounting enclosure should not exceed 40 Celsius 104 Fahrenheit Adjac...

Page 8: ...e of shielded cable however satisfactory results can sometimes be obtained without it The internal circuitry ground is connected to the chassis Power The unit connects to an AC mains power source 100...

Page 9: ...green Depending upon optional settings all channel pairs will either be in the muted condition or set in a predetermined way You may then use the Source and Channel controls to enable only the progra...

Page 10: ...es Note that for 8 channel sources the 8 channels are always displayed with 8 larger meters The selected Source input is displayed in the upper left of the meter screen as follows Pressing the Source...

Page 11: ...rnet port can connect to either a LAN or to a PC to let you perform administrative tasks remotely The Wohler Web GUI is described in Chapter 4 of this manual Third party equipment connecting to the iV...

Page 12: ...software licenses Figure 2 3 AES HD 15F Connector Pinout 8 AES Outputs This HD 15F connector provides 4 AES3id digital audio pairs 8 channels at a 48 kHz sample rate from selected monitored sources R...

Page 13: ...2110 or 2022 6 Receiver This uses Multi Mode 850 NM LC fiber connectors It allows the iVAM1 1 to monitor SDI audio transmitted in real time over Ethernet You must use the emSET configuration software...

Page 14: ...Wohler Sales Refer to Figure 2 6 for the pinout of this connector Note PCM channels marked as data channels such as those containing encoded Dolby streams are automatically muted from being sent out...

Page 15: ...G G G N C L R L R L R L R Pair 1 Pair 2 Pair 3 Pair 4 15 AoIP SFP Module Cage optional This provides a location in which to insert the AoIP Module supplied with the OPT DANTE iVAM and OPT RAVENNA 64...

Page 16: ...SFP 2110 PC Fiber Optic 192 168 39 217 192 168 39 215 The optional SFP 2022 6 or SFP 2110 module furnished by Wohler Technologies is manufactured by Embrionix and comes from the factory with a default...

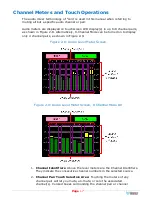
Page 17: ...Mode can be turned on to display only 4 channel pairs as shown in Figure 2 9 Figure 2 8 Audio Level Meter Screen Figure 2 9 Audio Level Meter Screen 8 Channel Mode On 1 Channel Identifiers Above the l...

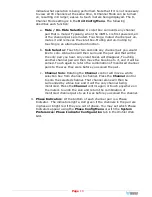
Page 18: ...ppear Touching another channel pair will then move the blue box to it and it will be soloed Touch again to return the combination of monitored channel pairs to the way they were before you soloed the...

Page 19: ...is only displayed for the first 5 or 10 seconds after switching to the video screen Figure 2 10 shows the Video Screen Figure 2 10 Video Screen Video Source SDI 1 HD 720p 50Hz Video Signal 1 Video So...

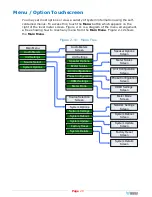
Page 20: ...11 Menu Tree System Options Audio Meters Screen System Details Screen Main Menu Audio Meters Unit Settings Source Select Speaker Options Screen Network Settings Screen Factory Reset Screen Source Sel...

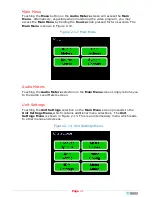
Page 21: ...n Figure 2 12 Figure 2 12 Main Menu Audio Meters Touching the Audio Meters selection on the Main Menu screen simply returns you to the Audio Level Meters screen Unit Settings Touching the Unit Setting...

Page 22: ...ring high pitched sounds out of the mix The control can be touched and moved left or right to adjust in 2 dB increments After touching the Treble control the Channel knob can also be turned to make th...

Page 23: ...l be applied to the audio meters Figure 2 15 Meter Scales Screen The controls function as follows 1 Scale This meter scales standard to be used when displaying audio levels A choice of seven scales is...

Page 24: ...g Segment Not Displayed When you have made your choices touch Save to retain them Touch Back or Meters to exit this screen Default Color Bounds Default Ballistics Scale Bottom Limit Top Limit Default...

Page 25: ...for 5 seconds after the video screen is selected and then it disappears d 10 Secs The video information is displayed for 10 seconds after the video screen is selected and then it disappears 3 AES term...

Page 26: ...sed to convey two independent monophonic signals or that one channel may be a Center channel and the other may be a Low Frequency Effects channel In these instances the Phase Indicator would almost al...

Page 27: ...cation Data EDID to disclose their capabilities to the video source The iVAM1 1 can use this information to ensure its compatibility with the HDMI Monitor If you decide that you do not want the iVAM1...

Page 28: ...ons as follows 1 8 Channel Mode This setting selects whether 16 meters are shown on the Metering Screen or whether 8 larger meters are displayed instead If it is not necessary to view 16 meters at a t...

Page 29: ...used contact Wohler Technologies Figure 2 21 shows the Source Select Menu Figure 2 21 Source Select Menu Touch Menu to exit this menu If you touch MADI BNC MADI Optical or SFP an additional selection...

Page 30: ...LR DB25 Back Analog Menu AoIP CH 1 16 AoIP CH 33 48 AoIP CH 17 32 AoIP CH 49 64 Back AoIP Back Valid hardware is required Feature is not supported or requires valid hardware Please call at 1 510 870 0...

Page 31: ...Settings Touch the Network Settings selection on the System Options Menu displays the Network Settings menu as shown in Figure 2 24 This screen lets you view or change the product IP the Net Mask Gate...

Page 32: ...ange from a static fixed to a dynamic DHCP network address touch the DHCP button The screen will change as shown in Figure 2 26 To change back to a static fixed network address touch the DHCP button a...

Page 33: ...d with a bit of forethought It puts the system out of service for several minutes while it is rebooting Figure 2 27 System Reboot System Reboot Are you sure You wish to Reboot the System No Yes Back I...

Page 34: ...ware locally from the iVAM1 1 front panel follow the procedure in the Local Update from the Front Panel section of Appendix A Figure 2 28 System Update Screen System Update There is no USB mounted Sof...

Page 35: ...se the Wohler Web GUI to reprogram everything from the start Figure 2 29 Factory Reset Note Factory Reset will also reset your IP address to the default one After a Factory Reset the IP Settings will...

Page 36: ...he System Details screen as shown in Figure 2 30 This screen lets you view the product Serial Number Software Version and various other information Figure 2 30 System Details Screen The information sh...

Page 37: ...el Meter Scale Choice of AES BBC DIN EBU EXTVU NORDIC or VU Sample Rate 48kHz De Multiplexing 16 channels from 16 channel SD HD 3G SDI 64 channel AES10 MADI SDI Inputs Outputs 1 or 2 SDI Inputs or Out...

Page 38: ...eo XLR 3 Male balanced 28 dBU max Analog I O Multi channel 8 Balanced Input Channels and 8 Balanced Output Channels on 2 x DB25F Optional Analog Output Frequency Response 40 Hz to 20 kHz 1dB Analog Ou...

Page 39: ...ors SFP module with software activation key Use emSET to configure SFP SFP 2110 829086 SMTPE 2110 receiver Multi Mode 850 NM LC fiber connectors SFP module with software activation key Use emSET to co...

Page 40: ...ed OPT DANTE iVAM 829172 Enable decoding and monitoring of DanteTM input streams Includes AoIP card Enables 2 x RJ 45 ports for 2022 7 support for Dante Ravenna and 2110 30 SFP cage allowing MM and SM...

Page 41: ...Page 41 Figure 3 1 iVAM1 1 Block Diagram...

Page 42: ...re scrolling making operation challenging The Chrome web browser is recommended for speed and compatibility First Time IP Assignments The iVAM1 1 can operate with a static fixed or dynamic DHCP IPv4 a...

Page 43: ...ular network Immediately after the host setup is complete change the iVAM1 1 s address Make the corresponding address mask and gateway changes in the iVAM1 1 Network Setup page Refer to the Network Se...

Page 44: ...lly be 255 255 255 0 unless your network can work across multiple subnets 4 Gateway Address This should usually be the same domain and subnet address numbers as the IP Address but with the last octet...

Page 45: ...udio Meters to remotely display the audio meters of the iVAM1 1 This display is shown in Figure 4 3 Also displayed is the name of the source that the meters are displaying In Figure 4 3 this is SDI 1...

Page 46: ...sed to convey two independent monophonic signals or that one channel may be a Center channel and the other may be a Low Frequency Effects channel In these instances the Phase Indicator would almost al...

Page 47: ...ese tabs are explained in the following three sections System Information This tab displays a variety of information about the iVAM1 1 It is shown in Figure 4 5 This information could be useful to vie...

Page 48: ...e useful to view if you need to ascertain what module if any is installed or if you are contacting Wohler Technical Service Figure 4 6 SFP Information Tab System SFP Information Note SFP Information a...

Page 49: ...ling these numbers Figure 4 7 Licenses Tab System Licenses The example above shows an iVAM1 1 with license keys for inputs and license keys for SFP modules installed To enter the license key provided...

Page 50: ...ould perform a Factory Reset do not click the Initiate Factory Reset button Contact Wohler Technical Service for advice Note Factory Reset will also reset your IP address to the default one After a Fa...

Page 51: ...or correct an issue The Reboot System function should be used with a bit of caution It puts the iVAM1 1 out of service for several minutes while it is rebooting and this may unexpectedly interfere wit...

Page 52: ...type and does not need to be empty Local Update from the Front Panel Use the following steps to update the software 1 Insert the USB flash drive with iVAM1 1 update package s into the front panel USB...

Page 53: ...el the upgrade at this point for any reason touch Back To proceed touch the software version entry in the Software Version screen A screen will appear as shown in Figure A 3 Figure A 3 Upgrade Verify...

Page 54: ...after which the iVAM1 1 will restart After the system has completed its restart cycle the Status indicator will turn green and the iVAM1 1 will once again be operational At this point you may remove...

Page 55: ...provided to receive the AoIP signal using network fiber SFPs These are 1G SFP slots The SFP slot always acts as a primary interface On iVAM1 1 the AoIP source can be selected through the Source Select...

Page 56: ...in the iVAM1 1 The iVAM1 1 transmits up to 20 channels 1 to 16 are the monitored channel in prefade mode The remaining four are reserved for future use Currently they are mapped to channels being moni...

Page 57: ...k but that will not change the iVAM1 1 s unit name appearing on GUI pages and iVAM1 1 Remote Metering or Discovery pages Figure B 3 iVAM1 1 Name During initial setup you may want to manually change th...

Page 58: ...Figure B 5 The iAM Brooklyn Dante card will serve as a temporary fallback clock source if preferred masters are interrupted It functions as an accurate slave clock synchronized to the master clock on...

Page 59: ...evice View AES67 Config menu enables disables AES67 Figure B 6 AES67 Enable Disable Further Dante AES67 discovery and operational protocol requires manual assignments for static multicast transmit and...

Page 60: ...Page 60 Figure B 7 Device View Network Config...

Page 61: ...te Multicast Flows window shown in Figure B 8 Figure B 8 Multicast Device Lock Audinate recently added a feature whereby a remote controller can send a command to lock Dante network device configurati...

Page 62: ...licable technical notes available Additional Information The following links are provided for those who need more information about the Dante controller or the Dante Firmware update manager https my a...

Page 63: ...eatures RAVENNA Compatible Talker Listener 1 RFC 3551 RTP Profile for Audio and Video Conferences a L16 16 bit linear format defined in RFC 3551 clause 4 5 11 b L24 24 bit linear format defined in RFC...

Page 64: ...ters of this manual The Merging Ravenna card runs specific firmware from Merging and augmented by Wohler for use within the iVAM1 1 The card will not function correctly if the user downloads and insta...

Page 65: ...vice Name Enter a useful Device Name for the card which will show up on other Ravenna devices on the subnet 2 Sample Rate 44100 48000 88200 96000 176400 192000 352800 384000 3 Frame size 1Fs current f...

Page 66: ...ou must first check the Manual checkbox a Priority 1 is the main priority value b Class This is the Device class This value should not be modified c Accuracy This field cannot be modified d Priority 2...

Page 67: ...Streams are to be Sourced from this card It is shown in the following figure Figure D 3 Getting Started Session Sources The elements of this tab are as follows 1 Create session button Create a new ses...

Page 68: ...the stream The drop down menu allows selection of specific channel range if the number of channels is less than 8 14 The URL of the SDP of this session This allows saving of the Session Description in...

Page 69: ...ate the connection status 0x10 receiving RTP packets OK 0x01 wrong RTP sequence id 0x02 wrong RTP SSRC 0x04 wrong RTP payload type 0x08 wrong RTP SAC 0x20 stream has been muted 0x40 Horus implementati...

Page 70: ...uts and or Outputs Figure D 5 Getting Started Ins Outs Getting Started I O Router This page allows remapping of incoming channels to different internal channel assignments For example Stream channel 1...

Page 71: ...erging ZMAN device in Aneman This brings up the browser page with tab set to General configuration GUI for the ZMAN card This is shown in Figure D 1 Use the following procedure 1 Select the Session Si...

Page 72: ...o direct Flows to higher channel ranges For example for monitoring 2 SDI sources four 8 channel Flows assign two flows to 1 8 and 9 16 and the next SDI signal to 17 24 and 25 32 Touch the iVAM1 1 AOIP...

Page 73: ...alized with the correct Wohler firmware load In case of future upgrades use the following steps 1 In Aneman right click the ZMAN entry on the bottom Devices section and select Maintenance Mode This br...

Page 74: ...gnments section of Chapter 4 to achieve the required network connection API Method POST URL api op sourceselect URL parameters data Data in JSON format Body Content for SDI SMPTE 2022 6 SMPTE 2110 Sou...

Page 75: ...erial_number 123456 status 200 Failure Response action For more information about valid data please see API document status 422 message SourceType Not a valid choice Status Codes 200 OK 400 Bad Reques...

Reviews: