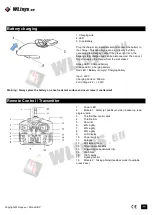
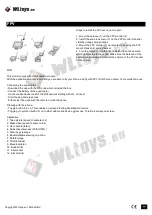
background image

1. Charging wire
2. LED
3. Li-po Battery

Plug the charger into a wall socket and connect the battery to 
the charger. This can only be done in one way: by firmly 
connecting the charging cable. If the green light is on, the 
battery is fully charged and can be disconnected. Then do not 
forget to unplug the charger from the wall socket.

Green LED = Charged battery
Orange LED = Charging battery
Red LED = Battery is empty / Charging battery

Input : 220V
Charging Current : 500mA
Full Voltage: 4.2 +/- 0.03V
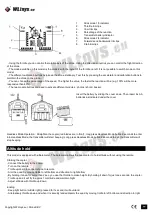
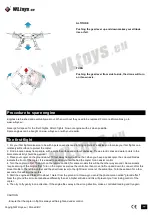
1.        Power LED
2.        Module 1 : Water jet; bubble jet; video; basket up; lead 
single missile
3.        Throttle/Yaw control stick
4.        Throttle trim
5.        Yaw trim
6.        40% agility
7.        60% agility
8.        80% agility
9.        LCD display
10.      Power switch
11.      Antenna
12.      Roll (when 100%)
13.      Direction control stick
14.      Forwards and backwards trim
15.      Crab trim
16.      100% agility
17.      Lighting control
18.      Module 2 : Taking photos(Headless mode if available, 
press 2 sec)

Battery charging

Warning : Always place the battery on a heat resistant surface and never leave it unattended!

Remote Control / Transmitter

Copyright WLtoys.eu | DroneX BV

Summary of Contents for Q222

Page 1: ...an adult Stand out of reach of moving parts of the copter After using the copter ALWAYS disconnect the battery and remove it from the device The model and the transmitter must be switched off after u...

Page 2: ...ouse interiour walls and all other surroundings that could get injured or damaged if you lose control during flights For the sensitive and rational conservation protection and improvement of the quali...

Page 3: ...put 220V Charging Current 500mA Full Voltage 4 2 0 03V 1 Power LED 2 Module 1 Water jet bubble jet video basket up lead single missile 3 Throttle Yaw control stick 4 Throttle trim 5 Yaw trim 6 40 agil...

Page 4: ...ry Test this by pressing the accelerator and calibration buttons to maintain the drone in one place You can choose the percentage of the speed The higher the value the faster the reaction will be e g...

Page 5: ...to the connector of the drone 2 Move the throttle left stick in mode 2 down and turn on the remote control 3 Wait for the controller to stop beeping and the copter should be connected 1 Put the batte...

Page 6: ...ou Mind that when you have a quadcopter the coloured blades indicate the front of the copter It is easiest to position yourself behind the copter for an easier control 4 Turn the copter on first Then...

Page 7: ...adjusting the clip or speed is inconsistent in the left right pirouette Tail rotors are probably damaged Replace the main wing and or the main engine 8 The quadcopter was still moving forward after t...

Page 8: ...le steering on phone 7 Rotate image WIFI This model comes with a Wifi camera module Connecting the quadcopter Download the app with the QR code which is inside the box Connect the battery of the quadc...

Page 9: ...tomers a high quality product All our products are carefully tested before shipment If unfortunately a problem persists contact your dealer or visit www wltoys eu Your dealer can also assist you in ge...

Page 10: ...l influences Homemade modifications on the product The damage caused by the loss of control of the vehicle Electric defects due to voltage overload or lightning Normal wear and tear of the device and...

Reviews: