background image


863-668 

© Firma WJG, Braunschweig. Nachdruck oder Vervielfältigung  nur mit ausdrücklicher Genehmigung 
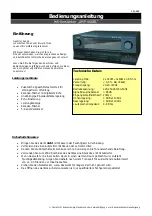
Owners Manual 

Hifi-Amplifier„AMP-400BL“ 


Introduce 


 Dear customer, 
 we gratulate of getting your new Hifi Amplifier!  
 
 With this choice you have decited to a product which  
 combines good design and practical technical features. 


 Please read the following advice carefully and work  
 accordingly to these advice to get troubleless fun with 
 the unit. 


Features 


Toroid Transformer Power Supply to increase 

      Power efficiency factor 


Digital time delay karaoke mixer 


Independent microphone volume 


Control and echo-adjustment 


Power Peak Meter 


Karaoke mixer 


5 channel Amplifier 


Savety Device 


Do not put the system near to water and humidity. 


Avoid place the system to moisture or excessive heat or direct sun. 


Take care for a good ventilation and do not cover the heat-sink-slots in the housing. 


Connect the system to a 230V power plug with a groundet protective-conductor only. 


To put system from a cold to a warm room cause humidity to the system, therefore 

      wait for a definied time of 2 to 3 hours before use after transport. 


The power cord of the appliance shold be unplugged from the power plug when left 

      unused for a long period of time. 


To open system for service is only allowed certyfied personal only. 


Specifications: 


Output Power Max: 

Distortion:                  

Frequency Range: 

Power Input: 

Signal to Noise Ratio:

Input Sensivity: 
Treble Tone Control: 

Bass Tone control:      

Load Impedance: 


2x 140W +3x40W at 8 Ohms 

< 0,5 % at rated power 

20-20.000Hz 

220-250VAC/50-60Hz 

200mV 

> 85dB 
± 8dB at 10KHz 

± 8dB at 100Hz 

4-8 

Ohms


Summary of Contents for AMP-400BL

Page 1: ...heitshinweise Bringen Sie das Gerät nicht mit Wasser oder Feuchtigkeit in Verbindung Vermeiden Sie einen Aufstellort mit Staub oder extremer Hitze Decken Sie die Kühlschlitze im Gehäuse nicht ab und sorgen Sie für ausreichende Belüftung Verwenden Sie zum 230V Anschluss des Gerätes eine Steckdose mit Schutzleiter Wenn das Gerät von einem kalten Raum in einen warmen Raum gebracht wird entsteht Feuch...

Page 2: ...s Stellen Sie sicher dass der Anschluss der linken Boxen L und der rechten Boxen R folgerichtig ausgeführt ist Ebenso achten Sie auf die richtige Polung der Boxen Anschlüsse und um ein gutes Klangergebnis zu erzielen Bitte achten Sie darauf dass die abisolierten Drahtenden der Lautsprecherkabel sich nicht berühren oder metallische Gegenstände berühren dies kann den Verstärker beschädigen Bei Verwe...

Page 3: ...uffunktionen während des Betriebes diese sind mit den VFD Tasten 8 anwählbar Wenn Sie einen DVD Player mit 5 1 Ausgang angeschlossen haben können Sie mit den Modus Tasten 9 die gewünschte Raumklangversion anwählen je nachdem wieviele Boxen Sie angeschlossenHaben Die Lautstärke der Einzelnen Boxen im Raumklanksystem kann mit den Einzeltasten 10 geregelt werden Die Stummschaltung Taster 15 dient daz...

Page 4: ...nbedienung zur Verfügung Die Funktionen die zusätzlich durch die Fernbedienung ermöglicht werden sind hier erklärt 1 Lautstärkeregler 2 Loudness hebt Bass und Höhen bei kleiner Lautstärke an 3 Bassregler 4 Höhenregler 5 Balanceregler 6 Eingangswahlschalter 7 Echo Delayregler 9 Modusumschalter 2 Kanal 3 Kanal 5 Kanal 10 Einzellautstärkeregler 11 DSP Schalter 14 Mikrofon An Aus 15 Stummschaltung 12 ...

Page 5: ...e system near to water and humidity Avoid place the system to moisture or excessive heat or direct sun Take care for a good ventilation and do not cover the heat sink slots in the housing Connect the system to a 230V power plug with a groundet protective conductor only To put system from a cold to a warm room cause humidity to the system therefore wait for a definied time of 2 to 3 hours before us...

Page 6: ...ophone Volume Rearside Loudspeaker Connection Figure 1 230V AC Cord Loudspeaker Connection Make sure that you have left L and right R channels correctly connected Also take care of the right polarity and follow the and label on the unit Do not let the bare speaker wires touch each other or any other metal part as these could damage the Amplifier When using 2 speaker systems the impedance shold not...

Page 7: ... DSP buttons 11 The display has various settings these settings can be choosen by pressing the VFD buttons 8 When you have connected a DVD Player with 5 1 Output you can choose the right mode by pressing The mode buttons 9 according the connected loudspeakers The volume of the seperate speakers can be adjusted by pressing the Volume buttons 10 When you have a call you can mute the system by pressi...

Page 8: ...o controlled by the attached remote control therefore we explain The additional functions 1 Volume Adjust 2 Loudness raise Bass and Treble at low volume 3 Bass Adjust 4 Treble Adjust 5 Balance Adjust 6 Input Selector 7 Echo Delay Adjust 8 Modus Switch 2 channel 3 channel 5 channel 9 Seperate Volume 10 DSP Switches 14 Mcrophone ON OF 15 Muting ...

Reviews: