WISEUP SHOP AT002 User Manual Download Page 1

AT002

User Guide

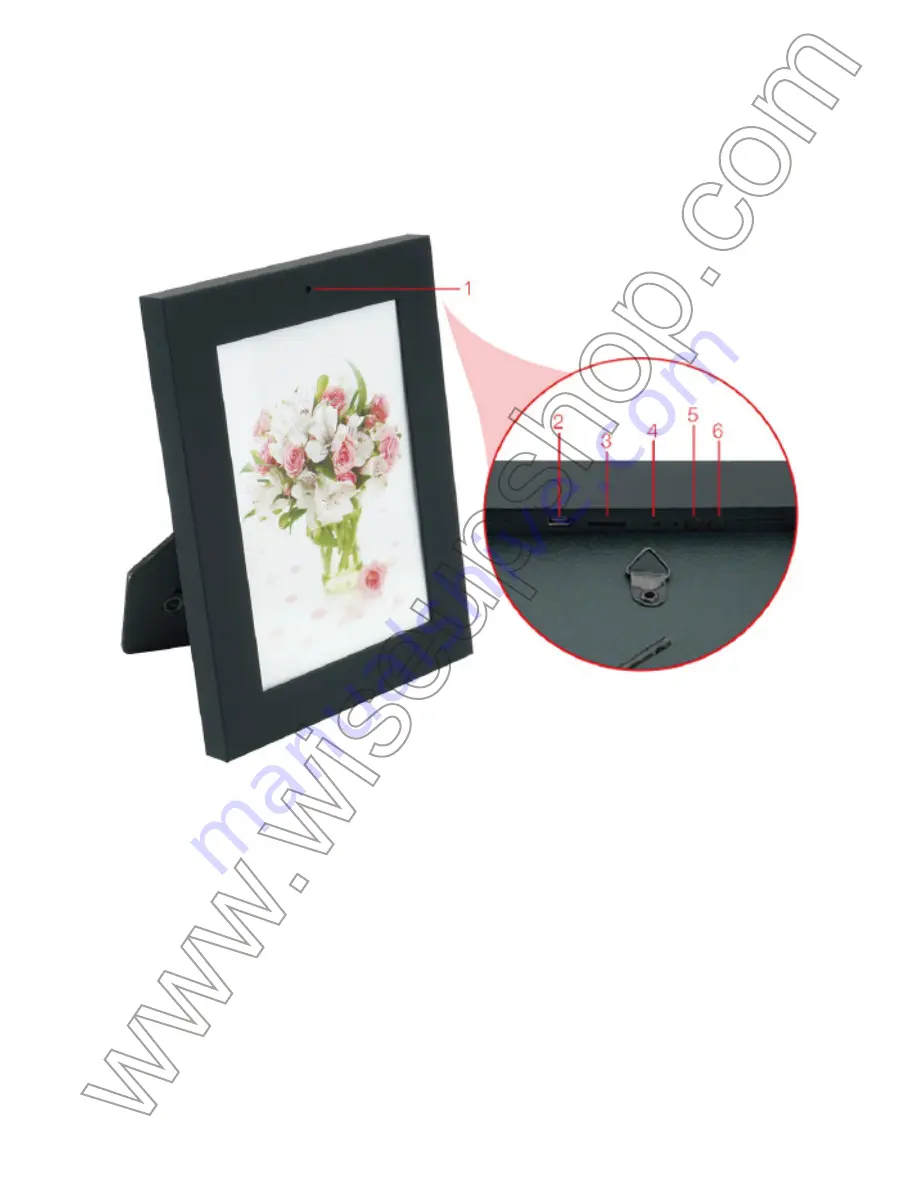
I. Product Overview

1.Camera Lens
2.USB Port
3.Micro SD Card Slot

II. What’s in the Box

-1× Photo Frame Camera
-1× USB Cable
-1× 8GB Micro SD Card (fitted into the Micro SD card slot already)

III. Operation

>> Please make sure your camera battery is fully recharged before using.
>> Please make sure the Micro SD card (4GB-32GB, format it for the first usage) 
is securely fitted into the camera’s SD card slot, or it will not work. A SDHC Class 
10 Micro SD card is recommended. If no Micro SD card is fitted into the camera, 
the indicator light will glow solid green and red for 5 seconds, then turn off after 
flashing 5 times. The camera will shut down automatically.

3.1. POWER ON/OFF

3.1.1. Power on the camera by pressing the Power Button for 2 seconds. The green 
indicator light will flash once and turn off, while the red indicator light will stay 
illuminated, indicating the camera has entered into standby mode automatically.
3.1.2. Power off the camera by pressing the Power Button for 2 seconds again. The 
green and red indicator lights will flash once, then turn off together. The camera will 
shut down automatically.

[Note]: 

The camera will shut down automatically if it is in standby mode without any 

operation more than 1 minute.

3.2. VIDEO RECORDING

3.2.1. Power on the camera by pressing the Power Button for 2 seconds. The green 
indicator light will flash once and turn off, while the red indicator light will stay 
illuminated, indicating the camera has entered into standby mode automatically.
3.2.2. Press the Video Recording Button once to record video. The red indicator light 
will flash 3 times and turn off.
3.2.3. Press the Video Recording Button once again to stop recording video. The 
red indicator light will flash twice and then stay illuminated, indicating the camera 
is back to standby mode.

[Notes]:

1). A video file will be generated and saved every 10 minutes automatically.
2). The camera can record video for one hour continuously on a full charge.
3). Video Resolution: 1280x960            Video Format: AVI
4). If the camera is in low battery, the indicator light will flash green and red in turn for 5 seconds. 
The video file will be saved and the camera will shut down automatically.

3.3. CAMERA/STILL PHOTOGRAPHY

3.3.1. Power on the camera by pressing the Power Button for 2 seconds. The 
green indicator light will flash once and turn off, while the red indicator light will stay 
illuminated, indicating the camera has entered into standby mode automatically.
3.3.2. Press the Camera Button once to take a photo. The red indicator light will 
flash once, then it stay illuminated, indicating camera is back to standby mode.

3.4. MOTION DETECTION RECORDING

3.4.1. Power on the camera by pressing the Power Button for 2 seconds. The green 
indicator light will flash once and turn off, while the red indicator light will stay 
illuminated, indicating the camera has entered into standby mode automatically.
3.4.2. Press the Motion Detection Button for 2 seconds to enter into motion detection 
recording mode. The green indicator light will flash 3 times and then turn off.
3.4.3. Press the Motion Detection Button once to exit motion detection mode. The 
green indicator light will flash once. Then the red indicator light will stay illuminated, 
indicating the camera is back to standby mode.

IV. Video/Image Files Uploads

4.1. Power off the camera, remove the Micro SD card and insert it into a card reader.
4.2. Insert the card reader into a PC computer.
4.3. The Micro SD card will be recognized as a removable disk drive.
4.4. All the files can be accessed in the “DCIM” folder.

V. Setting Time/Date Stamp

5.1. Power off the camera, remove the Micro SD card and insert it into a card reader.
5.2. Insert the card reader into a PC computer.
5.3. Removable disk drive folder appears.
5.4. Click on the drive in the root directory and inside the root directory, create a file 
named “TIMESET.txt”.
5.5. Write the current date and time in the “TIMESET.txt” file with the correct format:
YYYY.MM.DD HH:MM:SS (For example: 2016.04.12 14:24:32). Save this file.
5.6. Restart the camera and the system will upgrade the program automatically.

VI. Charging

6.1. Connect the camera to a PC computer by using the USB cable provided.
6.2. The indicator light will keep flashing red during the charging process.
6.3. It will take 2 hours to obtain a full charge.
6.4. When the camera is about to be fully charged, the indicator light will glow solid 
red; when it is fully charged, the indicator light will glow red and green.

4.Green/Red Indicator Light
5.Power/Camera Button
6.Video Recording/Motion Detection Button 

Summary of Contents for AT002

Page 1: ...Lens 2 USB Port 3 Micro SD Card Slot II What s in the Box 1 Photo Frame Camera 1 USB Cable 1 8GB Micro SD Card fitted into the Micro SD card slot already 4 Green Red Indicator Light 5 Power Camera But...

Page 2: ...will shut down automatically Note The camera will shut down automatically if it is in standby mode without any operation more than 1 minute 3 2 VIDEO RECORDING 3 2 1 Power on the camera by pressing t...

Page 3: ...mes and then turn off 3 4 3 Press the Motion Detection Button once to exit motion detection mode The green indicator light will flash once Then the red indicator light will stay illuminated indicating...

Page 4: ...6 2 The indicator light will keep flashing red during the charging process 6 3 It will take 2 hours to obtain a full charge 6 4 When the camera is about to be fully charged the indicator light will g...

Page 5: ...tiv 2 USB Port 3 Micro SD Karten Slot II Was ist in der Box 1 Photo Frame Kamera 1 USB Kabel 1 8 GB Micro SD Karte in den Steckplatz Micro SD Karte ausgestattet bereits Green Red Indicator Light 5 Pow...

Page 6: ...ra hat sich automatisch in den Standby Modus 3 1 2 Schalten Sie die Kamera mit der Power Taste erneut f r 2 Sekunden dr cken Die gr ne und die rote LED leuchtet blinkt einmal dann zusammen auszuschalt...

Page 7: ...rote Kontrollleuchte blinkt einmal dann bleiben sie beleuchtet Kamera anzeigt in den Standby Modus ist zur ck 3 4 Zur Bewegungserkennung 3 4 1 Schalten Sie die Kamera mit der Power Taste 2 Sekunden l...

Page 8: ...TIMESET txt 5 5 Schreiben Sie das aktuelle Datum und die Uhrzeit in der TIMESET txt Datei mit dem richtigen Format YYYY MM DD HH MM SS Zum Beispiel 2016 04 12 14 24 32 Speichern Sie diese Datei 5 6 S...

Page 9: ...Produit 1 Objectif de Cam ra 2 Port USB 3 Fente pour Carte SD 4 Voyant Verte Rouge 5 Bouton de March Cam ra 6 Bouton de Video Enregistrement D tection de mouvement II Qu y a t il dans la boit er 1 Cad...

Page 10: ...3 1 2 Mise hors tension de l appareil photo en appuyant sur le bouton d alimentation pendant 2 secondes Les lumi res vertes et rouges indicateurs clignotent une fois puis teignez ensemble L appareil p...

Page 11: ...OUVEMENT D ENREGISTREMENT 3 4 1 Allumez l appareil photo en appuyant sur le bouton d alimentation pendant 2 secondes Le voyant vert clignote une fois et teignez tandis que le voyant rouge reste allum...

Page 12: ...dans le fichier TIMESET txt avec le format correct YYYY MM DD HH MM SS Par exemple 2016 04 12 14 24 32 Enregistrez a 5 6 Red marrez l appareil photo et le syst me de mise niveau du programme automati...

Page 13: ...t Vue d ensemble 1 Camera Lens 2 USB Port Slot per scheda SD 3 Micro 4 Green Red Spia 5 Power macchina fotografica del tasto Pulsante 6 Video registrazione Motion Detection II Cosa c nella scatola 1 C...

Page 14: ...to in modalit standby automaticamente 3 1 2 Spegnere la fotocamera premendo il pulsante di accensione per 2 secondi Le spie verde e rossa lampeggia una volta poi si spegne insieme La fotocamera si spe...

Page 15: ...remendo il pulsante di accensione per 2 secondi La spia verde lampeggia una volta e spegnere mentre la spia rossa rimarr illuminato indicando la telecamera entrato in modalit standby automaticamente 3...

Page 16: ...M DD HH MM SS per esempio 2016 04 12 14 24 32 Salvare il file 5 6 Riavviare la telecamera e il sistema aggiorner automaticamente il programma VI ricarica 6 1 Collegare la fotocamera ad un computer PC...

Page 17: ...l del producto 1 Camera lente 2 USB Puerto 3 Ranura para tarjeta SD Micro 4 Green Red luz indicadora 5 bot n de la c mara potencia 6 Bot n de Grabaci n de Video detecci n de movimiento II Qu hay en la...

Page 18: ...dor permanece encendida indica que la c mara ha entrado en modo de espera autom ticamente 3 1 2 Apague la c mara por pulsando el bot n de encendido durante 2 segundos Los indicadores luminosos verde y...

Page 19: ...luminado indicando la c mara vuelve al modo de espera 3 4 GRABACION DETECCI N DE MOVIMIENTO 3 4 1 Encienda la c mara por pulsando el bot n de encendido durante 2 segundos La luz indicadora de color ve...

Page 20: ...MESET txt 5 5 Escribe la fecha y la hora actual en el archivo TIMESET txt con el formato correcto AAAA MM DD HH MM SS Por ejemplo 2016 04 12 14 24 32 Guarde este archivo 5 6 Reiniciar la c mara y el s...

Page 21: ...AT002 I 1 2 USB 3 SD 4 5 6 II 1 1 USB...

Page 22: ...1 8GB SD SD III SD 4GB 32GB SD SDHC 10 SD SD 5 5 3 1 3 1 1 2 3 1 2 2 1 3 2 3 2 1 2 3 2 2 3 3 2 3...

Page 23: ...1 10 2 1 3 1280 960 AVI 4 5 3 3 3 3 1 2 3 3 2 3 4 3 4 1 2 3 4 2 2 3 3 4 3 IV 4 1 SD 4 2 4 3 SD 4 4 DCIM...

Page 24: ...V 5 1 SD 5 2 5 3 5 4 TIMESET txt 5 5 TIMESET txt YYYY MM DD HH MM SS 2016 4 12 02 24 32 5 6 VI 6 1 USB 6 2 6 3 2 6 4...

Reviews: