background image

4

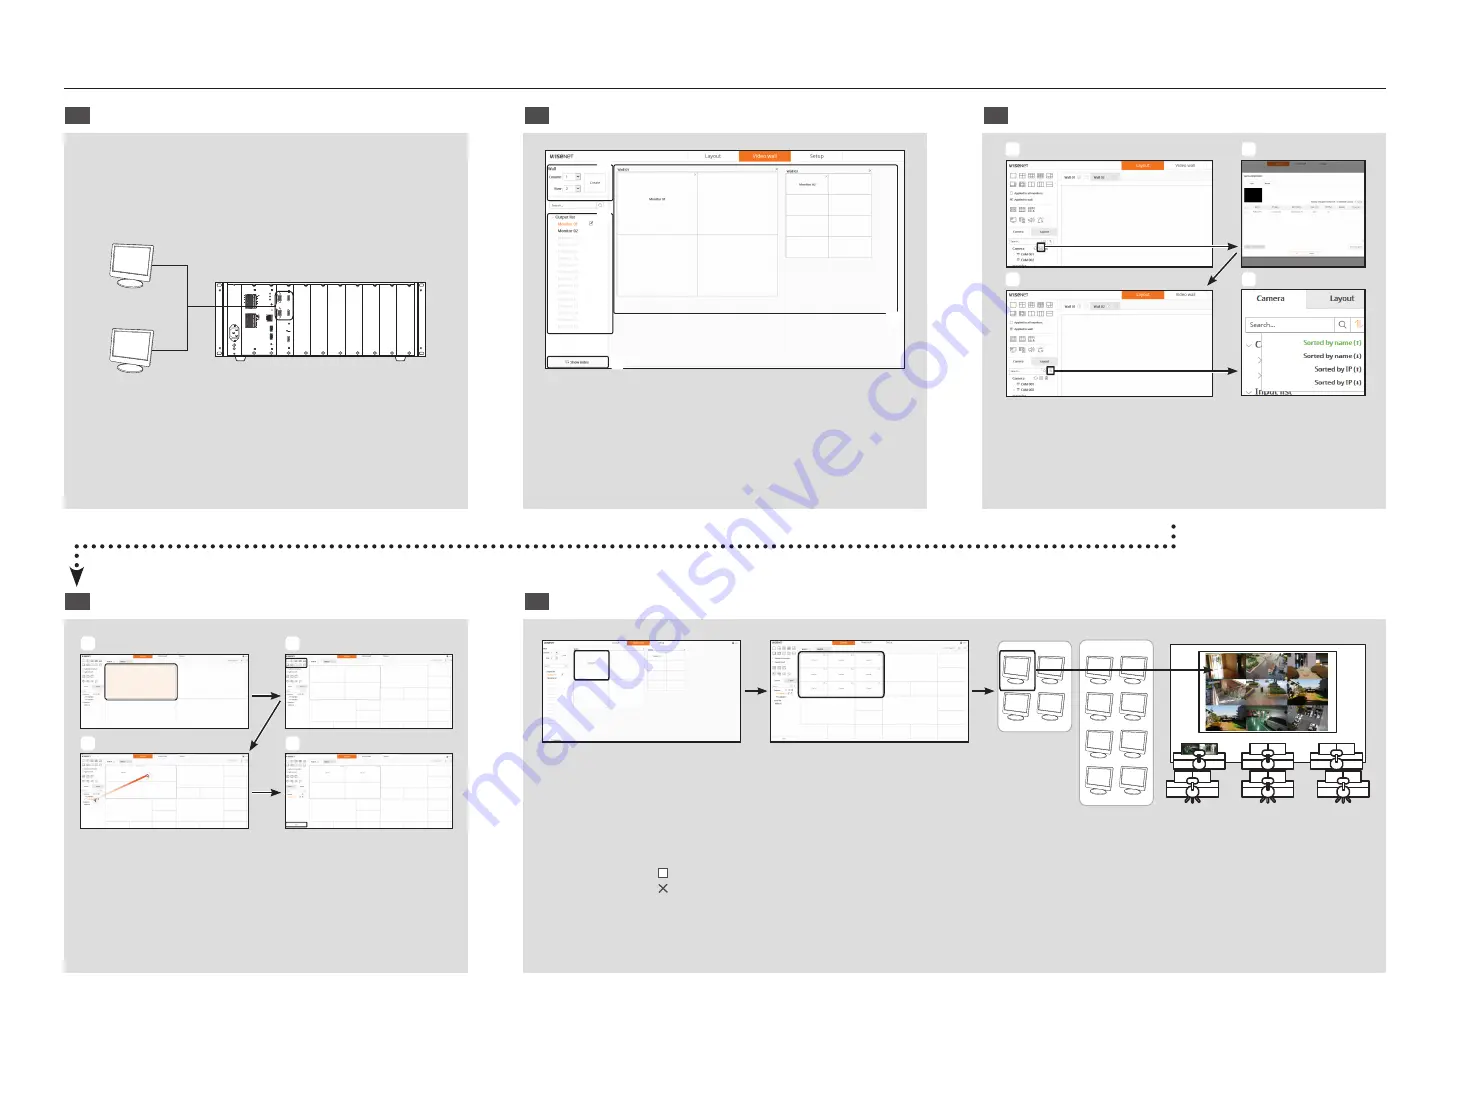
Video wall configuration guide

Monitor output for each decoder after the set boots

Configure the video walls and allocate monitors.

Registering camera

G

RS485

G

1

2

3

4

5

6

7

8

9

10

11

12

13

14

15

16

NO

NO

NO

NO

COM

NO

COM

NO

COM

NO

COM

NO

COM

RESET

COM

COM

COM

NC

G

G

NA

TW

ORK

NE

TWORK

RUN

POWE

R

USB 1

USB 2

AUD

IO

CONSOLE

RESET

CONSOLE

RUN

HDMI 2

HDMI IN

HDMI 1

VGA 2

VGA 1

VIDEO OUT 

(VGA/HDMI)

VIDEO OUT 

(VGA/HDMI)

a

c

d

b

a

  Create video walls.

b

  Add video walls (Wall 01 2x2, Wall 02 2x4)

c

  Assign monitors

d

   Check the actual connected monitor index  

(Show index : monitor number check, Hide index : video mode)

a

c

b

d

a

  Add a camera

b

  Add cameras with automatic/manual registration

c

  Select the camera list sort function

d

  Sort by name(

)/IP or ascending(

)descending. 

Setting Video Wall Layout

Monitoring by video wall

a

c

b

d

a

   Specify the monitor of the corresponding video wall to be 

applied by clicking it

b

   Select and apply a split mode to the selected monitor (Can 

be applied to each monitor)

c

  Assign it to the corresponding tile with the mouse in the camera list

d

   After saving the layout, add a new layout and repeat steps 1 - 4

Monitor 1

Wall 1

Wall 2

Monitor 2

Monitor 1

Monitor 2

a

  Monitor 1 assigned to Wall 01 (2x2)

b

  Assign cameras to 3x3 split mode in layout settings


`

When this is [   ] clicked, the video wall is enlarged to full screen. 

When this is [   ] clicked, the video wall zoom changes to the original size.

c

  3x3 video output on the actual monitor #1

Summary of Contents for SPD-1660R

Page 1: ...NETWORK VIDEO DECODER RACK Quick Manual SPD 1660R ...

Page 2: ...oth sides as shown in the figure and push it in the direction of the arrow CONSOLE RUN HDMI 2 HDMI IN HDMI 1 VGA 2 VGA 1 G RS485 G 1 2 3 4 5 6 7 8 9 10 11 12 13 14 15 16 NO NO NO NO COM NOCOM N OCOM N OCOM N OCOM RESET COM COM COM NC G G NETWORK NETWORK RUN POWER USB 1 USB 2 AUDIO CONSOLE RESET 3 Slide the blade SPD 260B into the rack until the ends of the rack are aligned and tighten the screws T...

Page 3: ...ssword The password is the login password of the admin user when connecting to the network decoder The default password is 4321 J J For the security purposes you are recommended to use a combination of numbers alphabets uppercase and lowercase and special characters for your password 4 Click OK Auto network setup will be completed For the IP installer use only the installer version provided in the...

Page 4: ...mera b Add cameras with automatic manual registration c Select the camera list sort function d Sort by name IP or ascending descending 4 Setting Video Wall Layout 5 Monitoring by video wall a c b d a Specify the monitor of the corresponding video wall to be applied by clicking it b Select and apply a split mode to the selected monitor Can be applied to each monitor c Assign it to the corresponding...

Page 5: ... local government office for details of where and how they can take these items for environmentally safe recycling Business users should contact their supplier and check the terms and conditions of the purchase contract This product and its electronic accessories should not be mixed with other commercial wastes for disposal Correct disposal of batteries in this product Applicable in the European U...

Page 6: ... 373 0124 www hanwhasecurity com Hanwha Techwin Europe Heriot House Heriot Road Chertsey Surrey KT16 9DT United Kingdom Tel 44 1932 57 8100 Fax 44 1932 57 8101 www hanwha security eu Hanwha Techwin Tianjin Co Ltd No 11 Weiliu Rd Micro Electronic Industrial Park Jingang Road Tianjin 300385 China Tel 86 22 2388 7788 www hanwha security cn Hanwha Techwin Middle East FZE JAFZA View 18 20th floor offic...

Reviews: