


3
Manual Network Setup
Run <
IP Installer_v2.XX.exe
> to display the camera search list.
At the initial startup, both [
Auto Set
] and [
Manual Set
] will be grayed out.
1
Select desired network decoders from the search list.
Check the MAC (Ethernet Address) on the back of the
network decoder.
Both the [
Auto Set
] and [
Manual Set
] buttons will be
activated.
2
Click [
Manual Set
].
The Manual Setting dialog appears.
The <
IP Address
>, <
Subnet Mask
>, <
Gateway
>,
<
HTTP Port
>, and <
Port (TCP)
> of the network
decoder are displayed as the previously set values.
3
In the <
Address
> pane, provide the necessary
information.
•
MAC (Ethernet) Address : The MAC address
imprinted on the camera label is automatically
displayed and requires no user setting.
J
`
IP related parameters can be set only when DHCP is not
checked.
Auto Network Setup
Run the <
IP Installer v2 XX.exe
> program to display the network decoder search list.
At the initial startup, both [
Auto Set
] and [
Manual Set
] will be grayed out.
1
Select your desired network decoders from the search
list. Check the MAC (Ethernet Address) on the back of
the network decoder.
Both the [
Auto Set
] and [
Manual Set
] buttons will be
activated.
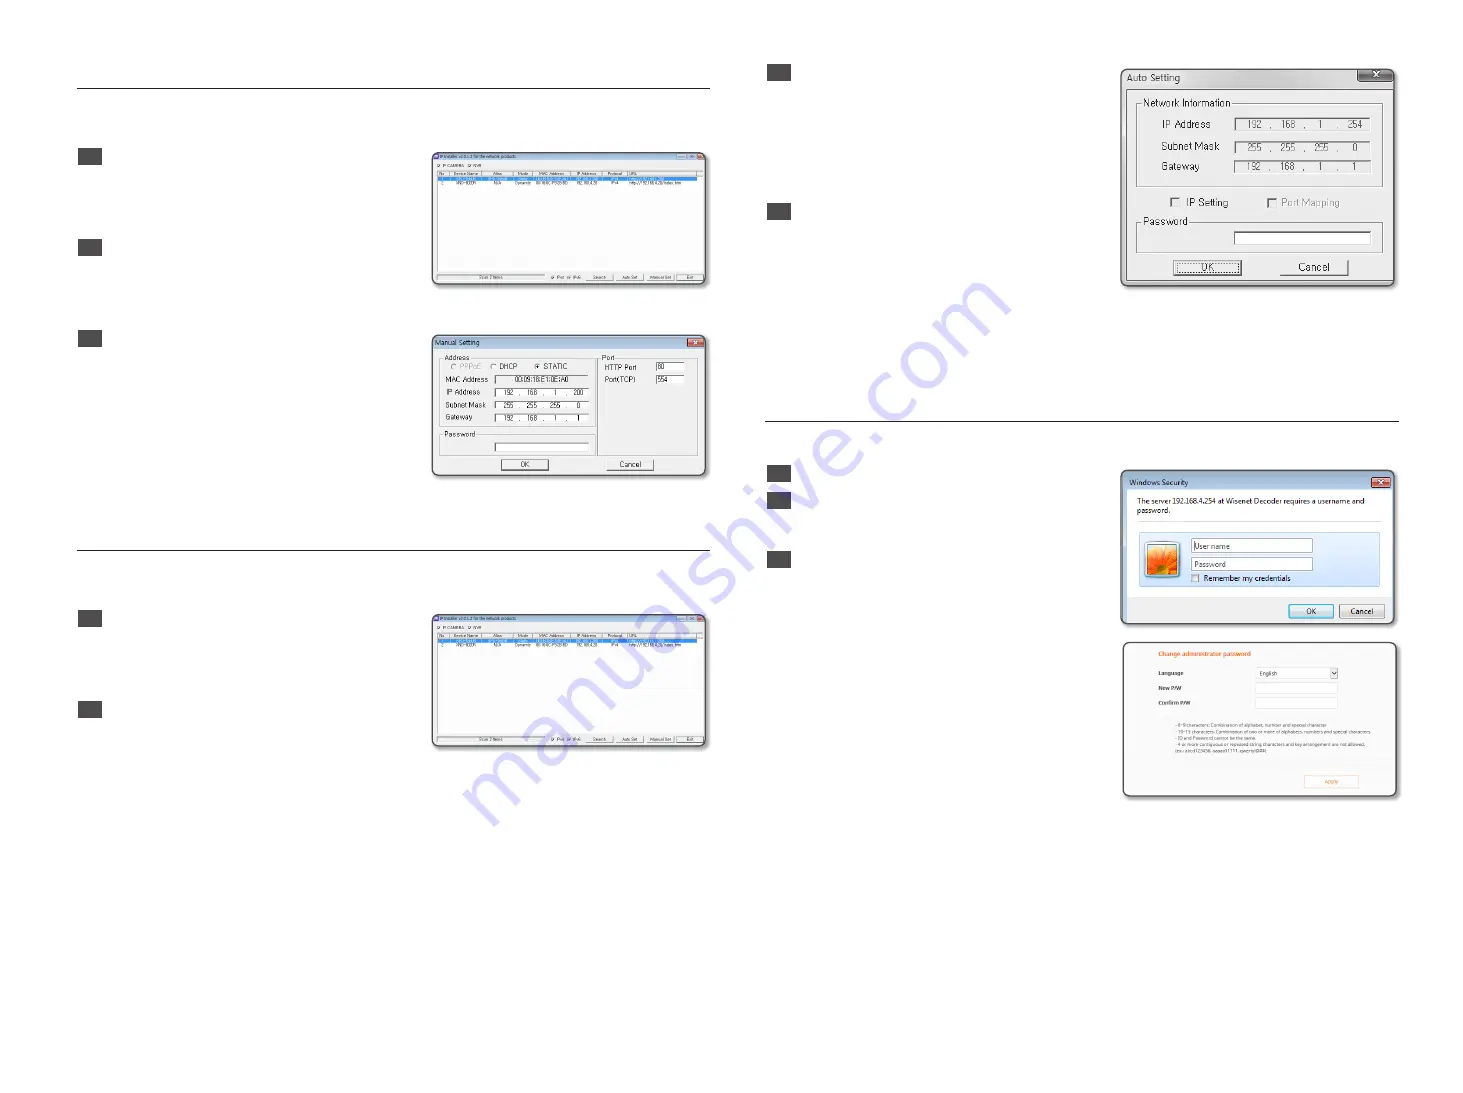
2
Click [
Auto Set
].
The Auto Setting dialog appears.
The <
IP Address
>, <
Subnet Mask
>, and
<
Gateway
> will be set automatically.
3
Enter the password.
The password is the login password of the "
admin
"
user when connecting to the network decoder.
The default password is "
4321
".
J
`
For the security purposes, you are recommended to use
a combination of numbers, alphabets uppercase and
lowercase and special characters for your password.
4
Click [
OK
].
Auto network setup will be completed.
※
For the IP installer, use only the installer version provided in the installation CD or use the latest one if available.
You can download the latest version from the Hanwha Techwin web site.
Login
The first time you connect after purchasing, the ID is "
admin
" and the password is "
4321
".
1
Enter "
admin
" in the <
User name
> input box.
2
Enter "
4321
" in the <
Password
> field. The password
setting window appears for the first time. If you have
changed your password, enter your new password.
3
Click the [
OK
] button. When login is complete, the
video wall setup screen appears.
※
For security, be sure to change the password in
<
User
>-<
Administrator
> in the setting screen.
※
If you enter a user name and password, and then
check the ‘Save password in the password list’
checkbox, the user name and password will be
automatically set for the next time you connect.
J
`
Internet Explorer will display the image best when the aspect ratio is 100%. If you reduce the aspect ratio, the screen may appear
to be ‘cut off’.
`
You cannot double-login with the "
admin
" account.
`
It takes about five minutes after you disconnect from the “
admin
” account to access the user account.


