background image

English_13


INTRODUC

TION

1


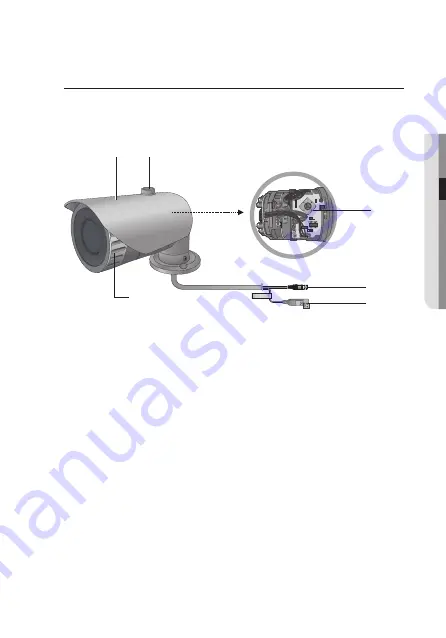
Camera Sunshield

2


Knob Sunshield : 

Fixing the sunshield onto the camera.


Front cover


Function Setup Switch :  

Display the menu on the screen and move the cursor to four 

directions to confirm status or after changing a selected item. 

  Switching between AHD and CVBS modes: Press the SET button 

for more than 5 seconds.


VIDEO OUTPUT jack :  

Video signals are output through this port. Connect this port to the 

Video IN port of a AHD DVR.


Power input terminal : 

Connect the power as specified for each model here.

SCO-6025R

CAUT

IO

N

:B

e w

are

 of

 the

Rated 

Volt

age and 

Polarit

y

of t

he

 po

wer

 con

nec

tio

n.

2

1


M


`

To ensure the weatherproof integrity is maintained, Before installation the front 
cover, it’s necessary to push tight first. and then turn it clockwise to locking 
indication.

Summary of Contents for SCD-6025R

Page 1: ...High Resolution Camera User Manual SCD 6025R SCO 6025R ...

Page 2: ...cumstances this document shall be reproduced distributed or changed partially or wholly without formal authorization Disclaimer Hanwha Techwin makes the best to verify the integrity and correctness of the contents in this document but no formal guarantee shall be provided Use of this document and the subsequent results shall be entirely on the user s own responsibility Hanwha Techwin reserves the ...

Page 3: ... hazard do not expose this appliance to rain or moisture To prevent injury this apparatus must be securely attached to the floor wall in accordance with the installation instructions WARNING 1 Be sure to use only the standard adapter that is specified in the specification sheet Using any other adapter could cause fire electrical shock or damage to the product 2 Incorrectly connecting the power sup...

Page 4: ...N 1 Do not drop objects on the product or apply strong shock to it Keep away from a location subject to excessive vibrationor magnetic interference 2 Do not install in a location subject to high temperature over 55 C low temperature below 10 C SCO 6025R 30 C or high humidity Doing so may cause fire or electric shock 3 If you want to relocate the already installed product be sure to turn off the po...

Page 5: ...Product Waste Electrical Electronic Equipment Applicable in the European Union and other European countries with separate collection systems This marking on the product accessories or literature indicates that the product and its electronic accessories e g charger headset USB cable should not be disposed of with other household waste at the end of their working life To prevent possible harm to the...

Page 6: ... replacement of the obsolete outlet 10 Protect the power cord from being walked on or pinched particularly at plugs convenience receptacles and the point where they exit from the apparatus 11 Only use attachments accessories specified by the manufacturer 12 Use only with cart stand tripod bracket or table specified by the manufacturer or sold with the apparatus 13 Unplug this apparatus when a card...

Page 7: ...uaranteed Install the product by referring to Installation connection in the user manual 19 Installing or using the product in water can cause serious damage to the product Apparatus shall not be exposed to dripping or splashing and no objects filled with liquids such as vases shall be placed on the apparatus WARNING To prevent damage which may caused by IR LED don t stare at operating lamp for be...

Page 8: ...STALLATION 14 14 Before installation 15 Installation SCD 6025R 17 Adjusting the monitoring direction for the camera SCD 6025R CONNECTION 18 18 Connecting to Monitor 19 Connecting to Power 20 Using Coaxial Communications CAMERA OPERATION 22 22 Menu Configuration 22 Menu Setup TROUBLESHOOTING 35 35 Troubleshooting ...

Page 9: ... or night time conditions The COLOR mode operates in daytime condi tions to provide optimum colors and B W mode operates in night time conditions to enhance the definition of the image y y PROFILE You can set a mode according to the camera installation conditions BASIC DAYNIGHT BACKLIGHT ITS INDOOR USER y y DWDR By adopting a proprietary high performance DSP chip the camera delivers clear high qua...

Page 10: ...tion introduction COMPONENTS AND ACCESSORIES Check if the following items are included in the product package SCD 6025R High Resolution Camera User Manual SCD 6025R SCO 6025R Camera UserManual TappingScrew Template ...

Page 11: ...English_11 INTRODUCTION SCO 6025R High Resolution Camera User Manual SCD 6025R SCO 6025R Camera UserManual TappingScrew Template ...

Page 12: ...onfirm status or after changing a selected item Switching between AHD and CVBS modes Press the SET button for more than 5 seconds Pan Base Control panning angle of camera Power Input Connector Video Output Jack Video signals are output through this port Connect this port to theVideo IN port of a AHD DVR IR LED These infrared LED s are controlled by the illumination sensor IIIumination sensor Detec...

Page 13: ...s the SET button for more than 5 seconds VIDEO OUTPUT jack Video signals are output through this port Connect this port to the Video IN port of a AHD DVR Power input terminal Connect the power as specified for each model here SCO 6025R CAUTION Be ware of the Rated Voltage and Polarity of the power connection 2 1 3 5 6 4 M M To ensure the weatherproof integrity is maintained Before installation the...

Page 14: ...hol solvent and or surfactant since they can cause product damage or deformation y y Install the camera in a cool area with no direct sunlight y y If you forcibly install the product the camera may be damaged due to misoperation If you forcibly assemble the product using an incompatible tool the product may be damaged y y Do not install the product in an area where chemical substances or oil vapor...

Page 15: ...English_15 INSTALLATION INSTALLATION SCD 6025R Disassembling 1 Use one hand to hold the camera s bottom part and turn the cover counterclockwise with another hand to separate it ...

Page 16: ... supplied screws to fix the camera to the 2 punched holes y y Set the FRONT mark imprinted on the camera to face the direction of camera monitoring 3 Adjust the lens in a desired direction by referring to the Adjusting the monitoring direction for the camera section 4 Attach the dome cover and the shield case to the main body M M Pay attention to the direction for assembly 케이블 구멍 ...

Page 17: ...the tilt is called Tilt and turning the lens on its axis is called Rotation The effective range of pan is a total of 350 degrees The effective range of rotation is a total of 355 degrees The effective range of tilt is a total of 67 degrees Methods of adjustment 1 After installing the camera adjust the panning angle in consideration of the monitoring direction 2 Set the horizontal angle so that the...

Page 18: ...R y y As the connecting method varies with the instruments refer to the manual supplied with the instrument y y Only connect the cable when the power is turned off SCD 6025R AHD DVR AHD DVR Monitor SCO 6025R Monitor POWER VIDEO RE C HD D ALAR M NETWOR K BACKUP POWE R POWER VIDEO RE C HD D ALAR M NETWOR K BACKUP POWE R ...

Page 19: ...following figure Power Input Terminal SCD 6025R Power Input Terminal SCO 6025R When the resistance value of copper wire is at 20 C 68 F Copperwiresize AWG 24 0 22mm2 22 0 33mm2 20 0 52mm2 18 0 83mm2 Resistancevalue Ω m 0 078 0 050 0 030 0 018 VoltageDrop V m 0 028 0 018 0 011 0 006 ...

Page 20: ...peration DC 12V 10 There may be some deviation in voltage drop depending on the type of wire and the manufacturer M M Be sure to connect power only after all the installation is complete USING COAXIAL COMMUNICATIONS y y Coaxial Communications System y y OSD Control method CAMERA DVR SET MENU ENTER UP UPKEY DOWN DOWNKEY LEFT LEFTKEY RIGHT RIGHTKEY POWER VIDEO RE C HD D ALAR M NETWOR K BACKUP POWE R...

Page 21: ...s connected to the DVR with a BNC coaxial cable shown below Distance Recommended Cable Specification 500m 5C2V M M It is recommended that pure copper coax cable is used and not copper coated steel as this will cause issues with the communication over the coaxial cable ...

Page 22: ... BAL ATW OUTDOOR INDOOR MANUAL AWC SET EXPOSURE BRIGHTNESS LENS SHUTTER AGC SSNR4 DWDR RETURN BACKLIGHT OFF USERBLC HLC SPECIAL DISPLAY COAX IMAGEADJ DAY NIGHT DEFOG PRIVACY MOTION RETURN EXIT SAVE NOTSAVE RESET MENU SETUP Use the Function Setup switch within the camera camera operation Function Setup switch SCD 6025R SCO 6025R ...

Page 23: ...ettings VIDEO FORMAT 1 When the SETUP menu screen is displayed select VIDEO FORMAT by using the Function Setup switch so that the arrow indicates VIDEO FORMAT 2 Select a desired mode using the Function Setup switch y y The video output can be selected from AHD CVBS M M By pressing the function setting button for more than 5 seconds you can change the setting from AHD to CVBS From CVBS you can chan...

Page 24: ... to help you take a picture in a regular indoor lighting condition y y USER Automatically configures the camera to your custom settings 1 Select Custom for Simple Setup mode 2 Configure the menu options to your custom settings 3 The settings are automatically saved as Custom mode 4 Profile user mode don t initialize when menu resets 3 In the PROFILE menu you can configure the following camera sett...

Page 25: ...e WhiteBalancemanually SetWhiteBalancefirstby usingtheATWorAWC mode Afterthatbuttonto MANUALmode fine tune theWhiteBalanceandtheFunctionSetupswitch y y AWC SET Tofindtheoptimalluminancelevelforthecurrentenvironment pointthe cameratowardsasheetofwhitepaperandpresstheFunctionSetupswitch If theenvironmentchanges readjustit M M White Balance may not work properly under the following conditions In this...

Page 26: ...talled lighting frequency M M The greater the shutter value the brighter the screen is but the more the residual images of objects there are If the min shutter value is large it can cause noise spots and white areas but still operate normally If you do not use the AGC mode on the exposure menu it cannot be set above 1 60sec Depending on the setting range of the minimal maximal shutter the screen e...

Page 27: ... there are both bright and dark areas at the same time this mode makes both areas distinctive LEVEL Select one from low middle high to adjust the brightness of the DWDR setup M M In DWDR mode there can be noise between a bright and dark area Depending on light conditions unnatural changes or symptoms can occur on the screen so deactivate the user mode DWDR SETUP 1 LEVEL IIIIIIIIIIIIIIIIIIIII 6 2 R...

Page 28: ...evel of a monitoring area LIMIT Enable to change the operating condition TOP BOTTOM LEFT RIGHT Adjust the area to be enhanced RETURN Return to the MAIN SETUP menu M M If the white balance menu is set to manual then HLC performance can be limited If you use the defog and HLC functions at the same time saturation can occur in a bright environment Because there can be a difference in the effectivenes...

Page 29: ... Enteratitle movethecursorto POS andpressthe FunctionSetupswitch Theenteredtitleappearson thescreen Selectthepositiontodisplaythetitleon thescreenbyusingtheFunctionSetupswitchand presstheFunctionSetupswitch Whentheposition isdetermined select END andpresstheFunction SetupswitchtoreturntotheDISPLAYmenu M M When the CAMTITLE menu is OFF no title will be displayed on the monitor screen even if you en...

Page 30: ...range is 1 100 The smaller the setting value is the smaller the color gain gets and the more color blind it gets H REV Flip an image horizontally V REV Flip an image vertically SHARPNESS Select a mode to adjust the thickness of an image s sharpness Increase or decrease the level of each mode to adjust the level of sharpness y y OFF Released state y y ON The setting range is 1 32 RETURN Return to t...

Page 31: ...turation at the center of the screen will be prevented depending on the set screen size so that the camera can identify a subject even at a close distance M M If you set the AGC mode to off on the exposure menu you cannot switch the day night mode to auto When a bright light source is in the screen or there are frequent brightness changes if you use the auto night day mode and set the switching ti...

Page 32: ...nual If there is little fog and the manual fog level is high the screen contrast can get high y y PRIVACY Maskanareayouwanttohideonthescreen If the SPECIAL menu screen is displayed use the Function Setup switch so that the arrow indicates PRIVACY Select a desired mode using the Function Setup switch y y AREA You can select up to 8 PRIVACY areas y y MODE Determines whether to use the area selected ...

Page 33: ... or removes transparency from the masking area TOP BOTTOM LEFT RIGHT Area location can be adjusted RETURN Return to the MOTION DET menu y y ARM OUT When object movement is detected the detection signal will be outputted OSD Display signals on the screen RETURN Return to the MOTION DET menu y y SENSITIVITY Set the sensitivity of the motion detection When you adjust the higher level the more sensiti...

Page 34: ...the consecutive frames If there are reflections blurs shadows created by a strong light such as direct sunlight lights and headlights Severe snow rain and wind Sunset or sunrise If the size is greater than the max size or smaller than the min size motion is not detected To avoid false detection caused by noises set the max min detection size suitable for the installation environment But the same m...

Page 35: ...condition y y If the camera is exposed to very strong light change the camera position The image on the screen is dark y y Adjust the contrast feature of the monitor or DVR y y If you have an intermediate device set the 75Ω Hi z properly The camera is not working properly and the surface of the camera is hot y y Check that you have properly connected the camera to an appropriate power source he DA...

Page 36: ......

Reviews: