background image

USER MANUAL 

CHAPTER 3 

AMI UEFI BIOS SETUP 

IKMH100 M-SERIES BOX PC 

38 


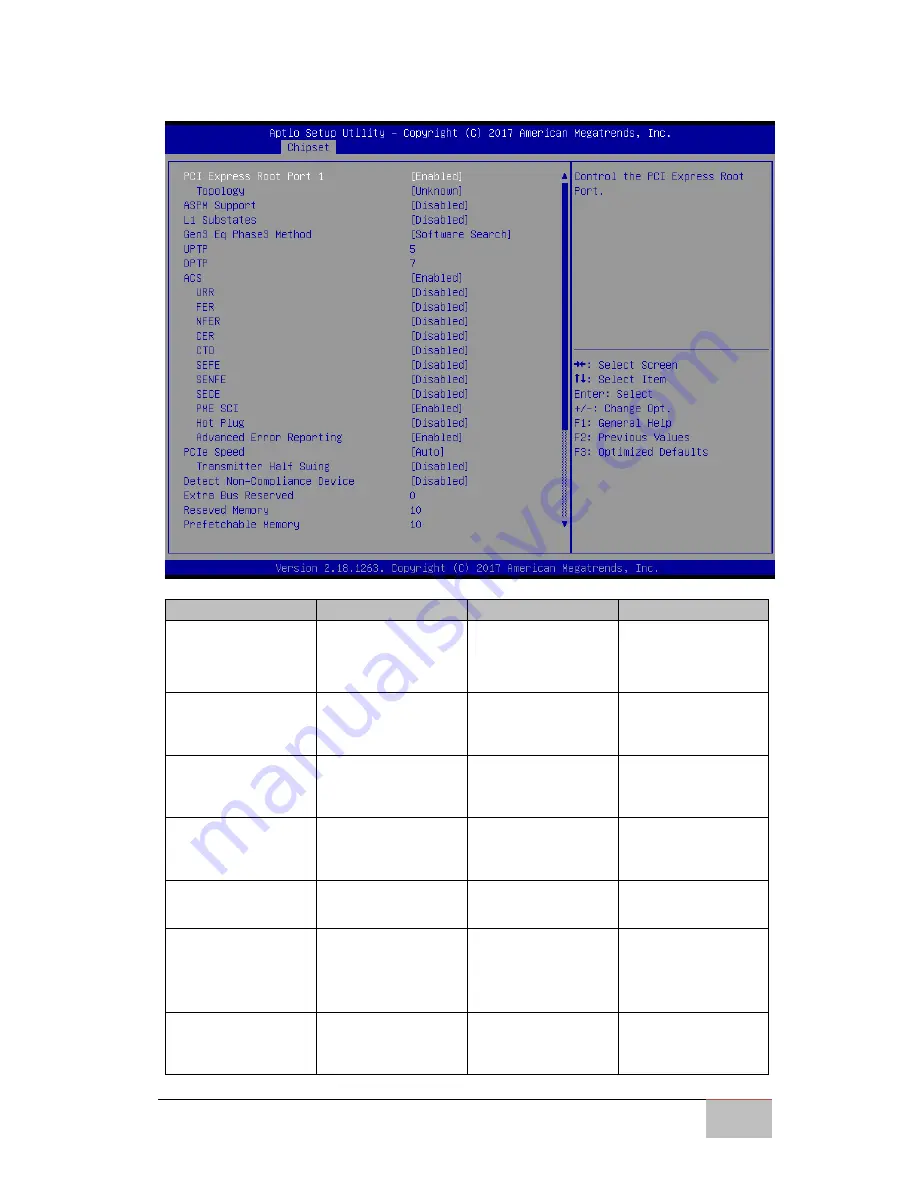
PCI Express Root 


BIOS Setting 

Description 

Setting Option 

Effect 

PCI Express Root 
Port 1 

The control of PCI 
Express Root Port 

Enable/ 

Disable 

Enables or disables 
this function 

ASPM Support 

Configures ASPM 
Support 
parameters 

Enable/ 

Disable 

Enables or disables 
this function 

L1 Substates 

Configures L1 
Substates 
parameters 

L1.1 & L1.2 

Setting up L1 
Substates 
parameters 

Gen3 Eq Phase3 
Method 

Configures Gen3 Eq 
Phase3 Method 

Software Search 

Setting up Gen3 Eq 
Phase3 Method 
parameters 

PCI Speed 

Configures PCI 
Speed parameters 

Auto 

Setting up PCI 
Speed 

Detect 
Non-Compliance 
Device 

Detect the device 
that is not 
compliant to the 
system settings 

Enable/ 

Disable 

Enables or disables 
this function 

Extra Bus Reserved 

Configures Extra 
Bus Reserved 
parameters 

Set the value 

Setting up the 
value 

Summary of Contents for IKMH100

Page 1: ...IKMH100 Intel Core i5 6200U 2 3 GHz up to 2 8 GHz M Series Box PC User Manual Version 1 0 ...

Page 2: ...described in this manual are for illustration purposes only We make no representation or warranty that such application will be suitable for the specified use without further testing or modification Warranty We warrant that each of its products will be free from material and workmanship defects for a period of one year from the invoice date Standard is one year extended warranty will need to discu...

Page 3: ...d to prepare the following information before you call Product serial number Peripheral attachments Software OS version application software etc Detailed problem description The exact wording of any error messages In addition free technical support is available from our engineers every business day We are always ready to give advice on application requirements or specific information on the instal...

Page 4: ...tant Cautions and Warnings The following is an example of each type of advisory NOTE A note is used to emphasize helpful information IMPORTANT An important note indicates information that is important for you to know CAUTION A Caution alert indicates potential damage to hardware and explains how to avoid the potential problem WARNING An Electrical Shock Warning indicates the potential harm from el...

Page 5: ... use liquid or spray detergents for cleaning Use a damp cloth 3 For pluggable equipment the power outlet must be installed near the equipment and must be easily accessible 4 Put this equipment on a reliable surface during installation Dropping it or letting it fall could cause damage 5 Make sure the voltage of the power source is correct before connecting the equipment to the power outlet 6 Positi...

Page 6: ......

Page 7: ...for the M Series Box PC provides information for specific user needs and includes M Series Box PC User Manual contains detailed description on how to use the Box PC its components and features M Series Quick Start Guide describes how to get the device up and running NOTE Some pictures in this guide are samples and can differ from actual product Document Revision History Version Date Note 1 0 7 Mar...

Page 8: ......

Page 9: ...Line In and Line Out 8 2 1 3 Serial Port Connector 8 2 1 4 USB 3 0 Connector 9 2 1 5 VGA Output Connector 9 2 1 6 HDMI Output Connector 9 2 1 7 Giga LAN Connector 10 2 2 CONFIGURING SERIAL PORT SETTINGS 11 2 3 HARDWARE INSTALLATION 12 2 3 1 Hard Disk Replacement 12 2 3 2 PCI Card RAM Internal SSD Fuse Replacement 13 2 3 3 Expansion Slot Replacement Preliminary 15 CHAPTER 3 AMI UEFI BIOS SETUP 17 3...

Page 10: ... INSTALLATION 55 4 3 ME AND NET FRAMEWORK 1 1 DRIVER INSTALLATION 59 4 4 AUDIO DRIVER INSTALLATION 64 4 5 LAN DRIVER INSTALLATION 66 4 6 RST DRIVER INSTALLATION 69 4 7 MICROSOFT NET FRAMEWORK DRIVER INSTALLATION 73 4 8 WATCHDOG DRIVER INSTALLATION 75 CHAPTER 5 TECHNICAL SUPPORT 80 5 1 SOFTWARE DEVELOPER SUPPORT 80 5 2 PROBLEM REPORT FORM 81 APPENDIX A PCIE CARD DIMENSIONS 83 APPENDIX B PRODUCT SPE...

Page 11: ...USER MANUAL CHAPTER 1 GENERAL INFORMATION 1 IKMH100 M SERIES BOX PC GENERAL INFORMATION This chapter includes IKMH100 M Series Box PC background information ...

Page 12: ...and VGA outputs two serial ports and one 2 5 SSD Bay M Series Box PC perfectly fits in applications where total costs of ownership TCO and quick recovery of failure is important The flexible system design provides easy access to components and can be serviced by local maintenance team Versatile easy to service and upgradable IKMH100 offers the best solution for industrial and building automation 1...

Page 13: ... the items listed below are inside your package If any of these items are missing or damaged contact us immediately Standard factory shipment list IKMH100 Box PC Driver CD User Manual Quick Start Guide Hardcopy Varies by product specifications 9171111I102Z 915211101023 Open Wire Cable Power Cord AC Adapter Terminal Block 12V 80W 94EL02X020E0 Varies by country 90PO12080007 ...

Page 14: ...el consists of 2 5 SSD Bay power reset buttons audio jacks two RJ45 connectors HDMI and VGA outputs and four USB 3 0 ports IKMH100 M Series Box PC has customizable expansion slot Preliminary Figure below shows the dimensions of the Winmate IKMH100 M Series Box PC Measurements shown in mm All Dimensions are 0 5 mm Note this is a simplified drawing and some components are not marked in detail ...

Page 15: ...a LAN Line in USB 3 0 x 2 Line out USB 3 0 x 2 HDD LED indicator HDMI output Reset VGA Output Power Button RS 232 422 485 Expansion slot configurations Preliminary USB 2 0 x 4 Giga LAN x 2 COM x 2 3G with SIM x 1 USB 3 0 x 2 1 5 Power Button IKMH100 Box PC has a Power On Off button on the front side 1 6 Reset Button IKMH100 Box PC has a Reset Button located on the front side Press reset button to ...

Page 16: ...MH100 M SERIES BOX PC 6 1 7 LED Indicator The IKMH100 provides one HDD LED indicator for status monitoring LED Indicator LED Indicator Color Description HDD Off Slot is empty drive is not yet discovered by the system Green HDD operating normally ...

Page 17: ...NSTALLATION 7 IKMH100 M SERIES BOX PC HARDWARE INSTALLATION This chapter provides information on how to use jumpers and connectors on the motherboard and the IKMH100 M Series Box PC hardware specifications and installation instruction ...

Page 18: ...V DC input 2 1 2 Mic In Line In and Line Out 2 1 3 Serial Port Connector The IKMH100 Box PC uses D SUB 9pin connector to connect serial interfaces Serial port settings can be configured for RS 232 RS 422 or RS 485 by jumpers Refer to Ch 2 Configuring Serial Port Settings section of this user manual for the instruction on how to configure serial port settings Voltage Minimum Voltage 9V Maximum Volt...

Page 19: ...in female output connector to connect the HMI device to an external display Pin Signal Name Pin Signal Name 1 5V 2 USB_D 3 USB_D 4 GND 5 STDA_SSRX 6 STDA_SSRX 7 GND_DRAIN 8 STDA_SSTX 9 STDA_SSTX Pin Signal Name Pin Signal Name 1 RED 2 GREEN 3 BLUE 4 ID2 RES 5 GND 6 RED_RTN 7 GREEN_RTN 8 BLUE_RTN 9 KEY PWR 10 GND 11 ID0 RES 12 ID1 SDA 13 HSync 14 VSync 15 ID3 SCL Pin Signal Name Pin Signal Name 1 T...

Page 20: ...ATION IKMH100 M SERIES BOX PC 10 2 1 7 Giga LAN Connector The IKMH100 equipped with one RJ45 10 100 1000 Mbps Ethernet interface for connecting to the internet Pin Signal Name Pin Signal Name 1 TX1 2 TX1 3 TX2 4 TX2 5 TX3 6 TX3 7 TX4 8 TX4 ...

Page 21: ...liers may be helpful when working with jumpers If you have any doubts about the best hardware configuration for your application contact your local distributor or sales representative before you make any changes Generally you simply need a standard cable to make most connections The jumper setting diagram is shown below When the jumper cap is placed on both pins the jumper is SHORT The illustratio...

Page 22: ... is serviced users should be aware of this condition 2 3 1 Hard Disk Replacement To remove the hard disk 1 Loosen by hand one thumbscrew on the rear bottom side of the device In order to loosen the screw slightly push the screw and turn it to the left 2 Open the cover door 3 Carefully pull the 2 5 hard disk bay out of the slot 4 The hard disk bay don t not fall out by itself the retaining springs ...

Page 23: ...RAM Internal SSD Fuse Replacement To remove the PCI card RAM Internal SSD Fuse 1 Turn the device right side up with the back toward you 2 Loosen two Philips M3x5 screws that secure side cover 3 Loosen four Philips M3x5 screws that secure top cover 4 Remove PCI card RAM Internal SSD Fuse ...

Page 24: ...USER MANUAL CHAPTER 2 HARDWARE INSTALLATION IKMH100 M SERIES BOX PC 14 Reverse this procedure to install the PCI card RAM Internal SSD Fuse ...

Page 25: ...n Slot Replacement Preliminary IKMH100 M Series Box PC has customizable expansion slot To replace expansion slot 1 Undo two screws that secure expansion slot to the Box PC 2 Remove the slot 3 Replace the slot with a new one if needed Reverse this procedure to install the expansion slot ...

Page 26: ...KMH100 M SERIES BOX PC 16 AMI UEFI BIOS SETUP BIOS Setup Utility is a program for configuration basic Input Output system settings of the computer for optimum use This chapter provides information on how to use BIOS setup its functions and menu ...

Page 27: ...board press Del key when the prompt appears on the screen during start up The prompt screen shows only few seconds you need to press Del key quickly If the message disappears before your respond restart the system by turning it OFF and ON and enter the BIOS again IMPORTANT Updated BIOS version may be published after the manual released Check the latest version of BIOS on the website Run BIOS setup...

Page 28: ...TER select the device used for the boot Pause Pressing the Pause key stops the POST Press any other key to resume the POST The following Keys can be used after entering the BIOS Setup Key Function F1 General Help F2 Previous Values F3 Optimized Defaults F4 Save Exit Esc Exit Change Opt Enter Select or execute command Cursor Moves to the previous item Cursor Goes to the next item Cursor Moves to th...

Page 29: ...u When you enter BIOS setup the first menu that appears on the screen is the main menu It contains the system information including BIOS version processor RC version system language time and date Immediately after the DEL key is pressed during startup the main BIOS setup menu appears ...

Page 30: ...screen IMPORTANT Handle advanced BIOS settings page with caution Any changes can affect the operation of your computer Advanced Configuration and Power Interface ACPI settings allow to control how the power switch operates The power supply can be adjusted for power requirements You can use the screen to select options of ACPI configuration A description of the selected items will appear on the rig...

Page 31: ... F81866 Super IO settings Enter Opens submenu Hardware Monitor Configures Hardware Monitor settings Enter Opens submenu RTC Wake Settings Configures RTC Wake parameters Enter Opens submenu CPU Configuration Configures CPU settings Enter Opens submenu SATA Configuration Configures SATA parameters Enter Opens submenu Network Stack Configuration Configures Network Stack Configuration parameters Enter...

Page 32: ...ading is a function in processors that speeds up computer performance Enable Disable Enables or Disables this function Execute Disabled Bit EDB is a hardware based security component used in the central processing unit CPU to separate areas of a memory as storage of processor instructions or as storage of data Enable Reduces a computer system s or a server s vulnerability to viruses and malicious ...

Page 33: ...y the manufacturer Turbo Allows processor cores to run faster than the frequency recommended by the manufacturer EIST Enhanced Intel SpeedStep Technology gives your OS the ability to switch the processor s speed and voltage up and down to preserve power when not much is being computed Enabled Disabled Enable or disable this function Turbo Mode Adjusts the power and clock speed of processor cores a...

Page 34: ...port for security device O S will not show Security Device TCG EFI protocol and INT1A interface will not be available Enabled Disabled Enable or disable this function TPM State Trusted Platform Module TPM parameters Enabled Disabled Enable or disable this function Pending operation Pending operation parameters None Shows the number of pending operations Device Select Selects the device Auto ...

Page 35: ...Settings BIOS Setting Description Setting Option Effect Enable ACPI Auto Configuration Enable or disable BIOS ACPI Auto Configuration Enabled Disabled Enable or disable this function Enable Hibernation To enable or disable hibernation Enabled Disabled Enable or disable this function ...

Page 36: ...f Serial Ports User can Enable Disable the serial port and select optimal settings for the super IO Device Enabled Disabled Default Enable Enable or disable Serial Port COM Watch Dog Timer Select This watchdog timer can be used to monitor system software operation and take corrective action if the software fails to function after the programmed period Enabled Disabled Enable or disable this functi...

Page 37: ...USER MANUAL CHAPTER 5 AMI UEFI BIOS SETUP 27 IKMH100 M SERIES BOX PC 3 2 2 5 Hardware Monitor You can check PC Health Status parameters such as system temperature fan speed etc ...

Page 38: ... 2 2 6 RTC Wake Settings BIOS Setting Description Setting Option Effect Wake system from S5 Configure wake from full shutdown and boot mode S5 system setting Enabled Disabled Enable or disable this function When enabled the system will wake on full shutdown and boot mode ...

Page 39: ...oller s Enabled Disabled Enable or disable this function SATA Mode Selection Allows users to select mode of SATA controller s AHCI Work in AHCI mode of SATA controller s SATA Controller Speed Allows users to select mode of SATA Controller Speed Default SATA Controller Speed default settings Serial ATA Port 0 1 2 Allows users to enable or disable the SATA Port Enabled Disabled Enable or disable thi...

Page 40: ...bility by emulating a BIOS environment allowing legacy operating systems and some option ROMs that do not support UEFI to still be used Enabled Disabled Enable or disable the Compatibility Support Module GetaA20 Active Activate GetaA20 Upon Request Enable or disable this function Option ROM Messages Receiving ROM Messages Settings Force BIOS Set ROM messages parameters Network Specifies which Netw...

Page 41: ...nable or disable USB port Auto Disable legacy support if no USB devices are connected Disable Will keep USB devices available only for EFI applications Enable Enable all the USB devices XHCI Hand off This is a workaround for OSs without XHCI hand off support The XHCI ownership Change should claim by XHCI driver Disable Disables this function Enable Enables this function ...

Page 42: ...rt Disable Disables this function Enable Enables this function USB Transfer time out The time out value for control bulk and interrupt transfers 1 Sec 5 Sec 10 Sec 20 Sec Depends on the time out value Device Reset time out USB mass storage device start unit command time out 10 Sec 20 Sec 30 Sec 40 Sec Depends on the time out value Device power up delay Maximum time the device will take before it p...

Page 43: ...OS SETUP 33 IKMH100 M SERIES BOX PC 3 2 3 Chipset Menu BIOS Setting Description Setting Option Effect System Agent SA Configuration System Agent SA Parameters Enter Opens submenu PCH IO Configuration PCH Parameters Enter Opens submenu ...

Page 44: ... Setting Description Setting Option Effect VT d VT d can help end users improve security and reliability of the systems and also improve performance of I O devices in virtualized environment Enable Disable Enables or disables this function Graphics Configuration Configures Graphics parameters Enter Opens submenu ...

Page 45: ...l Graphics Configures Internal Graphics parameters Auto Set up internal graphics parameters Aperture Size Configures aperture size settings 256MB Set up aperture size parameters DVMT Pre Allocation Configures DVMT Pre Allocation parameters 32M Set up DVMT Pre Allocation parameters DVMT Total Gfx Mem Configures DVMT Total Gfx Mem parameters 256M Set up DVMT Total Gfx Mem parameters Gfx Low Power Mo...

Page 46: ...ubmenu PCH LAN Controller Configures PCH LAN Controller parameters Enable Disable Enables or disables this function Wake on LAN Set up wake on LAN function Enable Disable Enables or disables this function SLP_A4 Assertion Width Configures SLP_A4 Assertion Width parameters 4 5 seconds Set up SLP_A4 Assertion Width parameters Restore AC Power Loss Enabling this will allow the computer to power up on...

Page 47: ...ol The control of Active State Power Management on both NB side and SB side of the DMI Link Enable Disable Enables or disables this function DMI Link Extended Synch Control The control of DMI Link Extended Synch parameters Enable Disable Enables or disables this function PCI Express Root Port 1 6 PCI Express Root Port 1 6 parameters Enter Opens sub menu see next section ...

Page 48: ... this function L1 Substates Configures L1 Substates parameters L1 1 L1 2 Setting up L1 Substates parameters Gen3 Eq Phase3 Method Configures Gen3 Eq Phase3 Method Software Search Setting up Gen3 Eq Phase3 Method parameters PCI Speed Configures PCI Speed parameters Auto Setting up PCI Speed Detect Non Compliance Device Detect the device that is not compliant to the system settings Enable Disable En...

Page 49: ...figures Prefetchable Memory parameters Set the value Setting up the value USB Configuration BIOS Setting Description Setting Option Effect USB Precondition Allows user to enable or disable USB Precondition Enable Disable Enables or disables this function USB Ports Per Port Disable Control Control each of the USB ports 0 XX disabling Enable Disable Enables or disables this function ...

Page 50: ...o your preference BIOS Setting Description Setting Option Effect Administrator Password Displays whether or not an administrator password has been set Enter Enter password User Password Display whether or not a user Password has been set Enter Enter password Secure Boot Menu This feature designed to prevent malicious software and unauthorized media from loading during the boot process Enter Opens ...

Page 51: ...Secure Boot Secure Boot is a feature designed to prevent malicious software and unauthorized media from loading during the boot process Enable Disable Enables or disables this function Secure Boot Management Manage Secure Boot settings Custom Configure Secure Boot parameters Key Management Setting Key Management parameters Enter Opens sub menu ...

Page 52: ...USER MANUAL CHAPTER 3 AMI UEFI BIOS SETUP IKMH100 M SERIES BOX PC 42 Key Management ...

Page 53: ...p prompt screen Enter Set the prompt timeout Boot NumLock State Enables or disables NumLock feature on the numeric keypad of the keyboard after the POST Default On On Remains On Off Remains OFF Quite Boot Determines if POST message or OEM logo default Black background is displayed Disabled Disables this function Enabled Enables this function Boot Mode Select Select boot mode LEGACY UEFI Select LEG...

Page 54: ...ll boot order from the available devices Ex Boot Option 1 network Options 1 7 Ex Set Network as the first priority Hard Drive 2 BBS Priorities Specifies the boot order for Hard Drive BBS parameters Enter Enter the submenu USB Key Drive Priorities Specifies the boot order for USB Key Drive Enter Enter the submenu ...

Page 55: ... exits the BIOS Setup without saving the changes made in BIOS Setup to the CMOS YES Saves the changes NO Return to the BIOS Setup Main Menu Save Changes and Reset Reset the system after saving the changes YES Saves the changes NO Return to the BIOS Setup Main Menu Discard Changes and Reset Reset system setup without saving any changes YES Saves the changes NO Return to the BIOS Setup Main Menu Sav...

Page 56: ...d default values for all the setup options YES Saves the changes NO Return to the BIOS Setup Main Menu Save as User Defaults Save the changes done so far as User defaults YES Saves the changes NO Return to the BIOS Setup Main Menu Restore User Defaults Restore the User Defaults to all the setup options YES Saves the changes NO Return to the BIOS Setup Main Menu Launch EFI Shell Launch Extensible F...

Page 57: ...ata will be lost after the recovery process To enable quick one key recovery procedure Plug in the AC adapter to the series computer Make sure the computer stays plugged in to power source during the recovery process Turn on the computer and when the boot screen shows up press the F6 to initiate the Recovery Wizard The following screen shows the Recovery Wizard Click Recovery button to continue ...

Page 58: ...ss will show up Make sure the data is backed up before recovery and click Yes to continue Wait the recovery process to complete During the recovery process a command prompt will show up to indicate the percent of recovery process complete The system will restart automatically after recovery completed ...

Page 59: ...lity Find more information on Watchdog in Watchdog Guide that you can download from Winmate Download Center or File Share Refer to the User Manual for more details To enable watchdog in Watchdog AP follow the instructions below 1 On the right bottom side of the desktop screen click triangle button to show hidden icons 2 Click icon to open Watchdog utility ...

Page 60: ...se any error occurs the system will restart automatically when the countdown time reaches 0 Every 9 min watchdog timer will be reset to 10 min Setting Description Watchdog Countdown Time The system automaticity restarts when this countdown time reaches zero Default 10 min Periodically Feed Time To set a cycle time to automatically reset watchdog timer Default 9 min Enable Disable Enable or disable...

Page 61: ...USER MANUAL CHAPTER 4 DRIVER INSTALLATION 51 IKMH100 M SERIES BOX PC DRIVER INSTALLATION This chapter provides driver installation instructions ...

Page 62: ...ructions on how to install drivers on the IKHM100 M Series Box PC 4 1 Chipset Driver Installation Follow instructions below to install Chipset driver 1 Open the Driver CD included in the package and select Chipset driver 2 Installation window will pop up select Next 3 Select Accept to agree with the terms of license agreement ...

Page 63: ...USER MANUAL CHAPTER 4 DRIVER INSTALLATION 53 IKMH100 M SERIES BOX PC 4 Check the ReadMe file information select Install to continue ...

Page 64: ...USER MANUAL CHAPTER 4 DRIVER INSTALLATION IKMH100 M SERIES BOX PC 54 5 Wait for the driver to be installed 6 When installation completed select Restart Now to restart your computer ...

Page 65: ...LLATION 55 IKMH100 M SERIES BOX PC 4 2 Graphic Driver Installation Follow instructions below to install Graphic driver 1 Open the Driver CD included in the package and select Graphic driver 2 Installation window will pop up select Next ...

Page 66: ...USER MANUAL CHAPTER 4 DRIVER INSTALLATION IKMH100 M SERIES BOX PC 56 3 Select Yes to agree with the terms of license agreement 4 Check the ReadMe file information select Next to continue ...

Page 67: ...USER MANUAL CHAPTER 4 DRIVER INSTALLATION 57 IKMH100 M SERIES BOX PC 5 Wait for the driver to be installed 6 Select Next to continue ...

Page 68: ...USER MANUAL CHAPTER 4 DRIVER INSTALLATION IKMH100 M SERIES BOX PC 58 7 After installation is completed select Yes I want to restart this computer now and click Finish ...

Page 69: ...SERIES BOX PC 4 3 ME and NET Framework 1 1 Driver Installation Follow instructions below to install Management Engine ME and NET Framework 1 1 driver 1 Open the Driver CD included in the package and select ME driver 2 Error message will pop up select Finish ...

Page 70: ...USER MANUAL CHAPTER 4 DRIVER INSTALLATION IKMH100 M SERIES BOX PC 60 3 Select NET Framework 1 1 4 Select Yes to start the installation ...

Page 71: ... 4 DRIVER INSTALLATION 61 IKMH100 M SERIES BOX PC 5 Wait for the driver to be installed 6 When installation completed select Restart Now to restart your computer 7 Again select the ME to continue installation Select Next ...

Page 72: ...ER MANUAL CHAPTER 4 DRIVER INSTALLATION IKMH100 M SERIES BOX PC 62 8 Please check the license agreement and then select Next 9 Select Next to start the installation 10 Wait for the driver to be installed ...

Page 73: ...USER MANUAL CHAPTER 4 DRIVER INSTALLATION 63 IKMH100 M SERIES BOX PC 11 When installation completed select Finish complete installation ...

Page 74: ... DRIVER INSTALLATION IKMH100 M SERIES BOX PC 64 4 4 Audio Driver Installation Follow instructions below to install Audio driver 1 Open the Driver CD included in the package and select Audio driver 2 Select Next to continue ...

Page 75: ...USER MANUAL CHAPTER 4 DRIVER INSTALLATION 65 IKMH100 M SERIES BOX PC 3 Wait for the driver to be installed 4 When installation completed select Finish complete installation ...

Page 76: ...R 4 DRIVER INSTALLATION IKMH100 M SERIES BOX PC 66 4 5 LAN Driver Installation Follow instructions below to install LAN driver 1 Open the Driver CD included in the package and select LAN driver 2 Compression has started ...

Page 77: ...ANUAL CHAPTER 4 DRIVER INSTALLATION 67 IKMH100 M SERIES BOX PC 3 When compression is complete select Next 4 Read the license agreement and then select Next 5 System displays the installed packages select Next ...

Page 78: ... 4 DRIVER INSTALLATION IKMH100 M SERIES BOX PC 68 6 Confirm the installation select Install to start the installation 7 Wait for installation to complete 8 When installation is completed select Finish to close the window ...

Page 79: ...R 4 DRIVER INSTALLATION 69 IKMH100 M SERIES BOX PC 4 6 RST Driver Installation Follow instructions below to install RTS driver 1 Open the Driver CD included in the package and select RTS driver 2 Select Next to continue ...

Page 80: ...MANUAL CHAPTER 4 DRIVER INSTALLATION IKMH100 M SERIES BOX PC 70 3 Read the license agreement and then select Next 4 Confirm the installation select Install to start the installation 5 Select Next to continue ...

Page 81: ...USER MANUAL CHAPTER 4 DRIVER INSTALLATION 71 IKMH100 M SERIES BOX PC 6 Select Next to start the installation 7 Wait for installation to complete 8 Warning message will pop up select Install ...

Page 82: ...USER MANUAL CHAPTER 4 DRIVER INSTALLATION IKMH100 M SERIES BOX PC 72 9 Installation continues 10 When installation is completed select Finish to close the window ...

Page 83: ... 73 IKMH100 M SERIES BOX PC 4 7 Microsoft NET Framework Driver Installation Follow instructions below to install Microsoft NET Framework 1 Open the Driver CD included in the package and select NET Framework 2 Wait for system to Import the file ...

Page 84: ... CHAPTER 4 DRIVER INSTALLATION IKMH100 M SERIES BOX PC 74 3 Read the license agreement and then select I agree 4 Wait for installation to complete 5 When installation is completed select Finish to close the window ...

Page 85: ...lease download Watchdog Guide from Winmate Downloads Center http dc winmate com tw _downloadCenter 2017 Embedded 20Computing Watc hdog 20Guide_IB_IH_IV_IK pdf Follow instructions below to install Watchdog driver 1 Open the Driver CD included in the package and select Watchdog driver 2 Check message and select Install to begin the installation ...

Page 86: ...HAPTER 4 DRIVER INSTALLATION IKMH100 M SERIES BOX PC 76 3 Wait for installation to complete 4 When installation is complete press any key to close 5 Open the Driver CD included in the package and select Watchdog AP ...

Page 87: ...USER MANUAL CHAPTER 4 DRIVER INSTALLATION 77 IKMH100 M SERIES BOX PC 6 Select Next 7 The installed storage location is displayed select Next to continue 8 Select Next to start the installation ...

Page 88: ...USER MANUAL CHAPTER 4 DRIVER INSTALLATION IKMH100 M SERIES BOX PC 78 9 Wait for installation to complete 10 When installation is completed select Close to close the window ...

Page 89: ...USER MANUAL CHAPTER 5 TECHNICAL SUPPORT 79 IKMH100 M SERIES BOX PC TECHNICAL SUPPORT This chapter contains directory to technical support ...

Page 90: ...y contact us 5 1 Software Developer Support Winmate provides the following development kits SDK for IKMH100 M Series Box PC Item File Type Description 1 Watchdog SDK AP Watchdog SDK and AP You can download drivers and SDK and other from Winmate Download Center or Winmate File Share Winmate Download Center http www winmate com DownCenter DownLoadCenter asp DownType 2906 Onl yContent Winmate File Sh...

Page 91: ...______________________________________________ _____________________________________________________________________ _____________________________________________________________________ _____________________________________________________________________ _____________________________________________________________________ _____________________________________________________________________ ___...

Page 92: ...USER MANUAL APPENDIX A PCIE CARD DIMENSIONS IKMH100 M SERIES BOX PC 82 PCIE CARD DIMENSIONS This section includes mechanical dimensions of Expansion PCIe Card Appendix ...

Page 93: ... APPENDIX A PCIE CARD DIMENSIONS 83 IKMH100 M SERIES BOX PC APPENDIX A PCIE CARD DIMENSIONS This section includes mechanical dimensions of Expansion PCIe Card Expansion PCIe Card Dimensions PCIe Card Height Limit ...

Page 94: ...USER MANUAL APPENDIX B PRODUCT SPECIFICATIONS IKMH100 M SERIES BOX PC 84 PRODUCT SPECIFICATIONS This section includes IKMH100 technical specifications Appendix ...

Page 95: ...ompatible Audio Realtek ALC886 Codec Expansion Slot PCIe x4 Expansion slot Preliminary I O Interface Front I O 1 x DC in 9 29V with isolation Terminal Block 3pin 2 x Giga LAN 4 x USB3 0 1 x HDMI Output 1 x D Sub15 VGA Output 1 x RS232 422 485 selectable serial port 1 x Audio in Jack 1 x Audio out Jack Physical Buttons 1 x Reset Key 1 x Power Button Indicator Two 2 5 SSD indicators Power Supply Pow...

Page 96: ...H100 M SERIES BOX PC 86 Environmental Specifications Operating Temp 0 C 50 C Operating Humidity 30 95 at 40 non condensing RH Optional Operating System Operating System Windows 10 IoT Enterprise Windows Embedded 8 Standard Windows Embedded Standard 7 ...

Page 97: ...Winmate Inc 9F No 111 6 Shing De Rd San Chung District New Taipei City 24158 Taiwan R O C Tel 886 2 8511 0288 Fax 886 2 8511 0211 Email sales winmate com tw Official website www winmate com ...

Reviews: