background image

15

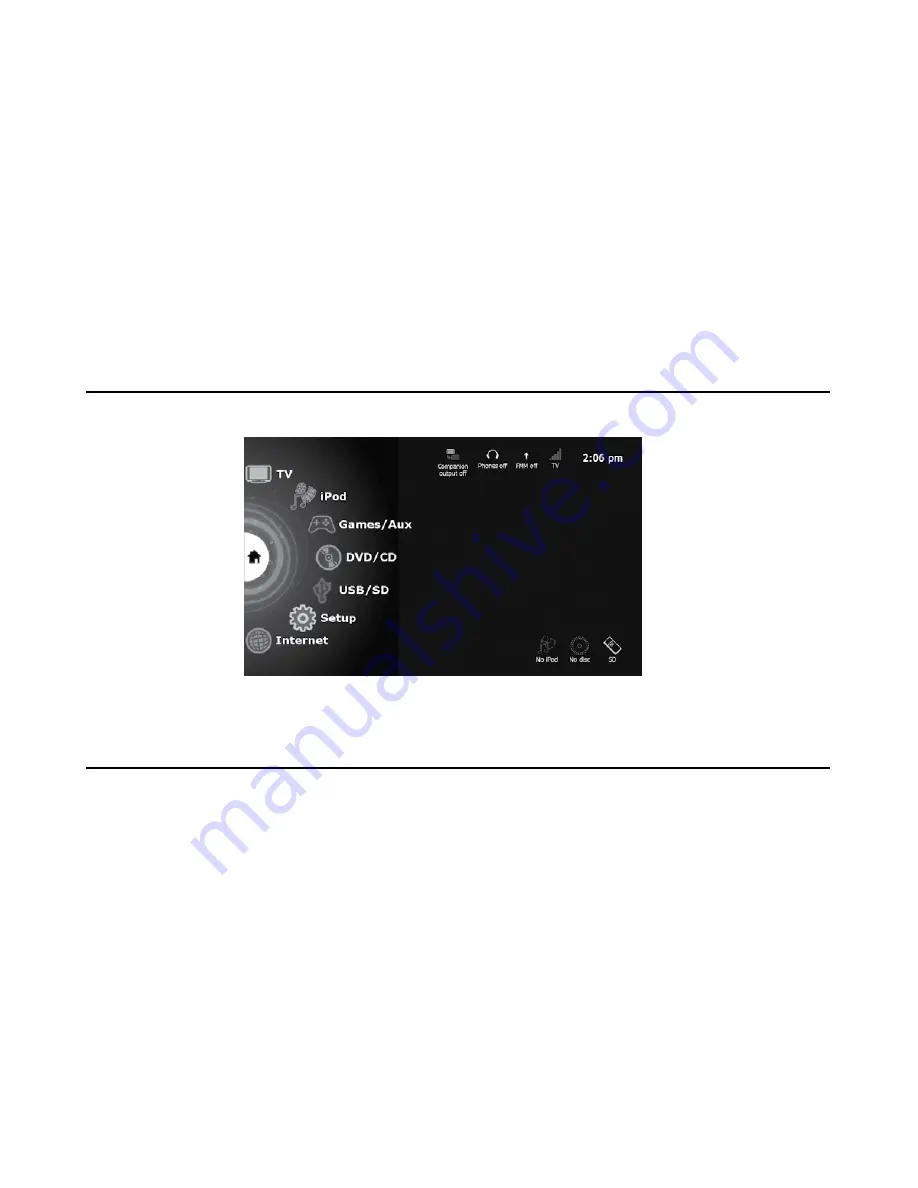
CIOtv Home Screen - Entertainment Options


Tap an icon to select your entertainment option.  See detailed operating instructions for each entertainment 
option below.

Remote Control Layout and Operation


An IR sensor is located in the front panel of CIOtv. By simply pressing the remote buttons, you can control your 
CIOtv while seated and using seat belts.  All CIOtv functions can be controlled and activated from the remote. 

Note:

 The status icons at the lower right corner of the CIOtv Home Screen will be highlighted when an iPod 

device is connected or a DVD disc or SD / USB media storage device is inserted. 

Summary of Contents for cio tv c-1000

Page 1: ...O mobile entertainment system Model C 1000 TM ...

Page 2: ...ion 15 Remote Control Buttons 16 Using Mobile TV 17 Using iPod or iPhone with CIOtv 17 Games AUX Input 20 Basic DVD Operation 22 Using USB or SD Media 27 Internet 28 Setup Screen 29 TV 29 Video 30 Wireless headphone 30 FMM 30 Wi Fi Network 31 Clock 32 System Info 32 Wireless Headphones 33 Inserting Batteries 35 Care and Maintenance 36 Screen Cleaning 36 AutoMount Hinge Tightening 36 Specifications...

Page 3: ...the owners manual thoroughly and take special note of all safety precautions noted by the following symbol SAFETY PRECAUTION Failure to follow operating instructions and safety precautions could result in personal injury and damage to your CIOtv system Before you get started please review the following operating precautions CIOtv is designed for passenger entertainment Avoid driver distraction Do ...

Page 4: ... be able to reach the screen A remote control is provided for remote operation To avoid draining your vehicle s battery DO NOT operate CIOtv for more than 15 minutes without running the engine For assistance call Technical Services M F 7 30 AM 6 PM CST Sat 8 AM 4 PM CST at 800 788 4417 PRODUCT REGISTRATION Please register your Winegard product by filling out and returning the Product Registration ...

Page 5: ... ll find that many stations have multiple MDTV channels with a variety of programming ranging from regular network simulcast of your favorite programs to live 24 hour news weather emergency reports traffic and business programming One thing to keep in mind is that MDTV is true broadcast TV and subject to a variety of environmental conditions and terrain features such as severe weather tall trees h...

Page 6: ... parts 1 CIOtv 10 2 TFT Viewer 2 CIOtv AutoMount with wiring harness 3 Remote Control 4 IR Headphones C 2510 5 AV AUX Input Cable C 2545 6 Owner s Manual 7 Four 4 ea AAA batteries 8 CLA Power Cable C 2535 with CLA Extension Cable C 2540 1 3 2 5 4 8 C 2535 C 2540 C 2510 C 2545 ...

Page 7: ...dphones DC Power In iPod iPhone SD Card Slot Top View USB Ports DVD Eject Button Power Light Sensor IR Receiver Infrared Remote Control 4 Red LED s IR Transmitter These sensors control the CIOtv operation DO NOT block these sensors Front Top of Viewer ...

Page 8: ...Accessories Available from www winegard ciotv com 1 Battery Pack C 2401 2 14V AC DC Converter C 2520 3 iPod Accessory Cable C 2530 4 Factory Radio Cable C 2201 Used away from vehicle 2 1 3 4 C 2401 C 2520 C 2530 C 2201 ...

Page 9: ...e that the CIOtv will fit your vehicle check the dimensions of your headrest posts before attempting to install the CIOtv AutoMount CIOtv is designed to fit the following headrest post configurations Headrest post diameters between 10mm and 14mm Headrest post spread dimensions between 110mm and 170mm on center NOTE For complete installation instructions please refer to www winegard com ciotv ...

Page 10: ...ocket wrench AutoMount Assembly with CIOtv Viewer AutoMount Bracket Assembly Openings for Headrest Posts AutoMount Clamp Assembly NOTE The AutoMount Bracket Assembly is designed to plug into the AutoMount Clamp Assembly Depress both tabs at the front of the AutoMount Bracket Assembly and pull to release Release Tabs ...

Page 11: ...ge card with sufficient capacity at least 256Mbytes If the Firmware version is not current please update using the following method 1 Copy latest firmware version from the Winegard website to your SD card at the top level directory i e not in a sub directory 2 Insert SD card into CIOtv then turn power on wait for screen to appear that says CIO update DO NOT REMOVE SD CARD OR POWER DOWN DURING THE ...

Page 12: ...wer to CIOtv When hand held you have three power options 1 Connect to power via the supplied CLA Power Cable C 2535 Insert the power connector into the DC Power In jack on the left side of your CIOtv then insert the CLA plug into your cigarette lighter receptacle 2 Connect to power via the optional CIOtv 14V AC DC Converter C 2520 or 3 Connect to power via the optional Battery Pack C 2401 Touchscr...

Page 13: ...shut off power press the power button again Note When power is available to CIOtv the POWER button will softly glow in the power off mode When the POWER button is activated and CIOtv is running the POWER button will increase in brightness indicating power on 3 Next select your audio option You can do this through either the Setup Menu or via the icons at the top of the CIOtv Home Screen Note Do no...

Page 14: ...me Screen Note If you have two CIOtv units mounted in your car the A or B channel selection allows viewers to make independent separate audio output selections For External Audio through your car factory sound system touch the FMM icon on the CIOtv Home Screen Select Enable FMM and select an FM frequency from the available frequency drop down list select a frequency that is not already being used ...

Page 15: ...seconds if not used Note The volume control slider vertical located at the right of each video control panel is provided to control volume for optional wired headphones connected to CIOtv through the 3 5mm headphone jack You can select volume levels for wired headphones by either tapping on the bar at the desired level or sliding the point up or down To control volume for the supplied wireless hea...

Page 16: ...An IR sensor is located in the front panel of CIOtv By simply pressing the remote buttons you can control your CIOtv while seated and using seat belts All CIOtv functions can be controlled and activated from the remote Note The status icons at the lower right corner of the CIOtv Home Screen will be highlighted when an iPod device is connected or a DVD disc or SD USB media storage device is inserte...

Page 17: ... Home Screen Icons DVD Controls FM Modulator TV Channel Scan TV Channel List Subtitles TV Channel Recall Directional Navigation Arrows Up Down Left Right OK Enter Channel Up Channel Down HOME TV iPOD AUX DVD CD USB SD SET UP INTERNET Home Screen Icons ...

Page 18: ...lete you can cancel at any time by selecting channel scan stop When the list of available channels appears you can scroll up or down to select channels using either t Chan Down or uChan Up at the bottom of the screen Using iPod or iPhone with CIOtv You can enjoy all of your iPod or iPhone audio and video files on the CIOtv big screen CIOtv supports on screen control and playback of various iPod an...

Page 19: ...ce then connect the RCA connectors to the RCA connectors on the supplied CIOtv A V Aux Input cable p n C 2545 Insert the 3 5mm connector into the AUX Input jack on the left side of the CIOtv Select Games Aux from the CIOtv Home Screen then select Aux Input from the menu Audio or Video from your iPod iPhone will now play on CIOtv Note This option supports full audio and video playback on your CIOtv...

Page 20: ...tion allows you to control your Apple device from the CIOtv Home Screen however you will not have video playback capability This option supports audio playback only After connecting CIOtv using one of the previous options you may now navigate and control your iPod Select from the following iPod options Music Video Photo or Podcast selections may be made using the scroll bar at the right of the scr...

Page 21: ...can display auxiliary analog A V input supplied through the 3 5mm jack and composite adapter cable supplied Insert the 3 5mm connector into the AUX Input jack on the left side of CIOtv From the CIOtv Home Screen select Games Aux From the Games Aux screen select Aux Input AV AUX Input Cable C 2545 ...

Page 22: ... Companion CIOtv mode 1 From the CIOtv Home Screen select Games Aux Then select Companion CIOtv 2 Next go to the Companion CIOtv unit and select the Companion icon at the top center of the CIOtv Home Screen the icon also appears on all video output screens From the dialog box select Send output to companion and touch Done Note The Send output to companion mode automatically defaults to off when yo...

Page 23: ...ert a disc and DVD video will appear If the DVD fails to start touch the DVD Menu arrow at the lower right corner of the screen Use the touch screen to go to Play on the DVD menu Select Enter Loading Discs Insert disc with printed side facing forward so you can see the label As you insert the disc the drive will gently take the disc and complete the insertion Don t force or hold onto the disc as i...

Page 24: ...ee screen above Eject DVD discs can be ejected by either pressing the eject button on the upper right corner or by touching the eject icon at the lower left corner of the DVD control screen Rew Reverses direction of play Each time Rew is pressed the speed of reverse play is increased 2X 4X 8X 16X To cancel press Play Pause icon to return to normal play speed Prev Forwards to previous chapter ...

Page 25: ...main menu Use the touchscreen to make a selection Video Setup Touching this control opens a dialog screen that lets you adjust the DVD video brightness contrast saturation and hue setting Play Position Last Scene Memory Feature Playback will stop as DVD Player or Vehicle Ignition is switched OFF When power is restored select DVD from CIOtv home page The DVD player will resume playback from the sam...

Page 26: ...eck the DVD firmware version against the latest version at www winegard com ciotv If the firmware version is different update your DVD firmware This will take a few minutes and will require an SD media storage card with sufficient capacity at least 256Mbytes Playable discs CIOtv is a multi region DVD player capable of playing the following DVD CD and Audio formats DVD media DVD ROM DVD R DVD RW CD...

Page 27: ...sert SD card into CIOtv then turn power on 4 After the Boot up process you will be prompted from the CIOtv Home Screen that a DVD upgrade object has been found Select Upgrade or Cancel 5 If Upgrade is selected the DVD ROM will be updated DO NOT REMOVE SD CARD OR POWER DOWN DURING THE ENTIRE UPDATE PROCESS 6 Remove SD card and reboot the CIOtv unit using the power button ...

Page 28: ...B drives If a device is inserted an SD or USB icon will be displayed Select the device type and the file menu will appear Select the desired files and view If a photo file is displayed thumbnails will appear this may take a few seconds You can either select an individual photo to display or view the file group as a slideshow by using the Touchscreen controls at the bottom of the screen From the sl...

Page 29: ...ive the local Wi Fi signal See the following Setup Network section for network connection instructions Touch the Internet icon on the CIOtv Home Screen The screen below will appear You may now navigate and browse the Internet The following file formats are supported by CIOtv SD USB player Video decoding MPEG 4 WMV Picture decoding JPEG BMP PNG GIF Audio decoding AAC MP3 WMA Back Forward Home URL t...

Page 30: ...onnected to an external antenna through the CIOtv AutoMount select TV from the Setup menu then select Use external TV antenna from the TV dialog box Select Done Note If you are using your CIOtv as a hand held device always remember to disable the Use external TV antenna utility in TV setup You can also configure your CIOtv to Always display TV Signal This is a way to always know what the received ...

Page 31: ...hat is not being used by a local station We recommend frequencies at the lower end of the FM band 88 3 90 1 for best results Remember to tune your car radio to the same frequency it s a good idea to set your FMM frequency to a radio pre set knob for quick reference and tuning Your car radio volume control will now control volume When complete select Done Video Video adjustment for picture brightne...

Page 32: ...he need to configure each time you change location To manually configure an IP address select Use Static IP and follow the configuration steps Remember to select Done when complete Next select Wi Fi from the Setup Screen menu A list of available networks will appear See screen shot top right Wi Fi signal strength is indicated by the bars at the left and numeric value expressed in db at the far rig...

Page 33: ...tes or service Select Done to return to Setup Select the Connect icon and enter a password if prompted a password is not required for non protected open networks Enter Done See screen at right A dialog box will appear Connect to this access point Select OK or Cancel After initial setup CIOtv will remember the configured networks and passwords and will automatically try to reconnect to the network ...

Page 34: ...f sight with a hand book or other object might cause interruption of the signal and sound transmission CIOtv headphones are designed for either mid or rear seat operating ranges up to 9 feet from the screen See the diagram below for operating instructions Volume Power Channel Selector Switch To Power CIOtv headphones set the three way switch as follows Position 1 Power off no light Position 2 Audi...

Page 35: ...endently i e MDTV DVD iPod Video etc audio signals must be transmitted through either channel A or B when more than one CIOtv unit is installed in your vehicle Select the A or B channel on your headphone set to correspond with the audio channel setting touch the Wireless Headphone icon on the CIOtv Home Screen for the CIOtv unit you are viewing Volume Adjusts volume level Up or Down CAUTION Turn h...

Page 36: ... size AAA batteries with correct polarity by matching and on batteries per the diagram inside battery compartment Safety Precaution Do not leave Remote Control or Headphones in direct sunlight Damage to the accessories may occur In addition rupture or chemical leakage from batteries may cause fire or personal injury Wash hands after handling batteries Keep batteries out of reach of children Remove...

Page 37: ...n recommended temperature ranges 4 Do not use strong chemical or abrasive cleaners or solvents to clean the screen or case We recommend a non abrasive micro fiber cleaning cloth and mild solution lens cleaner 5 Use only approved AC DC power sources AutoMount Assembly Hinge Tightening In the event that the hinge loosens over time and the mount tends to droop tighten the hinge by popping off the pla...

Page 38: ... FMVSS 302 Flammability DVD Laser Safety Standards EN 60825 1 2007 Edition 2 Safety of laser products 21 CFR 1040 10 Performance standards for light emitting products laser AC DC Converter Rated input 100 250VAC 50 60Hz 1A max Rated output 14V 15V DC 3 5A max Headphones Batteries 2 ea AAA Audio bandwidth 20Hz to 20KHz Total harmonic distortion 0 5 max Signal to Noise Ratio 60dB min ...

Page 39: ...r frequency deviation Range 3 meters min from front surface of CIOtv Electromagnetic Compatibility EMC Standards EU 2006 95 EC Low Voltage Directive EU 2004 108 EC EMC Directive EU 2004 104 EC Automotive EMC directive Internal Antenna Frequency range 54 88MHz 174 216MHz 470 698MHz Vehicle power 8 16VDC 3 5A max current FM Modulator Audio bandwidth 20Hz to 20KHz Total harmonic distortion 0 5 max Si...

Page 40: ... m min 250uV m max Conducted output power 75dBm min 50dBm max Conducted output impedance 50 ohms Aux headphone jack Connector type 3 5mm diameter 3 contact female Sound pressure level 100dB max Aux A V input Connector type 3 5mm diameter 4 contact female Video format NTSC or Color Video Blank and Sync CVBS composite video Touch Panel Type Projected Capacitive with laminated impact protection layer...

Page 41: ...rizontal and 110 vertical planes CR 10 Backlight type LED Temperature Range Operating Temperature 20C to 55C 4F to 131F Storage Temperature CIOtv Viewer and AutoMount 40C to 85C 40F to 185F Storage Temperature Accessories 40C to 75C 40F to 167F USB Host Ports USB file format FAT Video decode XviD MPEG 4 WMV H 264 MP AVI Picture decode JPEG BMP PNG GIF Audio decode AAC MP3 WMA WAV OGG ...

Page 42: ...BMP PNG GIF Audio decode AAC MP3 WMA WAV DVD CD drive Disc size 12cm Media Load Type Side load DVD media DVD ROM DVD R DVD RW CD media CD ROM CD R CD RW VCD SVCD CVD DVCD Video decode DVD Video DVD VR XviD MPEG 4 Picture decode JPEG Audio decode Audio CD CD DA HDCD MP3 WMA Lossy Anti shock buffer memory 16MB min Last scene memory supported ...

Page 43: ...ler with proof of warranty coverage This warranty covers parts but does not cover any costs incurred in removal shipping or reinstallation of the product The warranty does not extend to products which have been subjected to misuse improper installation or to damage caused by wind lightning ice or other occurrences over which the manufacturer has no control Dealer removal and or replacement charges...

Page 44: ... safety and regulatory standards Please note that the use of this accessory with iPod or iPhone may affect wireless performance iPhone iPod iPod classic iPod nano and iPod touch are trademarks of Apple Inc registered in the U S and other countries All Rights Reserved This publication is protected and all rights are reserved No part of it may be reproduced or transmitted by any means or in any form...

Page 45: ...stallation This equipment generates uses and can radiate radio frequency energy and if not installed and used in accordance with the instructions may cause harmful interference to radio communications However there is no guarantee that interference will not occur in a particular installation If this equipment does cause harmful interference to radio or television reception which can be determined ...

Page 46: ...Winegard Company 3000 Kirkwood Street Burlington IA 52601 www winegard com 2011 Winegard Company 2452221 REVJ 4 11 ...

Reviews: