WINDSTREAM 454213 Owner'S Manual Download Page 15


13

Main Bearings 

The two main ball bearings at each end of the bearing housing are identical. If the crank 
makes excessive noise or offers resistance without the chain in place, the main bearings 
should be inspected for excessive tightness or misalignment. If the crank rattles while turning, 
the bearing assembly may be too loose. In either case, contact Windstream Power’s Service 
Department at (802) 425-3435.  A bicycle repair shop will also have the required tools to 
remove the crank arm and inspect or change out the bearings. We use standard bicycle parts. 
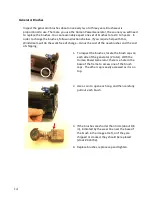
Chain Tension 

Periodically check the drive chain tension. If the chain makes a “growling” noise, it is too tight. 
If the returning loop of the chain appears floppy, the chain is too loose. To adjust the chain 
tension, remove the chain guard, and using a 10mm nut driver or socket wrench, loosen the 
four generator mounting nuts. Next, adjust the generator position, and then retighten the 
nuts. Replace the chain guard, ensuring there is no rubbing or scraping noises between the 
chain guard and the chain or pedals. 

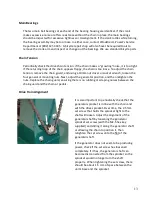
Drive Train Alignment 


It is also important to periodically check that the 
generator sprocket is in line with the chain and 
with the drive sprocket. Over time, the 2.5 mm 
set screw that holds the sprocket tight to the 
shaft will loosen. Adjust the alignment of the 
generator shaft by loosening the generator 
sprocket set screw (with the M2.5 hex key 
supplied) and sliding it along the generator shaft 
or allowing the chain to position it, then 
retighten the set screw onto the flat of the 
generator shaft.   

If the generator does not seem to be producing 
power, check if the set screw has loosened 
completely. If it has, the generator shaft can 
become disconnected from the sprocket so the 
sprocket would no longer turn the shaft 
properly.  When tightening the set screw, there 
should be about 1.5 mm of space between the 
unit’s base and the sprocket. 


Summary of Contents for 454213

Page 1: ......

Page 2: ......

Page 3: ...tery 5 Precautions 8 Other Useful Information 9 Battery Charging 9 Battery Voltages 10 Battery Connections 11 Safety Precautions 12 Mechanical Operation 12 Electrical Operation 12 Maintenance 12 Clean...

Page 4: ......

Page 5: ...y It will charge at a rate of between 3 5 amperes It will provide a maximum of 75 watts Sustainable power output over a period of time is usually around 50 watts It is ideal for low power appliances l...

Page 6: ...may be easy to produce 65 watts continuously for twenty minutes but that output may drop down to 30 watts as the person pedaling becomes tired That said 75 watts or slightly more may be produced in sh...

Page 7: ...ds 2 Attach each pedal or hand crank by screwing it onto the end of the crank arm using the 15 mm flat wrench provided 3 Within each pedal or hand crank set one has a left thread and one has a right t...

Page 8: ...revent reverse current from traveling back from the battery or motoring of the Human Power Generator The full wave bridge will also provide a consistent polarity output that is not dependent on the di...

Page 9: ...onnector is typically plugged into the jumper cable output connector on a portable power pack or similar device You must be sure that the positive and negative terminals match the positive and negativ...

Page 10: ...tions When moving the unit hold it by the base of the unit Do not pick it up by the chain guard If you want to install the Human Power Generator in a fixed location the four rubber feet can be removed...

Page 11: ...nt will not flow into the battery even though the charging source may be capable of supplying power The Human Power Generator will not deliver a charging current to a battery until the generator is tu...

Page 12: ...stop charging If you are using the Human Power Generator with your own battery monitor the battery voltage to prevent overcharging A simple voltmeter can be used to measure output and battery voltage...

Page 13: ...e voltage They can also be connected in a series string positive of one battery to negative of the next to provide higher voltages such as two 6 volt batteries combined in series to make a 12 volt bat...

Page 14: ...considerations should consult with their health care practitioners before engaging in strenuous cranking or pedaling Electrical Operation As with any electrical device use caution with the Human Power...

Page 15: ...ur generator mounting nuts Next adjust the generator position and then retighten the nuts Replace the chain guard ensuring there is no rubbing or scraping noises between the chain guard and the chain...

Page 16: ...e minus the cost of the new brushes and the cost of shipping 1 To inspect the brushes locate the brush caps on each side of the generator 2 total With the Human Power Generator there is a hole in the...

Page 17: ...1107 15mm flat wrench for attaching pedals Stock 371311 2 5 mm hex wrench for adjusting sprocket Stock 301114 M4X38 Wood screws for attaching base to support and Stock 312506 M4 Nylon cup washers for...

Page 18: ...ice department at 802 425 3435 to be assigned an RMA number WSP reserves the right to refuse delivery of any equipment without an RMA number clearly displayed on the package s WSP reserves the right t...

Page 19: ..._____________________________ What other Windstream Power product s were also being used ___________________________________ ___________________________________________________________________________...

Page 20: ...ream In the case of a missing shipment the customer must advise Windstream within thirty days of the expected arrival date The company cannot be responsible for loss or damage claims made after expira...

Page 21: ...19 If components designed or manufactured by Windstream are to be used in the construction of equipment for resale the buyer must obtain prior written permission or licensing from Windstream...

Reviews: