


13
Maintenance
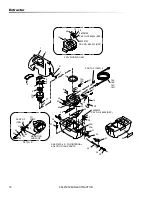
Vacuum Motor Replacement
1.
Turn off all switches and unplug machine.
2.
Unlatch and remove recovery tank.
3.
Unfasten screws holding vacuum motor retainer to
vacuum motor housing
4.
Lift vacuum motor from vacuum motor housing.
Locate the vacuum motor wires and disconnect at
the connector.
5.
Remove vacuum motor.
6.
Reverse process to install vacuum motor replace-
ment.
3
8
[9.5 mm]
Carbon
Brushes
End Cap
If armature commutator is grooved, extremely pitted or not
concentric, the motor will need to be replaced or sent to a
qualified service center.
Important:
These brushes wear quicker as the length shortens due to
increased heat. Spring inside brush housing will damage
motor if brushes are allowed to wear away completely.
Periodically check the length of the carbon brushes. Replac
both carbon brushes when either is less than 3/8" (9.5mm)
long.
WARNING:
The green ground wire must be attached for
safe operation. See wiring diagram.
AVERTISSEMENT:
Le fil à la terre vert doit être attaché
pour un fonctionnement en toute sécurité. voir le schéma
de câblage.
86221950 MINI-EXTRACTOR
Summary of Contents for 86221950-H
Page 15: ...15 PARTS 86221950 MINI EXTRACTOR Parts...
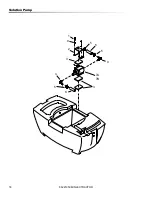
Page 18: ...18 Solution Pump 86221950 MINI EXTRACTOR 9 1 2 3 4 5 8 3 7A 7B 4 5 6 5...
Page 22: ...22 Notes 86221950 MINI EXTRACTOR...
Page 23: ...23 OPTIONS Options...
Page 24: ...24 Hand Tool 86221950 MINI EXTRACTOR 1 2 3 4 5 6 7 8...
Page 26: ...26 Mini Cart 86221950 MINI EXTRACTOR 1 2 3 4...
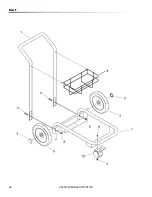
Page 28: ...28 Cart 86221950 MINI EXTRACTOR...
Page 31: ...31 Serial Numbers REF NO MODEL SERIAL 1 N A 86221950 MINI EXTRACTOR...