


36
A l e x x I n stal l ation and Car e
G u ide
A u t h e n t i c E x c e l l e n c e ™
Note: Be very careful not to cross-thread the spikes. The base of the Alexx
is made of “X” material and can be cross threaded if installed on an angle.
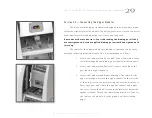
5. With one person stabilizing the Alexx, lower the Alexx by turn-
ing the jack wrench counterclockwise. Note that the Alexx will
now sit lower in the front as the spike assembly is shorter than
the caster. Use caution.
Note: It is very important, at this point, that an able assistant stabilize the
front of the Alexx until the rear spikes are attached and the unit is lowered.
6. Repeat the previous process of the caster removal/spike inser-
tion on the opposite side of the enclosure. Then continue the
process on the other channel.
Leveling the Alexx
1. It is not necessary to use the jack to level the Alexx.
2. Place a level on the top of the woofer enclosure from the rear
to check left to right oriented axis. If it is level, move to the
next step.
3. If the bubble shows that the speaker is leaning toward the
center of the room, you will have to lengthen one of the inside
spikes down toward the floor. If the bubble is leaning toward
the outside of the room, you will have to lengthen one of the
Summary of Contents for Alexx
Page 4: ......
Page 5: ...S e c t i o n 1 WA S P S e t u p W i l s o n A u d i o S p e c i a l t i e s...
Page 14: ......
Page 15: ...S e c t i o n 2 A l e x x A s s e m b ly W i l s o n A u d i o S p e c i a l t i e s...
Page 32: ......
Page 33: ...S e c t i o n 3 F i n a l S e t u p W i l s o n A u d i o S p e c i a l t i e s...
Page 42: ......
Page 43: ...S e c t i o n 4 S p e c i f i cat i o n s W i l s o n A u d i o S p e c i a l t i e s...
Page 46: ......
Page 52: ......
Page 53: ...S e c t i o n 6 W a r r a n t y W i l s o n A u d i o S p e c i a l t i e s...