


S
e c t i o n
3 . 2— u
S i n g
t h e
l
i f t
t o
i
n S tA l l
S
P i k e S
35
W i l s o n A u d i o S p e c i a l t i e s
weigh over 450 LBS and may seriously injure someone if tipped over.
•
8 sets of assembled spikes
•
The Wilson Audio Jack
•
The jack socket wrench
•
Swivel caster wrench
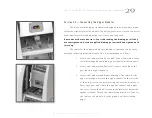
Installation Procedure
1. Slide the Wilson Audio Jack under the front of the Alexx,
centered between the casters, so that the jack’s lift bolt is
exposed. Place the lift plate so it is positioned about an inch
behind the front facade of the Alexx woofer enclosure.
Note: An assistant should stand to the rear of the Alexx to steady it.
2. Attach the wrench to the lift bolt and begin to slowly raise the
front of the Alexx by turning the bolt clockwise.
3. After the front of the Alexx is high enough (you will need
approximately one and a half inches of clearance beneath the
caster), use the swivel caster wrench to loosen the casters.
Remove the casters.
4. Insert and screw-in the finished spike assembly. Hand tighten
only!
Summary of Contents for Alexx
Page 4: ......
Page 5: ...S e c t i o n 1 WA S P S e t u p W i l s o n A u d i o S p e c i a l t i e s...
Page 14: ......
Page 15: ...S e c t i o n 2 A l e x x A s s e m b ly W i l s o n A u d i o S p e c i a l t i e s...
Page 32: ......
Page 33: ...S e c t i o n 3 F i n a l S e t u p W i l s o n A u d i o S p e c i a l t i e s...
Page 42: ......
Page 43: ...S e c t i o n 4 S p e c i f i cat i o n s W i l s o n A u d i o S p e c i a l t i e s...
Page 46: ......
Page 52: ......
Page 53: ...S e c t i o n 6 W a r r a n t y W i l s o n A u d i o S p e c i a l t i e s...