s
eC T i o n
3� 5 —u
m b i l i C a l
C
o n n eC T i o n s
27
Section 3.5—Umbilical Connections
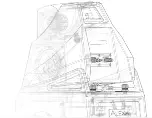
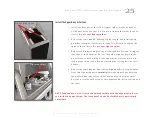
The correct connection of the two umbilicals to the Upper Array is as follows:
1. Locate the binding post labeled “Mid Frequency.”
2. Locate the cable directly below this binding post. This cable exits the top of the
Woofer Module just below the appropriate connector. Connect the RED cable to
the RED (positive) terminal labeled “Mid Frequency.” Connect the BLACK lug of
the cable to the BLACK (negative) terminal. Tighten binding post nut with the
1/2” Driver found in the Tool Kit.
Do not over tighten.
3. Locate the cable directly below the binding post labeled “High Frequency.”
Connect the RED cable to the RED (positive) terminal on the biding post labeled
“High Frequency” on the Upper Array. Connect the BLACK cable to the BLACK
(negative) terminal. Tighten binding post nut with the 1/2” Driver found in the
Tool Kit.
Do not over tighten.
4. Once the cables are connected correctly to the binding posts make sure to
tighten the cable clamp hardware at the base of the cable to ensure the enclo-
sure is sealed.
5. Using the form found on page 11 identify the best sounding location in your
listening room before installing the spikes under your Woofers.
Note: Please ensure that you do not invert the polarity of the umbilicals or connect the ca-
bles to the wrong binding posts on the Alexia V. Connecting the wrong cables to the wrong
binding posts will void the warranty and potentially damage the drivers.
W i l s o n A u d i o S p e c i a l t i e s
Note: Hand-tighten cable clamps
when finished connecting cables
Summary of Contents for Alexia V
Page 4: ......
Page 5: ...Section 1 WASP Setup W i l s o n A u d i o S p e c i a l t i e s...
Page 11: ...Sect i o n 1 1 WASP 11 W i l s o n A u d i o S p e c i a l t i e s...
Page 12: ...Upper Array Woofer...
Page 13: ...Section 2 Uncrating Alexia V W i l s o n A u d i o S p e c i a l t i e s...
Page 18: ......
Page 19: ...Section 3 Assembling Alexia V W i l s o n A u d i o S p e c i a l t i e s...
Page 28: ......
Page 29: ...Section 4 Final Setup W i l s o n A u d i o S p e c i a l t i e s...
Page 36: ......
Page 37: ...Section 5 Specifications W i l s o n A u d i o S p e c i a l t i e s...
Page 42: ......
Page 43: ...Section 6 Time Alignment Charts W i l s o n A u d i o S p e c i a l t i e s...
Page 46: ......
Page 47: ...Section 7 Warranty W i l s o n A u d i o S p e c i a l t i e s...


