background image


E.  To set further programs repeat steps item B through D above. 
 

NOTE:

  When the same ON and OFF times are desired for different days of the week, the setting procedure may be simplified. 


1-2-3-4-5 

(from Monday through Friday) 


1-2-3-4-5-6 

(from Monday through Saturday) 


1-2-3-4-5-6-7 

(from Monday through Sunday) 


6-7 

(Saturday and Sunday) 


F.  To avoid undesired operation verify that the programs do not overlap one another.  You can check the settings by 

pressing the Program Selection button.  (

, Figure 10-C) 


G.  Move the Setting/Regulator switch to the RUN position (center).  The display will show the current day and time. 


IMPORTANT:

  All the programs set will be activated ONLY the day after the setting has been carried out. 

 
During operation, the ON status of the timer is shown on the display with the     symbol on the right end.  When the     symbol 
does not appear, the timer is OFF. 
 

Cancelling a Single Program 

To cancel a single program: 
 

A.  Move the Setting/Regulator switch (Figure 10-B) to the (

, Figure 10-C) position (right).  

Press the Program Selector (

, Figure 10-C) button and select the program to be 

cancelled. 


B.  Simultaneously press the Program Selector (

, Figure 10-C) and SKIP button (


Figure 10-G) for at least 2 seconds.  The selected program will be cancelled. 
 

C.  Verification that program has been cancelled is the continual blinking of 0:00. 


Cancelling of all Preset Programs 

To cancel all the preset programs, press the Reset button, R, for at least 2 seconds.  All the preset programs will be cancelled. 


Using the Skip Function 

To skip a program: 
 

A.  Move the Setting/Regulator switch in the RUN position (center). 


B.  Press the SKIP button (

 Figure 10-G). The next program will be activated as 

programmed.  The SKIP symbol (

 Figure 10-G) is shown on display. 


C.  The SKIP command may be stopped, by pressing the SKIP button.  (

 Figure 10-G)  

The preset program will restart and SKIP symbol (

 Figure 10-G) will disappear from 

the display. 


Skip Function Procedure During Operation 

A.  The SKIP function can be activated only in RUN mode. 


B.  The SKIP function starts immediately after the pressing the SKIP button, and disappears when next program starts. 


C.  The SKIP function can be stopped manually by pressing the SKIP button and the preset program will be activated. 


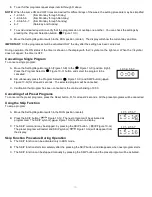
1 2 3 4 5 6 7 

0:00 


1 2 3 4 5 6 7 

15:16 


1 ☼ 

1 2 3 4 5 6 7 

15:16 


19 

Summary of Contents for 1773511

Page 1: ...losion may result causing property damage personal injury or loss of life Williams Furnace Co 250 West Laurel Street Colton CA 92324 U S A MODEL Natural Gas Only 1773512 MODEL Propane Gas Only 1773511...

Page 2: ...d repair should be done by a QUALIFIED SERVICE TECHNICIAN The installation must conform to local codes or in the absence of local codes the installation must conform to the National Fuel Gas Code ANSI...

Page 3: ...qualified service technician to inspect the furnace and to replace any part of the control system and any gas control which has been under water Safety Information for Users of LP Gas Propane LP Gas i...

Page 4: ...is a good safety measure under any condition If at any time you do not smell the LP Gas odorant and you should assume you have a leak Then take the same immediate action recommended when you do smell...

Page 5: ...in Canada with CAN CSA C22 2 No 3 Installations in the State of Massachusetts All installations in the State of Massachusetts must use the following requirements when installing maintaining or operat...

Page 6: ...e of the terminal 18 inches 46 cm minimum E Clearance to unventilated soffit 12 inches 30 cm minimum clearance to vinyl soffit 36 inches 90 cm minimum F Clearance to outside corner 12 inches 30 cm min...

Page 7: ...be length wall thickness 1 5 16 inches 7 9 mm 4 Drill the mounting holes A 5 holes in the wall If possible use self tapping screws drill 1 8 inch diameter holes If self tapping screws cannot be used d...

Page 8: ...end Mark the location of the three holes for the screw anchors Figure 7 The flue grid must be vertical 12 Remove the vent cap and drill all the necessary holes diameter inch for the screw fittings pro...

Page 9: ...r inserting the screwdriver as indicated by the arrow 3 Remove the nozzle from the support and replace it with the correct one Reassemble the nozzle assembly and the screw indicated at point 1 Set the...

Page 10: ...l Gas Code that a drip line be installed near the gas inlet This should consist of a vertical length of pipe tee connected into the gas line that is capped on the bottom in which condensation and fore...

Page 11: ...the furnace Checking the Gas Manifold Pressure The gas manifold pressure can be measured by connecting a test gauge to the connection provided on the gas valve Figure 8 B The furnace comes set from t...

Page 12: ...otor Moteur du Ventilateur de Combustion SF Flame View Lamp green lamp Lampe de Presence de Flamme Verte SB Lock Out Lamp red lamp Lampe de Verrouillage Rouge TR Current Transformer 120 24 V Transform...

Page 13: ...ond attempt is STOP Read the safety information above on this label Set the thermostat to the lowest setting by turning it counterclockwise This appliance is equipped with an ignition device that auto...

Page 14: ...needs to be refilled after 4 5 days NOTE The use of water low in limestone or distilled is advisable in order to prevent any possible calcareous sedimentation that may be difficult to remove Anticalca...

Page 15: ...nnect the test gauge and firmly tighten the screw of the gauge connection then check for gas leaks from it The HI and LO pressures must be adjusted as instructed above Never adjust them independently...

Page 16: ...s 4 Check air flow switch 5 Clean and check exhaust flue pipe and air intake pipe 6 Check for gas leaks on all connections 7 Check and adjust gas pressure Check red O Ring Gasket NRNG003 If it is dama...

Page 17: ...tion Programmable day blocks 1 2 3 4 5 Monday Friday 1 2 3 4 5 6 Monday Saturday 1 2 3 4 5 6 7 Monday Sunday 6 7 Saturday Sunday KEY A On Off Switch Pos I The appliance is controlled by the room therm...

Page 18: ...proceeds one day at a time Number 1 stands for Monday number 2 stands for Tuesday etc C To set the time press the Hour Selector button h Figure 10 E to set the hour and the Minutes Selector button m F...

Page 19: ...button and select the program to be cancelled B Simultaneously press the Program Selector Figure 10 C and SKIP button Figure 10 G for at least 2 seconds The selected program will be cancelled C Verifi...

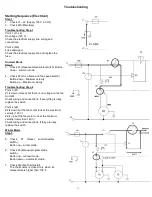
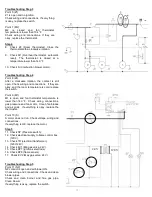
Page 20: ...ximum velocity Troubleshooting Step 2 Point 3 Z1 Z1 is down closed but there is no voltage on the fan motor M Check wiring and connections If everything is okay replace the switch Point 4 Z2 Z2 is dow...

Page 21: ...temperature is cold replace the switch Point 9 M1 M1 is open and fan thermostat temperature is lower than 140 F Check wiring connections gas pressure and fan motor Clean fan blades and air grids If e...

Page 22: ...control box Point 16 RP8 No flame sensing Check flame sensor wiring and connections SCheck gas pressure and exhaust flue pipe If everything is okay replace the flame control box Point 17 EV2 No voltag...

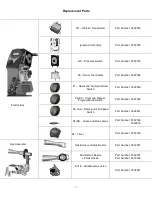
Page 23: ...inter Switch Part Number P332630 Z8 Z3 Timer and Manual Program Mode Switch Part Number P332629 Z2 Hi Lo Flame and Fan Speed Switch Part Number P332631 SF SB Green and Red Lamps Part Number P332538 P3...

Page 24: ...n Blower Motor Part Number P332514 M1 Overheat Thermostat Part Number P332565 M2 Fan Thermostat Part Number P332496 Fan Blades 4 pieces Part Number P332572 Left P332638 Right M Fan Motor 2 Pieces Part...

Reviews: