LCD will be renewed for [000]. But it is not effect to any image or video contents in the camera memory
3-6 Event Counter
The event counter are included three digits in the center of the lower LCD to let you know how many motion records that up to 999 events for a trail history.
If you want to renew the counter anytime, simply to press and hold the OK/DEL button until LCD become blinking, then it will resume to [000]
Caution:
The camera will keep going to capture continually even the scouting event counter is already reach to [999] full. On the other hands, the event
counter will keep going to renew in case the memory on camera are full.
3-7 Battery Icon
The Bat-icon on the upper and lower on right are represented for motion sensor and camera power. All Bat-icons will indicate three status as below:
GOOD: Battery Icon show with solid.
LOW: Battery Icon is half blank.
BAD: Battery icon is totally blank. In this case, the Lighting Flash icon will also disappear. It does alert that you must replace them with new batteries
immediately. Camera will not work at night if battery is bad and still will work at day time till to camera will not be wake up any more..
Caution:
If you notice batteries are bad, you have to replace all batteries with brand new completely. Do Not try to replace some of them only. After
replacement, remember to re-boot the device by the main PW switch.
Important:
Since this unit detects batteries becoming too weak and an blank battery icon appear, the unit will stop working at night but will still takes day
time pictures or video continually.
MAIN UNIT OPERATION MODES
This is a mode switch in the bottom of cabinet. There are three modes to be selected under difference operation.
3-8 PW-ON Mode
The WildSpy Cam will be always required working under this mode. Since the PW-SW is pushed to ON mode, the motion sensor will begin to warms up for
1 minute, then start to detect motion for taking pictures/ Video.
3-9 PW-OFF Mode
Slide the PW to the center position to turn the system power OFF. All pictures and current settings will be retained at this mode and internal real time clock
will still run.
Caution:
Remember to remove all batteries in case you will no longer to use it in order to avoid the metal terminals to be oxidized due to the leakage current
from battery itself to damage the terminal contacts.
3-10 WALK-TEST Mode / Sensitivity Adjustment
Walk-Test Mode
is used to verify the detection range and pointing zone before placing it in the field. After mounted the unit on a tree, push the PW switch
to
Walk-TEST
. The Walk-Test LED will light up last 1 minute to warm up. A radar animation icon with TEST alert is remaining blinking during Walk-Test
mode. Then, Walk-Test Light will goes off and will alert with 3 times flashing once you will be detected in front of the device. Now you try to go far away to
check how long the PIR motion sensor will still see you. The camera does not take any picture during this test process.
Note: The system will resume to normal Scouting
ON DUTY
mode automatically after 3 minutes (Time-Out) since no longer detection of walk-test to be
triggered in order to avoid user may forget to push the PW switch back to ON before he left.
Sensitivity Adjustment
The
DISTANCE
dial on inner panel is used for adjusting sensitivity of the motion sensor (Gain Control). By turning the dial to the right, sensor sensitivity is
set to the Max to detect animal over 50 feet away. You may reduce the detection distance for taking picture with a larger animal target.
Caution:
It is recommended to set
MAX
in warmer environment like in the summer time.
3-11 Walk-Test LED+ DC In-Use Indicator
Both lights will be ON during the first minute of Walk-Test mode warm-up and Camera setting mode. They will blink for 3 times once a walk-test motion is
detected.
In the PIR scouting setting mode, an instant flash is response to each valid key input.
3-12 Turbo Shot
There is switch knob on the right of the scouting LCD. Slide the
Trigger Time
switch to FAST mode, the DC will be set for the fastest speed for shooting. In
this mode, capture speed will be 1 second that double faster than the setting in the BAT-Save while a motion is detected. Setting of BAT_SAVE will be ideal
for extending longer battery life. In case you expect to resume the FAST mode to be Bat-Save, slide the knob for BAT-SAVE and then reboot the Device.
Caution: During the FAST mode is activated, you will not be able to turn on the camera by pressing CAM-PW key except rebooting the device.
3-13 Day / Night Exchange Status
A sensor will sense an environment of Day / Night exchange to control the camera to take a colorful picture at day and monochrome picture at night time
automatically. At a moment of exchanging, an animation
“
F
”
is moving in the scouting LCD. The motion sensor will not be triggered at this period. When it
sense a night time, the inhibited symbol of the IR Flash icon on the scouting LCD will disappear.
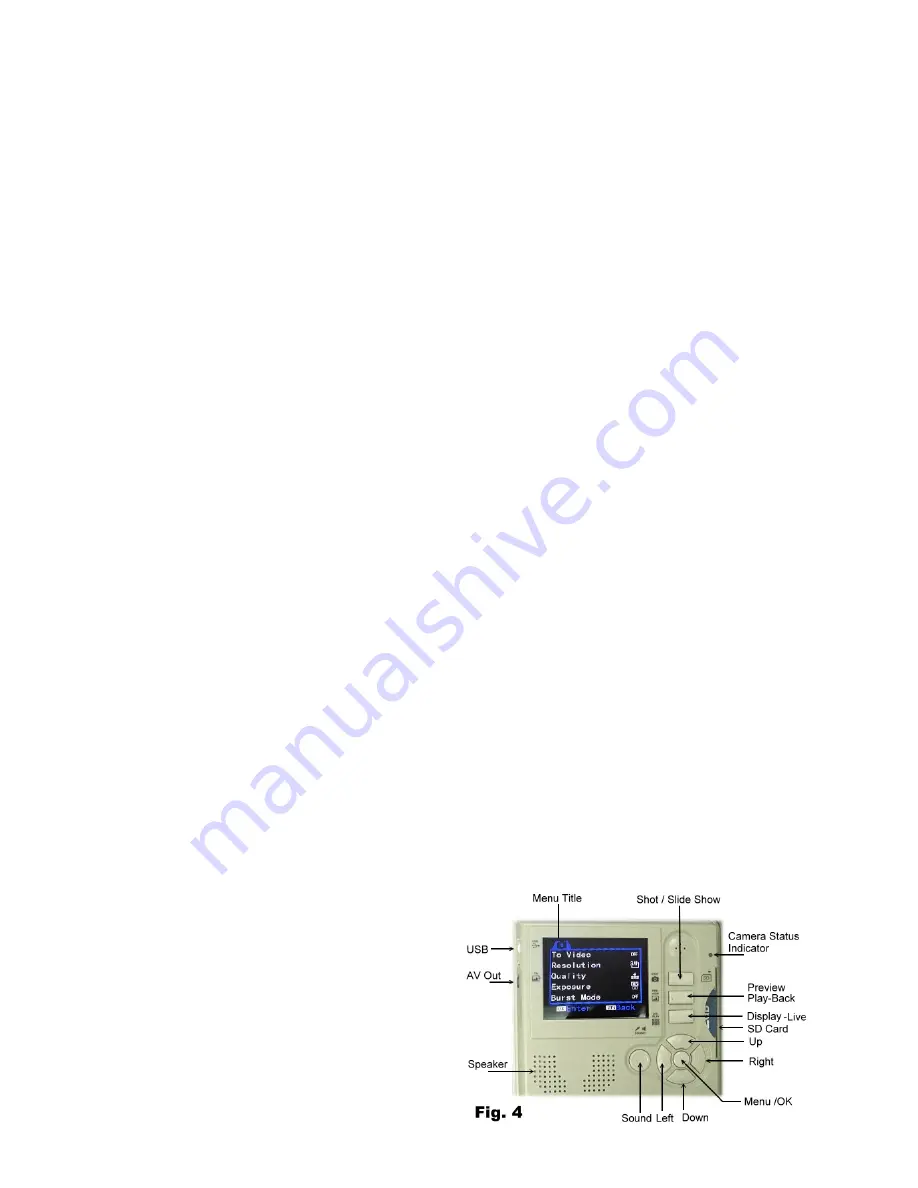
Setting for CAMERA / Operation
Description for Camera Operation Keys which are in the upper portion of the inner panel. See Fig. 4
SHOT
PREVIEW
DISPLAY
MENU
(
OK
Key in Center)
Fig. 4
NAVIGATOR KEYS
UP/DOWN/LEFT/RIGHT
SOUND
3-14 CAM-PW (Camera Power Button)
This button is located on the left of the lower portion.
See
Fig. 3
Before a programming for the camera, be sure the Main Power switch at ON
position. There are two modes that called
LIVE VIEW and PREVIEW
for
camera OPERATION. Once you press CAM-PW to turn on the Camera, it works
at the default of the LIVE VIEW. Then, both the IN-USE and Walk-Test LED are
lighted. The camera status small LED on the right top will alerts with red light for
2 seconds to show camera is PW ON already. As a default, camera screen is
always remaining black until either DISPLAY or PREVIEW key is pressed. When