background image

Power On

Test Mode

page 5

1.

To turn the unit ON press and re-

lease the power button.

2.

Check the battery level icon 

to ensure the batteries just 

installed contain the proper 

charge level. If so, you are ok to 

proceed with camera use.

NOTE: LCD cycle through camera in-

formation. PIR picture number > 

Remaining pictures > Time .

1.

LCD Ready Mode:  The camera will 

automatically enter Ready Mode if a 

button is not pressed for greater than 

30 seconds.

2.

LED Status Light:  During the first 

30 seconds of the LCD Ready Mode, 

the red light will illuminate when a 

PIR event is triggered. After the LCD 

turns off, the red light will blink 2-3 

seconds when photo is taken. After 

2 minutes, all indicator lights will 

turn off until a button is pressed.
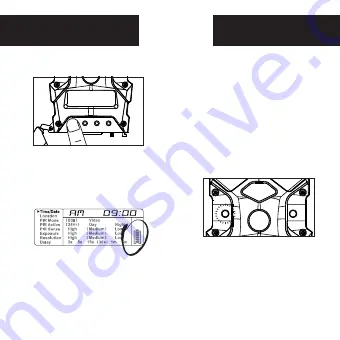
Time/Date


Location


PIR Mode


PIR Active


PIR Sense


Picture


Resolution


Delay


Still


24Hr


High


Regular


High


5s


15s


30s


1m


5m


10m


Video


Day


 Medium


 Wide


 Medium


Night


Low


Low


Summary of Contents for M16i19-8

Page 1: ...Infrared Digital Scouting Camera User s Manual Model M16i19 8...

Page 2: ...Includes page 1 User Manual Camera Unit Adjustable Strap...

Page 3: ...Sensor PIR Motion and Heat up to 60 feet JPEG Digital Stills AVI Digital Video up to 32GB SD Card not included and required Class 4 and above recommended High 16 MP Medium 10 MP Low 5 MP 8 AA batterie...

Page 4: ...liding the latch to the left page 3 3 With the bottom of the camera to wards you Make sure to insert the batteries into the camera with the positive ends towards you where marked positive and the nega...

Page 5: ...Make sure the camera is powered off before removing or installing an SD card If you are using an SD card from other cameras please make sure to format the SD card in your computer prior to use in your...

Page 6: ...will automatically enter Ready Mode if a button is not pressed for greater than 30 seconds 2 LED Status Light During the first 30 seconds of the LCD Ready Mode the red light will illuminate when a PIR...

Page 7: ...p when camera is writing to memory 1 To change date and time start by pressing and release the Enter navigation button to set the hour 2 Press the or navigation button to go up or down in sequence 3 W...

Page 8: ...ss the Enter navigation button while Location is selected The first character will be blinking 2 Press the or navigation but ton to go up or down in sequence Press the Enter navigation button when the...

Page 9: ...active at all times DAY The PIR can be active in daylight hours only NIGHT The PIR can be active in nighttime hours only 1 Press the Enter navigation button while PIR Mode is selected The highlighted...

Page 10: ...HI The PIR detects the smallest movement MED Default The PIR detects most common size movements LO The PIR detects only larger movements 1 2 Press the Enter navigation button while Exposure is selecte...

Page 11: ...ton to move to different options Press the Enter navigation button to save the setting RESOLUTION HI Images will be at the highest resolution but take up the most space MED Images will be at medium r...

Page 12: ...option will be blinking 2 Press the or navigation but ton to move to different options Press the Enter navigation button to save the setting DELAY The time before the camera is able to take another p...

Page 13: ...need an adapter to allow it to fit into standard SD card ports If your computer does not have an SD card port built in you can use an external USB card reader that plugs into any USB port on your comp...

Page 14: ...ing quality To improve the quality of your images try not to mount the unit facing the rising or the setting sun in order to avoid direct sunlight into the camera lens If mounting to a feeder unit or...

Page 15: ...ou will need to go to the Start Menu at the bottom left of your screen and select Computer The summary view will then be illustrated on the right hand side of the window where by the Devices with Remo...

Page 16: ...mplete description of the problem on all enclosed correspondence When possible pack product carefully in original carton Customers are responsible for any shipping cost to WGI Innovations WGI Innovati...

Page 17: ...diate radio frequency energy and if not installed and used in accordance with the instructions may cause harmful interference to radio communications However there is no guarantee that interference wi...

Page 18: ...602 Fountain Parkway Grand Prairie TX 75050 800 847 8269 wildgameinnovations com Wildgame Innovations and the Button Logo are trademarks of Wildgame Innovations LLC...

Reviews: