Wildgame L10b5 User Manual Download Page 10

PIR ACTIVE:

24 HR: The PIR can be active at all times.
DAY: The PIR can be active in daylight 

hours only.
NIGHT: The PIR can be active in 

nighttime hours only.

page 9

page 10

Flextime period:

1. 15 min before Sunrise 

to 1 hour after Sunrise.

2. 1 hour before Sunset 

to 15 min after Sunset

Flextime period:

1. 15 min before Sunrise 

to 1 hour after Sunrise.

2. 1 hour before Sunset 

to 15 min after Sunset

Flextime period:

1. 15 min before Sunrise 

to 15 min after Sunset

1 HOUR

AFTER

SUNRISE

1 HOUR

BEFORE

SUNSET

15 MINUTES

BEFORE

SUNRISE

15 MINUTES

AFTER

SUNSET

FLEX

TIME

FLEX

TIME

FLEX

TIME

FLEX

TIME

PIR

INACTIVE

Camera is inactive before and after Flextime periods.

Flextime is active twice a day.

Flextime is active twice a day.

Flextime is active during daytime.

Camera is in PIR mode before and after Flextime periods.

Camera is in PIR mode before and after Flextime periods.

INACTIVE

INACTIVE

INACTIVE

INACTIVE

INACTIVE

PIR

PIR

FLEXTIME

PIR

PIR

P1

FLEXTIME selected

BOTH selected

P2

INTERVAL

Fl PIR period:

1. 15 min before Sunrise 

to 1 hour after Sunrise.

2. 1 hour before Sunset 

to 15 min after Sunset

Fl PIR period:

1. 15 min before Sunrise 

to 1 hour after Sunrise.

2. 1 hour before Sunset 

to 15 min after Sunset

Fl PIR period:

1. 15 min before Sunrise 

to 15 min after Sunset

P1

P2

INTERVAL

1 HOUR

AFTER

SUNRISE

1 HOUR

BEFORE

SUNSET

15 MINUTES

BEFORE

SUNRISE

15 MINUTES

AFTER

SUNSET

FLEX

TIME

FLEX

TIME

FLEX

TIME

FLEX

TIME

PIR

PIR

PIR

PIR

PIR

PIR

PIR

FLEXTIME & PIR

PIR

PIR

Camera is inactive before and after Fl PIR periods.

Fl PIR is active twice a day.

Camera is in PIR mode before and after Fl PIR periods.

Fl PIR is active twice a day.

Camera is in PIR mode before and after Fl PIR periods.

Fl PIR is active during daytime.
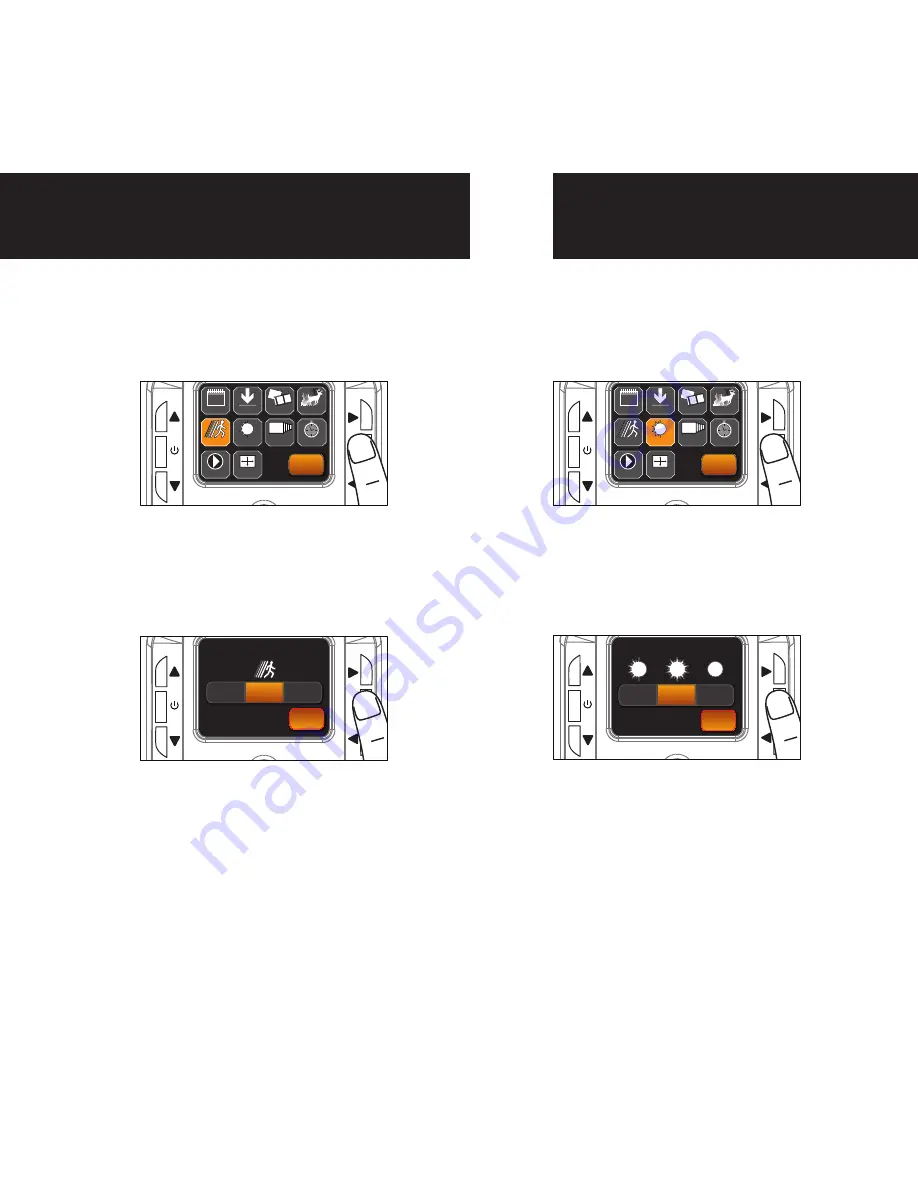
PIR Sensitivity

1.

To change PIR Sensitivity, enter 

MENU and press the UP,DN,L or 

R buttons to navigate to the PIR 

Sensitivity icon and press OK.

2.

Press the L, R button to select 

the sensitivity and press OK to 

save. Then press OK again to go 

back to the MENU. 

UP

OK

L

R

DN

BACK

ACTIVE TIME

LOCATION

TRIGGER

DELAY

PIR SENSITIVITY

FLEXTIME 

+

+

DATE & TIME

30

PLAY BACK

IMAGE TYPE

VIEW ASSIST

UP

OK

L

R

DN

BACK

HI

MED

LOW

PIR SENSITIVITY

Active Time

1.

To change the Active Time, enter 

MENU and press the UP,DN,L or R 

buttons to navigate to the Active 

Time icon and press OK.

2.

Press the L, R button to select the 

active time and press OK to save. 

Then press OK again to go back to 

the MENU. 

UP

OK

L

R

DN

BACK

ACTIVE TIME

LOCATION

TRIGGER

DELAY

PIR SENSITIVITY

FLEXTIME 

+

+

DATE & TIME

30

PLAY BACK

IMAGE TYPE

VIEW ASSIST

UP

OK

L

R

DN

BACK

24 HR

DAY

NIGHT

ACTIVE TIME

PIR SENSITIVITY

ACTIVE TIME

Summary of Contents for L10b5

Page 1: ...Invisible Infrared Digital Scouting Camera User s Manual Model L10b5...

Page 2: ...Includes USB Cable 2 Bungee Cords User Manual Flextime Player Software Camera Unit NOTE Flextime Player Software is optional Flextime files can be played by using most media players page 1...

Page 3: ...i USB style included High 10MP Medium 8MP Low 5MP 12 AA batteries not included and required Alkaline recommended External power port Estimated up to 1 year or 55 000 photos Built in battery to retain...

Page 4: ...the bottom of the camera towards you load 6 AA batteries with the positive ends towards you in the left battery chamber and load 6 AA batteries with the positive ends towards you in the right battery...

Page 5: ...connectors facing down 5 TIPS Make sure the SD Card is unlocked small switch on the side of the SD Card or the camera LCD will read LOCK IMPORTANT Make sure the camera is powered off before removing...

Page 6: ...Mode The camera will automatically enter Ready Mode if a button is not pressed for greater than 30 seconds The status lights will illuminate for a total of 2 minutes 2 UP OK L R DN 3 04 2 PM UP OK L...

Page 7: ...ed by pressing the Power button briefly Note The LCD will not wake up when camera is writing to memory 2 UP OK L R DN UP OK L R DN BACK ACTIVE TIME LOCATION TRIGGER DELAY PIRSENSITIVITY FLEXTIME DATE...

Page 8: ...R buttons to navigate to the Image Type icon and press OK 2 Press the L R button to select STILL and press OK Then select the Resolu tion and press OK Select the Exposure and press OK Then select the...

Page 9: ...ted to the Flextime Menu see page 11 Image Type Video 1 To change Image Type enter MENU and press the UP DN L or R buttons to navigate to the Image Type icon and press OK 2 Press the L R button to sel...

Page 10: ...U UP OK L R DN BACK ACTIVE TIME LOCATION TRIGGER DELAY PIRSENSITIVITY FLEXTIME DATE TIME 30 PLAY BACK IMAGE TYPE VIEW ASSIST UP OK L R DN BACK HI MED LOW PIR SENSITIVITY Active Time 1 To change the Ac...

Page 11: ...s INACTIVE INACTIVE INACTIVE INACTIVE INACTIVE PIR PIR FLEXTIME PIR PIR P1 FLEXTIME selected BOTH selected P2 INTERVAL Flextime PIR period 1 15 min before Sunrise to 1 hour after Sunrise 2 1 hour befo...

Page 12: ...ion properly BACK P1 P2 Interval 3 Press the L R button to select the time between images and press OK to save Then press OK again to go back to the MENU UP OK L R DN FLEXTIME DELAY BACK 1min 2min 5mi...

Page 13: ...LETE Press L or R then select the Delete button to delete the selected image UP OK L R DN BACK ZOOM IN DELETE ZOOM OUT Playback Videos 1 To view your videos enter MENU and press the UP DN L or R butto...

Page 14: ...ENU and press the UP DN L or R buttons to navigate to the View Assist icon and press OK 2 Once in View Assist the camera will show a live view of the lens Adjust the camera locations to your liking an...

Page 15: ...as come standard with an external power port You must open the weather resistant cover and use a Wildgame Innovations 6 Volt camera battery accessory 1 087 F 08 15PM 11 12 2011 T08 0200 Temperature Ti...

Page 16: ...cords through the mounting holes on the left or right side of the camera Then stretch the cords around the tree and latch the other ends of the bungee cords through the mounting holes on the opposite...

Page 17: ...e below listed steps are to serve as a guideline and may have to be slightly modified based on the specific operating system and preference as on your personal computer TIPS Recommended distance from...

Page 18: ...the right hand side of the window where the Devices with Removable Storage will be listed The computer will recognize the camera as Removable Disk Please select Removable Disk from this menu or doubl...

Page 19: ...Removable Disk the SD Card then you will need to go to the Start Menu at the bottom left of your screen and select Computer The summary view will then be illustrated on the right hand side of the wind...

Page 20: ...sed correspondence When possible pack product carefully in original carton Customers are responsible for any shipping cost to WGI Innovations WGI Innovations will pay the shipping cost of replacement...

Page 21: ...dio frequency energy and if not installed and used in accordance with the instructions may cause harmful interference to radio communications However there is no guarantee that interference will not o...

Page 22: ...n Parkway Grand Prairie TX 75050 800 847 8269 Wildgame Innovations and the Button Logo are TM trademarks of Wildgame Innovations LLC Sport Responsible Redux and Flextime are TM trademarks of WGI Innov...

Reviews: