Quick start guide (translation from original)
wienet
IoT-Gateway Starterkit
IOT SK 115-W
83.041.1000.0
Wieland Electric GmbH
Brennerstraße 10 – 14
96052 Bamberg
Phone +49 951 9324-0
Fax
+49 951 9324-198
Doc. #
BA001201
– 07/2019 (Rev. A)
wienet
IOT SK 115-W
EN
Quick start guide
1
Commissioning
To establish a network connection, your PC must be in the same network as the IoT gate-
way.
Variant 1 Standard:
1.
Connect your PC to the IoT gateway via Ethernet cable.
2.
Set the IP address of network adapter manually on the PC.
IP address: 192.168.1.100-250
Network mask: 255.255.255.0
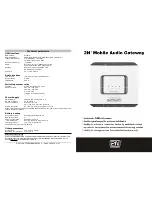
Variant 2: wienet IoT IP-Tool
Download the
wienet
IoT IP-Tool from
and install the tool.
1.
Connect your PC to the IoT gateway via Ethernet cable.
2.
Open the tool.
▷
Your IoT gateway is now displayed.
You can change the IP address of the gateway directly in the
wienet
IoT IP-Tool and thus in-
tegrate the gateway into your network.
3.
Enter the new IP address and, if necessary, the new network mask and the gateway IP
address. Click on
Configure
.
Username: admin
Password: wienet123
▷
After successful configuration, your IoT gateway has the IP address you specified.
4.
Click the
HTTP
button to open the web interface of the IoT gateway.
2
Change user password
After successful login to the web interface of the
wienet
IoT gateway, you must change the
password first.
Default:
Username: admin
Password: wienet123
Enter your new password according to the guidelines and follow the instructions.
3
Communication with the wienetCloud portal
To communicate successfully with the server, follow the steps below.
a.
Connecting to the internet with IoT gateway
1.
Go to the web interface of the IoT gateway.
2.
Go via the
Settings icon
to
Settings
and then to
Network
. Select according to your IoT
gateway type
Ethernet
,
WLAN
or
Cellular Modem
.
•
Ethernet:
Set the Ethernet interface to
DHCP
. Click
OK
and reboot the system. Con-
nect the corresponding port to the internet via an Ethernet cable with a gateway.
•
WLAN:
In the
Network Settings
, select
Use DHCP
. To scan for WLAN, click the
Search
button. Select the correct WLAN and enter the encryption key. Click
OK
and
reboot the gateway.
•
Cellular modem:
Go to
Cellular modem
and select
Enable cellular modem
. Then
enter the SIM PIN and the APN. Click
OK
and reboot the system.
3.
To test the internet connection, click on the
Diagnose icon
and select the
Ping
tab.
Enter the following IP address under
Host
: 172.217.16.131 (google.de)
4.
Click
Start
.
b.
Create project
•
Starter kit
: After you have received your Starter kit, please contact our technical support
(Tel. +49 (0) 951 9324-995). They will create a project for you on our test server and send
you the access data.
•
Gateway:
Go to
https://www.iot.wienet.cloud/register
and register for the
wienet
Cloud
portal. After checking your data, your portal access will be activated and you can log in.
c.
Activate Gateway
1.
To activate an IoT gateway, you must log in to the corresponding project, see step3b.
2.
In the
View
window, go to the
Gateway
tab. Select
Activate Gateway
.
3.
Select your IoT gateway type and enter the MAC address of the IoT gateway.
4.
Fill in the following fields:
Scope
,
Username
and
Password
.
Remember this information well or note it!
5.
To activate the IoT gateway, click on
ORDER AND ACTIVATE WITH COSTS
. There are no
costs for the Starter kits, as one year of cloud access to our test server is included.
6.
Go back to the web interface of the IoT Gateway.
7.
Go via the
Settings icon
to
Settings
and then to
wienetCloud
.
8.
Fill in the following fields:
Host
,
Project
,
Scope
,
Username
and
Password
. This Infor-
mation must match the information you provided in the
wienet
Cloud.
9.
Click
OK
and reboot the gateway.
Under
Settings >Event log
, you can track the status of the connection and possible errors.
After the successful connection, your IoT gateway is highlighted green in the
wienet
Cloud
portal.
Reboot


