background image


Issue 5.2 – March  2016 


Page 31 


1

2

3

4

5

6

7


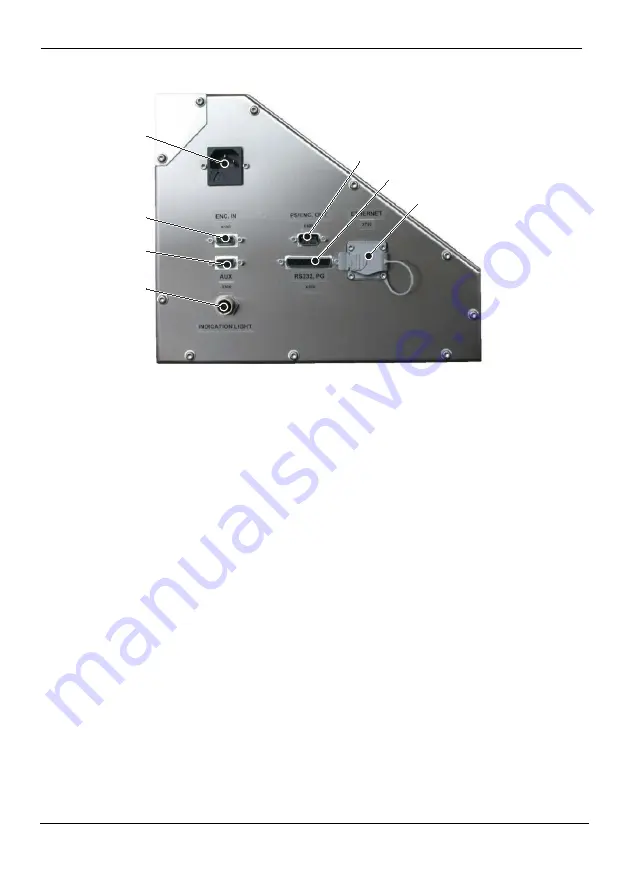
External connections 

1  Power supply 

100-240V 

2  Shaft encoder connection 
 

(input) 

Rotation impulse transmitter for control-
ling the printing speed. 

3  Additional connection 

-- 

4  Indication light (optional) 

A three-coloured signal lamp (optionally 
with horn) can also be connected as an 
option. 

5  Shaft encoder connection 
 

(output) 

Rotation impulse transmitter for control-
ling the printing speed. 

6  RS232 Interface 

The inkjet printer is addressed via the 
RS232 interface for remote operation 
with the Komax-machines. 

7  Ethernet interface 

The printer can be connected to a net-
work via the Ethernet interface. 


Summary of Contents for Komax ims 295 BC

Page 1: ...ims 295 Series Operating Manual ...

Page 2: ...Page 2 Issue 5 2 March 2016 Notes ...

Page 3: ...l Safety Measures 12 3 13 Safety Measures for Use of Inks Make Up and Wash 13 3 14 Safety for Maintenance and Troubleshooting 13 3 15 Cleaning the Machine and Disposal 14 3 16 Use of Inks in Connection with Foodstuffs 14 3 17 Training of Personnel 14 3 18 Personal Safety Equipment 15 3 19 Noise of the Inkjet Printer 15 4 Structure and Function 16 4 1 Cabinet View Komax ims 295 MC BS 16 4 2 Cabinet...

Page 4: ...tching off 38 7 5 Starting up after a long Period out of Operation 39 7 6 Shutdown for extended idle Periods 39 8 Faulty Printing Quality 40 9 Alarm Messages 42 9 1 List of Error Messages and their Remedies 43 10 Maintenance 46 10 1 Maintenance and Inspection Intervals 47 10 2 Refilling Ink or Make Up 48 11 Disposal 49 12 EC Declaration of Conformity 50 ...

Page 5: ...31 799 11 0 Fax 49 0 77 31 799 11 90 infoservice wiedenbach com www wiedenbach com Translation of the original operating manual All rights reserved No part of this publication may be reproduced stored on a retrieval system or transmitted in any form or by any means electronic mechanical photocopying recording or otherwise without the prior permission in written form of WIEDENBACH Subject to techni...

Page 6: ...DENBACH inks should be used and the make up and wash approved for the ink 1 2 Improper Use Use of the ink jet printer in explosion proof rooms outside industrial premises in the vicinity of electrical devices naked lights radiators and other sources of heat and sparks for printing red hot or extremely heated objects 1 3 Additional Documents Additional information can be found on the enclosed CD ...

Page 7: ...tainless steel IP 54 Printing speed Up to 10 m s Temperature range 5 C to 35 C ink dependent Up to 90 rH non condensing Ink capacity 1 00 Litre Make up capacity 1 25 Litre Compressed air 6 bar Weight 26 4 kg 30 3 kg Dimensions printer H x W x D 630 x 418 x 325 mm Space required print er H x W x D 630 x 700 x 325 mm Dimensions print head Ø 40 mm L 252 mm Bending radius Print head conduit 100 mm min...

Page 8: ...n addition the rules and regulations for the prevention of accidents applicable at the respective application site must be observed 3 2 Obligation of the Owner The owner is obliged to only allow persons to work on the ink jet printer who are familiar with the basic regulations governing work safety and the prevention of accidents and are instructed in the handling of the inkjet printer have read a...

Page 9: ...ific information for inks Make Up and Wash fluids WIEDENBACH will be glad to answer any other questions you may have 3 4 Dangers when handling the Printer The ink jet printer conforms to current technology and safety require ments Nevertheless damage to the life and limb of the user or third persons or damage to the inkjet printer or other property may occur dur ing its use The inkjet printer may ...

Page 10: ...gnal word Warning indicates a possible danger to the life and health of persons Failure to heed these instructions can result in serious damage to health and even fatal injury CAUTION This symbol in connection with the signal word Caution indicates a possibly dangerous situation Failure to heed these instructions can lead to minor injury or property damage IMPORTANT This symbol provides important ...

Page 11: ...le 3 7 Electrical Safety DANGER Work on the electrical supply may only be carried out by a qualified electrician or the local KOMAX representative Check the electrical equipment of the inkjet printer regularly Fix loose connections and repair damaged cables immediately The inkjet printer must always be kept closed 3 8 Mechanical and electrical Interfaces Danger areas at interfaces between the inkj...

Page 12: ...manufacturer to the same load and safety specifica tions 3 11 Protective Devices All the protective devices and covers must be fitted and functioning properly before starting the machine Protective devices and covers may only be removed when the inkjet printer is switched off The housing of the inkjet printer may not be used as a resting place for objects 3 12 Informal Safety Measures The operatin...

Page 13: ...nd ink jet printers may never be kept or placed in the vicinity of electrical equipment naked flames radiators and other sources of heat and sparks Using cellular phones and smoking in the offing of the ink jet printer is forbidden IMPORTANT Use and mixture of other non approved inks Make Up and Wash are therefore strictly prohibited and any guarantee is excluded See the special instructions in th...

Page 14: ...ass The print ers have never been used for any other purpose beforehand 3 17 Training of Personnel Only trained and instructed personnel may work on the inkjet printer The responsibilities of the personnel must be clearly defined for opera tion maintenance and service Personnel being trained may only work on the inkjet printer under the supervision of an experienced person The operator must be ins...

Page 15: ...henever there is a danger of coming into contact with ink or Make Up Wear protective glasses Ink and Make Up can cause irritation of the eyes Wear protective glasses whenever there is a danger of ink or Make Up splashing or evaporating 3 19 Noise of the Inkjet Printer The continuous sound pressure level emanating from the inkjet printer is 70 dB A A higher sound pressure level may occur depending ...

Page 16: ...7 8 9 10 11 Cabinet View 1 Data input and control panel 2 Transport handle 3 Hydraulic cover 4 Print head Return and dosing pump behind ma nometer cover 5 Pressure pump Toothed wheel pump head 6 Pressure regulator 7 Ink tank 8 Make Up tank 9 Main filter 10 Diaphragm tank 11 Pressure gauge system pressure ...

Page 17: ...Cabinet View Komax ims 295 BC 1 2 3 4 5 6 7 8 9 Cabinet View 1 Data input and control panel 2 Transport handle 3 Hydraulic cover 4 Print head 5 Dosing pump 6 Return pump 7 Pressure pump Toothed wheel pump head 8 Ink tank 9 Make Up tank ...

Page 18: ...e Make Up transparent 4 Charge electrode 5 Control electrode 6 Basis element 7 Deflection plates 8 Flight time electrode 9 Gutter pipe block 10 Nozzle 11 Mounting bracket for print head cover 12 Locking screw for inkjet adjustment 13 Excentric 14 Print head ventilation blue 15 Heating element IMPORTANT The print head and the supply hose must be fixed firmly and without vibrations so that no person...

Page 19: ...Recommended Pressure Settings depending on ink type Nozzle Frequency Pressure 60 µm 84 kHz 3 2 3 8 bar 40µm 120 kHz 3 6 4 5 bar Nozzle Frequency Pressure from SW Version 60 µm 84 kHz 2 7 3 3 bar V13 3 9 40µm 120 kHz 3 7 4 3 bar V13 3 8 ...

Page 20: ...transport instructions on the packing Transport the printer upright vibration free and protected against frost with suitable means of transport pallet transport box 5 2 Preparation for Transport Switch off the printer and disconnect it from the power supply Disconnect the compressed air supply Completely empty the printer or attach transport locks to a full printer see chapter 5 3 Close the hydrau...

Page 21: ...t due to temperature fluctuations Open the tank cap carefully to allow for pressure compensation Printers which are delivered filled with ink and Make Up are fitted with transport locks Remove the transport locks before commissioning IMPORTANT Keep the transport locks in a safe place Fit the transport locks before every transport or remove the ink and Make Up from the tanks ...

Page 22: ...Page 22 Issue 5 2 March 2016 5 3 1 Transport Protections Proceed as follows to remove the protections Open the hydraulic cover Remove the 3 stoppers 1 12 mm 10 mm ...

Page 23: ...Issue 5 2 March 2016 Page 23 12 mm For mounting the protections proceed in reverse order ...

Page 24: ...Page 24 Issue 5 2 March 2016 5 3 2 Transport locks in condenser Proceed as follows to remove the transport locks Open the hydraulic cover Remove the 4 stoppers 1 12 mm ...

Page 25: ...Issue 5 2 March 2016 Page 25 ...

Page 26: ...Page 26 Issue 5 2 March 2016 12 mm Proceed in the reverse order to install the transport locks ...

Page 27: ... tightly and be easily accessible for the fire brigade Do not store these liquids together with highly inflammable solids Observe the instructions in the safety data sheets Observe the locally valid regulations for the storage of volatile in flammable solvent based materials IMPORTANT Store printers upright and protected from frost and heat Protect against moisture Leave the printer in the packagi...

Page 28: ...in well aired rooms The printer must be set up stable If the printer is set on a WIEDENBACH wheeled underframe it has to be fastened with safety elements on the surface The power connector on the printer housing is used as a safety separator acc to IEC60950 and must be easily accessible Lay down print head hose and connection cable so that no per sons can get caught The difference in height betwee...

Page 29: ...ge Place the printer on a suitable base and fasten the printing head IMPORTANT Lay the printing head hose and all connecting cables so that no one can trip over them Open the hydraulic cover see chapter 4 1 and check whether connections have come loose during transport Remove the transport locks and install the exhaust air filter and hose connections provided see chapter 5 3 Connect the printer el...

Page 30: ...s sure to 6 bar Increase the system pressure slowly to the nominal pressure of 3 3 8 bar with the system pressure regulator ims 295 BS 3 6 4 5 bar Press the red POWER key on the keyboard for 1 second Start up the printer see chapter 7 2 IMPORTANT Check all the connections for leaks during the start phase ...

Page 31: ...ication light optional A three coloured signal lamp optionally with horn can also be connected as an option 5 Shaft encoder connection output Rotation impulse transmitter for control ling the printing speed 6 RS232 Interface The inkjet printer is addressed via the RS232 interface for remote operation with the Komax machines 7 Ethernet interface The printer can be connected to a net work via the Et...

Page 32: ...head Turn the print head cover anticlockwise Place funnel bottle below the print head Open hydraulic cover Infill ink and make up see chapter 10 2 Start up the printer see chapter 7 2 Shut down the printer IMPORTANT This procedure is necessary to ensure that all hydraulic components are completely filled with ink and Make Up Close the head cover of the print head and the hydraulic cover Start up t...

Page 33: ...void any explosive atmospheres Every source of ignition must be kept away 7 Operation DANGER Electrical hazard Work on electrical installations may only be carried out by a qualified electrician All protective devices and covers must be fitted and functioning properly before starting the inkjet printer CAUTION Ink and Make Up can cause skin burns and irritation of the eyes Never point the printing...

Page 34: ... Switching the device to stand by The activated LED indicates that the device is ready for operation 3 QUIT key Quit error messages Switch to alarm menu Stop alarm signal 4 SYS key From the standby menu the SYS key switches into the system settings menu From the regular menu the SYS key switches into sys tem menu 5 TEXT key From the standby menu the TEXT key switches into edit menu From the regula...

Page 35: ... in a printing data record Home and End function in the Edit function 9 Function key F SHIFT Open the menu of the second level 10 Function keys F1 F5 With the functions keys F1 F5 the functions can be started If the function keys are pressed at the same time as the F SHIFT the menus of the second level can be reached 11 TAB keys Jump between setting boxes in the menu 12 ESC key Exit or reject menu...

Page 36: ... red POWER key for 1 second The power supply is ac tivated and the boot process starts After a view seconds the display shows StandBy mode Press the ON key The start process lasts approx 2 to 3 min The LED of the ON lights steadily and the main menu appears in the display Then the display shows the text in the printing output ...

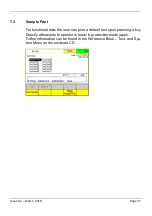
Page 37: ...Print For functional tests the user can print a default text upon pressing a key Directly afterwards th eprinter is ready in production mode again Futher information can be found in the Reference Book Text and Sys tem Menu on the enclosed CD ...

Page 38: ...sage appears with the question whether the printer should be shut down Confirm with ENTER The printer is now shut down regularly and afterwards switched off automatically IMPORTANT For maintenance purpose the printer has also to be without cur rent by taking out the main cable If the printer has been switched off by a power failure or improperly restart the device as quickly as possible by pressin...

Page 39: ...ion the printer has to be vented This may only be done by trained service personnel See information on en closed CD See chapter Bleeding in Reference Book Text and System Menu 7 6 Shutdown for extended idle Periods CP Print head Press STBY button Ink jet will be stopped Rinse the gutter tube with 10 ml of Make Up 1 ...

Page 40: ...fectly clean Is modulation drop separation set correctly Is alignment of the ink jet in the charge electrode parallel central Is system pressure set correctly see chapter 6 2 Does the ink jet hit the gutter tube Correct ink density IMPORTANT See also the enclosed CD for further information about printing quality faults Correctly set printing quality Omitted or double drops The horizontal and verti...

Page 41: ...ge dissolves vertically the drops are spread too far apart Print head is too far away from the surface being printed Print image interrupted Poorly set drop separation The single drops are not charged correctly Incomplete print image drops missing Jet too far towards the centre of the gutter pipe Drops formed on the gutter pipe High voltage too low ...

Page 42: ...or information F1 key Open Info menu Displaying subsequent errors F2 key Open Next menu If several errors occur simultaneously this command switches between the messages Deleting error messages The error has to be recovered before printing can be continued F3 Taste Deletes the error message and the error code Stop Ink Stream F4 key Open the Stop Ink menu the display shows the information Stop Ink ...

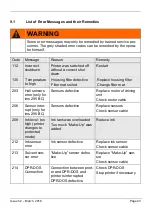
Page 43: ...03 Hall sensors error only for ims 295 BC Sensors defective Replace motor of driving unit Check motor cable 206 Sensor inter rupt only for ims 295 BC Sensors defective Replace sensors Check sensor cable 208 Ink level too high printer changes to protected mode Ink tank was overloaded Too much Make Up was added Reduce ink 212 Ink sensor error Ink sensor defective Replace ink sensor Check sensor cabl...

Page 44: ...nearly empty Refill Make Up tank 302 HV error Deflection plates are dirty Clean print head High voltage flashover No modulation High voltage too small Contact your Komax rep resentative 307 Gutter suction error Gutter sensor in the print head did not identify the ink Check ink jet adjustment If the error remains con tact your Komax repre sentative 325 Gutter suction warning Gutter sensor in the pr...

Page 45: ...Issue 5 2 March 2016 Page 45 Code Message Reason Remedy or Contact your Komax rep resentative 501 509 Corr values missing Printer configuration wrong Choose correct frequency nozzle values ...

Page 46: ...pair work may only be carried out by WIEDENBACH or companies authorized by WIEDENBACH IMPORTANT Observe the safety instructions in chapter 3 and the safety data sheets for all work on the inkjet printer Catch ink droplets which occur during maintenance with an earthed container of conductive material CAUTION Wear protective gloves Ink and Make Up can cause skin burns Wear protective gloves for all...

Page 47: ...erator himself Element Interval Action Flight time electrode Charge electrode Deflection plates Gutter pipe block Nozzle yearly Visual checks on print head settings after opening the cover if necessary cleaning Tanks Filter Fittings Pumps monthly Visual checks on hy draulic system after opening the hy draulic cover Dye based ink yearly Change Pigmented ink six monthly Change Housing filter weekly ...

Page 48: ...be replaced it must be disposed of according to local environmental and safety regulations 10 2 Refilling Ink or Make Up IMPORTANT Refill ink into ink tank and Make Up into Make Up tank only Check content before refilling DANGER Should spilled or leaked ink have entered any cavities e g the open ings of the optional aircon unit these cavities must be cleaned and sufficiently aired immediately in o...

Page 49: ... must be cleared up immediately with suita ble material with regard for the safety of personnel Special attention must be paid not to allow spilled ink or clean ing residue to get into plug holes or drains Inks and associated fluids contaminated cleaning materials and changed filters must be disposed of according to local regula tions See also safety data sheets Should spilled or leaked ink have e...

Page 50: ...Page 50 Issue 5 2 March 2016 12 EC Declaration of Conformity ...

Page 51: ...Issue 5 2 March 2016 Page 51 Notes ...

Page 52: ...ext and System Menu manuals on the CD ROM for further details Komax AG Professionals in Advanced Automation Industriestr 6 6036 Dierikon LU Switzerland Tel 41 0 41 455 0 455 Fax 41 0 41 450 4 266 info din komaxgroup com http www komaxgroup com Article number 14 080411 03 Operating Manual US Korean Japanese ...

Reviews: