background image

Aquatronic 3 ultra

SPARE PARTS

WARNING 

WARNING 

P12

7210

02

INLET


>POM-GF30< 

P12

7210

02

INLET


 Ref.  Description 

Part No.


1.

  Power selector including  

    microswitches 

S12121008

  2.

  Terminal block & outlet 

    pipe assembly 

S12721003

  3.

  Thermal cut-out 

22011180

  4.

  Heater can assembly 


8.5kW 

P12120701 


9.5kW 

P12120702 


10.5kW 

P12120703

  5.

  Stabiliser valve/solenoid 

    assembly 

P12120800

  6.

  PRD & ‘O’ ring 

82800450


7.

  Inlet pipe assembly 

S12721002

  8.

  Trimplate (white) 

7053372 

    Trimplate (satin) 

7053433


  Drip shield 

7052871


  Neon and switch assembly 

P12720903

  9.

  Cover assembly (white) 

P15910600 

    Cover assembly (satin) 

P22720601


10.

  Start/stop switch assembly 

82301310

 11.

  Installation trim 

(optional)


7053517

 12.

  Back plare (satin) 

7053432

1

2

2

3

4

5

6

7

8

9

10

11

12

12

11

Summary of Contents for TRITON Aquatronic 3 ultra

Page 1: ...Installers please note these instructions are to be left with the user 2180541F February 2009 Installation and operating instructions Aquatronic 3 ultra electric shower...

Page 2: ...connections 11 Replacing the cover 12 Commissioning 13 Operating the shower 14 15 Operating functions 16 Instructions for installers and service engineers only 17 Spare parts 18 Fault finding 19 20 G...

Page 3: ...could also cause the Pressure Relief Device in the unit to operate This product is not suitable for mounting into steam rooms or steam cubicles PLUMBING The plumbing installation must comply with Wat...

Page 4: ...h the heater can which determines the water temperature The slower the flow the hotter the water becomes the faster the flow the cooler the water b During winter the mains water supply will be cooler...

Page 5: ...n 14 Pressure relief device 15 Outlet temperature limiter 16 Neons 17 Trimplate Inside cover fig 2 18 Cover tags 19 Neon brackets 20 Start Stop switch Screw fixing kit Instructions guarantee etc WARNI...

Page 6: ...e way which will take the fuse or Miniature Circuit Breaker MCB necessary for the shower Fig 4 4 1 If your consumer unit has a rating below 80A or if there is no spare fuse way then the installation w...

Page 7: ...current carrying capacity of the cable must be at least that of the shower circuit protection see Table B 8 1 To obtain full advantage of the power provided by the shower use the shortest cable route...

Page 8: ...it throughout the year During periods of high ambient temperatures it may be necessary to select a low power setting to achieve your preferred shower temperature The water supply can be taken from a c...

Page 9: ...not operate the shower with a damaged or kinked shower hose or a blocked showerhead which can cause the PRD to operate When commissioning the showerhead must be removed from the flexible hose while a...

Page 10: ...m the top is required then a small area will need to be cut out in the backplate fig 10 If installing a feed pipe from the rear or bottom the centre of the inlet valve to the wall surface is 20 mm fig...

Page 11: ...position leaving the base of the screw head protruding 6 mm out from the wall Hook the backplate over the top screw and fit the bottom fixing screw into position Do not fully tighten the screws at th...

Page 12: ...of the shower flush out the pipework to remove all swarf and system debris This can be achieved by connecting a hose to the pipework and turning on the mains water supply long enough to clear the deb...

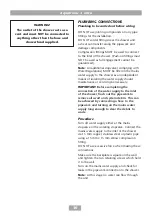
Page 13: ...of the supply cable must be stripped back to the minimum The supply cable must be secured either by routing through conduit or in trunking or by embedding in the wall in accordance with current IEE r...

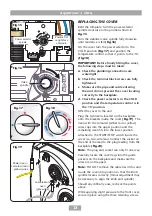
Page 14: ...he brackets inside the cover fig 19 The neon with the coloured either red or yellow wires clips into the upper position and the remaining neon fits into the lower position Attached to the Start Stop s...

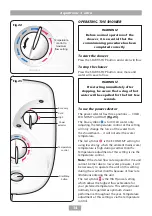
Page 15: ...p button fig 21 and wait until water starts to flow from the flexible hose Slowly turn the temperature control fully anti clockwise to 1 the maximum flow position fig 22 It will take about thirty seco...

Page 16: ...l Note If the stated flow rate required for the unit cannot be met due to low water pressure it will be necessary to operate the unit on this setting during the warmer months because of flow rate limi...

Page 17: ...satisfactory by testing with your hand before stepping under the showerhead There will always be a time delay of a few seconds between selecting a flow rate and the water reaching the stable temperat...

Page 18: ...operation if an overheat temperature is sensed power to the elements will be reduced although water will continue to flow When the temperature has cooled sufficiently power to the elements will be au...

Page 19: ...f both the electricity supply and water supply at the mains The inlet filter is situated at the bottom of the inlet pipe fig 25 To gain access to the filter remove the trimplate and then unscrew the r...

Page 20: ...assembly 8 5kW P12120701 9 5kW P12120702 10 5kW P12120703 5 Stabiliser valve solenoid assembly P12120800 6 PRD O ring 82800450 7 Inlet pipe assembly S12721002 8 Trimplate white 7053372 Trimplate sati...

Page 21: ...aps are fully open Check if blockage in inlet filter 2 3 1 Switch to economy power setting and readjust flow rate to give required temperature 3 1 1 See Water too hot causes 2 1 2 2 and 2 3 and their...

Page 22: ...the water pressure resumes to normal Low pressure indicator extinguishes 6 1 1 Clean sprayplate and then fit a new PRD 6 2 1 Check for free passage through hose Replace hose if necessary and then fit...

Page 23: ...Aquatronic 3 ultra 21...

Page 24: ...he event of a complaint occurring the following procedure should be followed 1 Telephone Customer Service on 0844 980 0735 having available the model number and power rating of the product together wi...

Reviews: