background image

5

4

Burn Protection
The welding arc is intense and visibly bright. 

Its radiation can damage eyes, penetrate 

light-weight clothing, reflect from light-

coloured surfaces, and burn the skin and 

eyes. Burns resulting from gas-shielded 

arcs resemble acute sunburn, but can be 

more severe and painful.
Wear protective clothing - leather or heat 

resistant gloves, hat, and safety-toe boots. 

Button shirt collar and pocket flaps, and 

wear cuff less trousers to avoid entry of 

sparks and slag.
Avoid oily or greasy clothing. A spark may 

ignite them. Hot metal such as electrode 

stubs and work pieces should never be 

handled without gloves.
Ear plugs should be worn when welding in 

overhead positions or in a confined space. 

A hard hat should be worn when others are 

working overhead.
Flammable hair preparations should not be 

used by persons intending to weld or cut.

Toxic Fumes
Adequate ventilation with air is essential. 

Severe discomfort, illness or death can 

result from fumes, vapours, heat, or oxygen 

depletion that welding or cutting may 

produce. NEVER ventilate with oxygen.
Lead, cadmium, zinc, mercury, and 

beryllium bearing and similar materials 

when welded or cut may produce harmful 

concentrations of toxic fumes. Adequate 

local exhaust ventilation must be used, 

or each person in the area as well as 

the operator must wear an air-supplied 

respirator. For beryllium, both must be used.

Metals coated with or containing materials 

that emit fumes should not be heated 

unless coating is removed from the work 

surface, the area is well ventilated, or the 

operator wears an air-supplied respirator.
Work in a confined space only while it is 

being ventilated and, if necessary, while 

wearing air-supplied respirator.
Vapours from chlorinated solvents can 

be decomposed by the heat of the arc (or 

flame) to form phosgene, a highly toxic 

gas, and lung and eye irritating products. 

The ultra-violet (radiant) energy of the arc 

can also decompose trichlorethylene 

and perchloroethylene vapours to form 

phosgene. Do not weld or cut where solvent 

vapours can be drawn into the welding or 

cutting atmosphere or where the radiant 

energy can penetrate to atmospheres 

containing even minute amounts of 

trichlorethylene or perchloroethylene.

Fire and Explosion Prevention
Be aware that flying sparks or falling slag can 

pass through cracks, along pipes, through 

windows or doors, and through wall or floor 

openings, out of sight of the operator. Sparks 

and slag can travel up to 10 metres from the arc.
Keep equipment clean and operable, free of  

oil, grease, and (in electrical parts) of metallic 

particles that can cause short circuits.
If combustibles are present in the work 

area, do NOT weld or cut. Move the 

work if practicable, to an area free of 

combustibles. Avoid paint spray rooms, dip 

tanks, storage areas, ventilators. If the work 

can not be moved, move combustibles at 

least 10 metres away out of reach of sparks 

and heat; or protect against ignition with 

suitable and snug-fitting fire-resistant 

covers or shields.

Summary of Contents for W64-1

Page 1: ...Wirefeeder WELDING COM AU OPERATORS MANUAL W64 1 From serial numbers W641A ...

Page 2: ...of ITW Australia Pty Ltd ABN 63 004 235 063 1300 300 884 Email info welding com au welding com au WELDWELL NEW ZEALAND A Division of ITW New Zealand NZBN 9 429 039 833 129 GST NO 080177186 0800 9353 9355 Email info weldwell co nz weldwell co nz ...

Page 3: ...Trouble Shooting 12 9 Trouble Shooting Chart 13 10 Wirefeeder Circuit Diagrams 14 11 Assembly Parts Lists 11 1 Wirefeeder 15 11 2 Wirefeed Assembly 17 11 3 1 Gun Cable Assembly 350 Amp Torch 18 11 3 2 Gun Cable Assembly 400 Amp Torch 19 11 4 Work Lead Interconnecting Lead Kit 270 356 21 11 5 Work Lead Interconnecting Lead Kit 396 FABRICATOR 22 12 Australia Warranty Information 23 13 New Zealand Wa...

Page 4: ...ade Filter Lens Amps TIG MMAW MIG Pulsed MIG 0 100 10 9 10 12 13 100 150 11 10 10 12 13 150 200 12 10 11 11 12 12 13 200 300 13 11 12 13 12 13 300 400 14 12 13 14 400 500 13 14 14 500 14 14 READ FIRST The information contained in this manual is set out to enable you to properly maintain your new equipment and ensure that you obtain maximum operating efficiency Please ensure that this information i...

Page 5: ...th or containing materials that emit fumes should not be heated unless coating is removed from the work surface the area is well ventilated or the operator wears an air supplied respirator Work in a confined space only while it is being ventilated and if necessary while wearing air supplied respirator Vapours from chlorinated solvents can be decomposed by the heat of the arc or flame to form phosg...

Page 6: ...some time after welding or cutting if Combustibles including building construction are within 10 metres Combustibles are further than 10 metres but can be ignited by sparks Openings concealed or visible in floors or walls within 10 metres may expose combustibles to sparks Combustibles adjacent to walls ceilings roofs or metal partitions can be ignited by radiant or conducted heat After work is don...

Page 7: ...such as AUSTMIG ES6 is used with a shielding gas of Carbon Dioxide or Argon mixed with Carbon Dioxide Alternatively Flux cored consumable wires are available in both gas shielded and gasless self shielding types Stainless steel and Aluminium can be welded with G M A W using the correct consumable wire and shielding gas The Weldmatic W64 1 4RD Wirefeeder has been designed to feed a range of hard so...

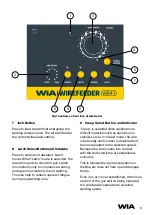
Page 8: ... wire Rotate the control clockwise to increase the feed speed This control is used in conjunction with the Wire Speed Range Select Switch Switch to low for slower 0 10 metres min wirespeed control and switch to high for higher 8 20 metres min wire speeds 4 Wire Speed Range Indicator Light This indicator is illuminated when speed range is set to High speed range 8 20 metres min 5 Wire Speed Range S...

Page 9: ...runs 9 Creep Select Button and Indicator Creep is selected when welding more difficult materials such as aluminium or stainless steel In Creep mode the wire is fed slowly until contact is detected and then accelerated to the selected speed Because the wire comes into contact with the work slowly the arc establishes smoothly This is followed by rapid acceleration so that the arc does not flare up a...

Page 10: ...ly anti clockwise the welder will operate for a short time after each trigger press Turn clockwise to increase the weld duration up to a maximum of 5 seconds Burnback Control This control sets the time period that welding voltage continues after the gun switch is released and wirefeed ceases The extra time allows the wire to burn back slightly toward the tip When set correctly Burnback prevents th...

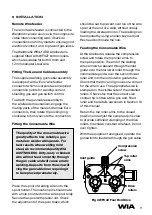
Page 11: ...using an allen key to adjust Hex head bolt inside the hub Feeding the Consumable Wire At the wirefeeder release the compression screw and rotate the top roller arms to the open position The end of the welding wire can now be passed through the inlet guide over the first lower roller through the intermediate guide over the second lower roller and into the output wire guide tube Check that the drive...

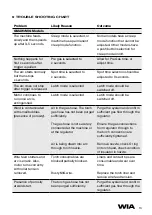
Page 12: ...G with dry compressed air This may be conveniently done each time the wire spool is replaced 3 Welding tip is free of obstructions such as spatter build up Ream out the tip bore with a suitable size oxy tip cleaner Replace the welding tip as it becomes worn 4 Feed roll pressure is not excessive The pressure should be just sufficient to feed the wire evenly Excessive pressure will deform the electr...

Page 13: ...ected Latch mode should be switched off Weld is contaminated with small bubbles presence of porosity Air in the gas hose The torch gas hose has not been purged sufficiently The gas hose is not securely connected at the machine or at the regulator Air is being drawn into arc through torch nozzle Purge the system and confirm sufficient gas flow through the regulator Ensure the gas connections from r...

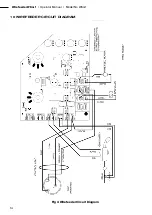
Page 14: ...14 Wirefeeder W64 1 Operator Manual Model No W64 1 10 WIREFEEDER CIRCUIT DIAGRAM Fig 4 Wirefeeder Circuit Diagram ...

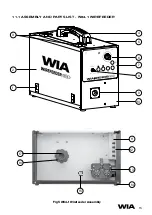
Page 15: ...15 11 1 ASSEMBLY AND PARTS LIST W64 1 WIREFEEDER Fig 5 W64 1 Wirefeeder Assembly 10 9 11 13 12 2 6 7 1 8 3 5 14 15 16 17 4 ...

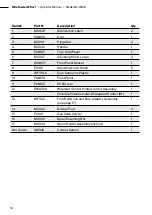
Page 16: ...icker 1 8 E0016 Adjusting knob Small 5 9 WF001 6 Euro Surround Plastic 1 10 PAN126 Front Panel 1 11 PAN125 PCB Cover 1 12 PWA099 Wirefeed Control Printed Circuit Assembly 1 Includes Potentiometer Wirespeed Control 1K 1 13 WF042 Four Roll Drive and Euro Adaptor Assembly see page 17 1 14 M0043 Rubber Foot 4 15 E0041 Gas Valve 24 vdc 1 16 M0046 Spool Retaining Nut 1 17 M0044 Spool Holder Assembly inc...

Page 17: ...2 WF029 1 0 1 2 mm Aluminium 2 WF030 1 0 1 2 mm Flux Cored Wire 2 WF031 1 2 1 6 mm Flux Cored Wire 2 3 WF049 4 Roll Drive Box Assembly incl Front Rear Plastic Hous ing Pressure Screw Complete 1 4 W26 0 13 Inlet Guide 1 5 W26 0 4 Woodruff Key 2 6 WF001 21 Outlet Guide Tube oversize cut to 41mm long 1 7 WF038 Positioning Shaft Brass 1 8 WF044 Euro Adaptor incl Gas Barb Positioning Shaft Guide Tube 1...

Page 18: ...EQT3 45 Body Tube 3 x 45 6 GUN002 Handle Kit includes both halves screws trigger 7 GUN003 Trigger Switch 8 GUN006 Rigid Casing 9 BE9165 Small O ring on gas nipple 10 BE4421 Large O ring on gas nipple 11 BEL3B 15 BE4154503N Steel Liner 0 9 1 2mm 300 amp Nylon Liner 0 9 1 2mm BEL3A 15 Steel Liner 0 9 1 2mm 400 amp GUN004 350A Gun Cable Assembly Fig 7 350 Amp Gun and Cable Assembly 1 2 3 4 5 6 7 8 10...

Page 19: ...Body Tube 3 x 45 6 GUN002 Handle Kit includes both halves screws trigger 7 GUN003 Trigger Switch 8 GUN006 Rigid Casing 9 BE9165 Small O ring on gas nipple 10 BE4421 Large O ring on gas nipple 11 BEL3B 15 BE4154503N Steel Liner 0 9 1 2mm 300 amp Nylon Liner 0 9 1 2mm BEL3A 15 Steel Liner 0 9 1 2mm 400 amp GUN008 400A Gun Cable Assembly 1 2 3 4 5 6 7 8 10 9 11 11 3 2 400 AMP TORCH ...

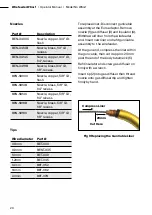
Page 20: ...nto gas diffuser then thread nozzle onto gas diffuser tip and tighten firmly by hand Part Description BEN 3400C Nozzle copper 3 4 I D flush BEN 3414B Nozzle brass 1 4 I D recess BEN 3414C Nozzle copper 3 4 I D 1 4 recess BEN 3418B Nozzle brass 3 4 I D 1 8 recess BEN 5800C Nozzle copper 5 8 I D flush BEN 5814B Nozzle brass 5 8 I D 1 4 recess BEN 5814C Nozzle copper 5 8 I D 1 4 recess BEN 5818B Nozz...

Page 21: ...ng Cable 35mm2 1 2 CX21 Plug Dinse 2 AM341 1 10 10m Interconnecting Lead for complete assembly order AM342 1 10 Includes 2 1 Welding Cable 35mm2 2 2 CX21 Plug Dinse 2 3 E0062 Control Plug 3 Pin 2 4 TC267 Gas Nut 2 5 TC268 Gas Tail 5mm Fig 10 Work Lead Interconnecting Lead Kit supplied with Weldmatic 270 356 1 1 1 1 2 2 2 1 2 2 2 3 2 4 2 5 ...

Page 22: ...1 Work Lead Includes 1 1 Welding Cable 50mm2 1 2 CX22 Plug Dinse 1 3 CLA001 Work Clamp G Clamp Style 2 Includes 2 1 AM342 1 10 Welding Cable 50mm2 2 2 CX22 Plug Dinse 2 3 E0062 Control Plug 3 Pin 2 4 TC267 Gas Nut 2 5 TC268 Gas Tail 5mm Fig 11 Work Lead Interconnecting Lead Kit supplied with Weldmatic 396 Fabricator 1 1 3 1 1 1 2 2 2 1 2 2 2 3 2 4 2 5 ...

Page 23: ...your products may result in the loss of any user generated data Please ensure that you have made a copy of any data saved on your product Any handling and transportation costs and other expenses incurred in claiming under this warranty are not covered by this warranty and will not be borne by Welding Industries of Australia Welding Industries of Australia will return the replacement product if ori...

Page 24: ... or replaced if the goods fail to be of acceptable quality and the failure does not amount to a major failure The benefits given by this warranty are in addition to other rights and remedies which may be available to the customer under any law in relation to goods and services to which this warranty relates Warranty provided by Welding Industries of Australia ABN 63 004 235 063 A Division of ITW A...

Page 25: ...tralian warranty conditions the customer should return the Product to the original place of purchase with proof of purchase or contact Weldwell on 0800 9353 9355 The warranty shall not apply to parts that fail due to normal wear For customers located in New Zealand you can contact Weldwell New Zealand Division of ITW New Zealand 64 Thames Street Napier 4110 New Zealand 0800 9353 9355 Email info we...

Page 26: ...26 Wirefeeder W64 1 Operator Manual Model No W64 1 NOTES ...

Page 27: ...27 NOTES ...

Page 28: ...a Pty Ltd ABN 63 004 235 063 1300 300 884 Email info welding com au welding com au WELDING COM AU WELDWELL NEW ZEALAND A Division of ITW New Zealand NZBN 9 429 039 833 129 GST NO 080177186 0800 9353 9355 Email info weldwell co nz weldwell co nz W64 41 RevB ...

Reviews: