Whittier Wood 1671DUET Assembly Instructions Manual Download Page 5

1671DUET Addison Rectangular Mirror 

Assembly Instructions


1671DUET 

— Page 5 — 08/18 

 
5. 

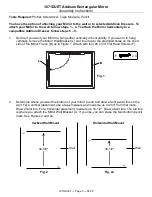
To attach the Mirror to an Addison Dresser, remove the Mirror Wall Bracket (L) that is attached 
to the Mirror Frame (B) as shown in Figure 5. Keep these Mirror Wall Brackets (L) and the four 
#6 x 3/4" Flat Head Screws (F) if in the future, you will want to mount the Mirror to the wall. 


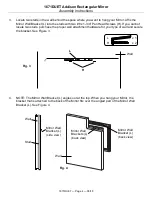
Note: to attach the Mirror either horizontally or vertically to Dresser Model #s 1237, 1238, or 
1239 see steps 6-10.  To attach vertically onto dresser Model # 1236 see steps 11- 12 
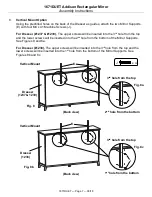
 

6. 

To attach the Mirror horizontally to 

dresser model #1237, 1238, 1239

 use the predrilled outer 

holes in the back as noted in Figure 6. 


Use outer holes for 1671 

mirror 


Dresser 

(1239) 

Fig. 6 

Horizontal Mount 

x 4 

Fig. 5 

Summary of Contents for 1671DUET

Page 1: ...guards for personal protection For more information go to www p65warnings ca gov wood This product can expose you to chemicals including formaldehyde which are known to the State of California to caus...

Page 2: ...e following letter and part name Part Description Quantity A Mirror Assembly 1 B Mirror Frame 1 C Mirror attached 1 D Mirror Retainer attached 4 E Mirror Support 2 F 6 x 3 4 Brass Flat Head Screw inse...

Page 3: ...y remove the Mirror Wall Bracket L and line it up to the predrilled holes on the short side of the Mirror Frame B as in Figure 1 Attach with four 6 x 3 4 Flat Head Screws F 2 Determine where you want...

Page 4: ...te two studs purchase the proper wall attachment hardware for your type of wall and secure the bracket See Figure 3 4 NOTE The Mirror Wall Bracket L angles out at the top When you hang your Mirror the...

Page 5: ...Flat Head Screws F if in the future you will want to mount the Mirror to the wall Note to attach the Mirror either horizontally or vertically to Dresser Model s 1237 1238 or 1239 see steps 6 10 To att...

Page 6: ...will be inserted into the 2nd hole from the bottom of the Mirror Supports See Figures 7 and 7a For Dresser 1238 The upper screws will be inserted into the 3rd hole from the top and the lower screws wi...

Page 7: ...lower screws will be inserted into the 2nd hole from the bottom of the Mirror Supports See Figures 8 and 8a For Dresser 1238 The upper screws will be inserted into the 3rd hole from the top and the lo...

Page 8: ...to the bottom of the Mirror Assembly A See Figures 9 and 9a 10 Place the Mirror on top of the Dresser and attach it to the Mirror Supports E with four 7 x 1 1 2 Black Pan Head Screws I See Figures 10...

Page 9: ...ole from the top and the lower screws will be inserted into the 2nd hole from the bottom of the Mirror Supports See Figures 11 and 11a 12 Peel off the backing on the Velvet Pads K and apply them to th...

Reviews: