


1506RGB Stonewood Beveled Mirror
Assembly Instructions
1506RGB
— Page 4 — 01/15
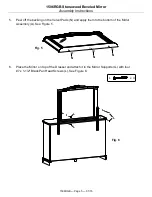
3.
NOTE: The Mirror Wall Bracket (P) angles out at the top. When you hang your Beveled Mirror,
the Mirror Frame Bracket (O) fits over the angled part of the Mirror Wall Bracket (P).
See Figure 3.
4.
Using the predrilled holes on the back of the Dresser as guides, attach the two Mirror Supports
(G) with four M4 x 41 Machine Screws (M). The upper screws will be inserted into the 3
rd
hole
from the top and the lower screws will be inserted into the 2
nd
hole from the bottom of the Mirror
Supports. See Figure 4 and 4a.
Mirror Wall
Brackets (P)
(back view)
Wall
Stud
Mirror Wall
Bracket (P)
(side view)
Wall
Fig. 3
Mirror Frame
Bracket (O)
(back view)
M
x 4
M
1187 Dresser
(Back view)
G
M
M
Fig. 4
3
rd
hole from the top
2
nd
hole from the bottom
Fig. 4a


