background image

4

Never operate the mower in wet grass. Always be 
sure of your footing. A slip and fall can cause 
serious personal injury. Keep a firm hold on the 
handle and walk, never run. If you feel you are 
losing your footing, RELEASE THE BLADE 
CONTROL HANDLE IMMEDIATELY and the blade 
will stop rotating within three seconds.

Mow only in daylight or good artificial light.

Stop the blade when crossing gravel drives, walks 
or roads.

If the equipment should start to vibrate abnormally, 
stop the engine and check immediately for the 
cause. Vibration is generally a warning of trouble.

Shut the engine off and wait until the blade comes 
to a complete stop before removing the grass 
catcher or unclogging the chute. The cutting blade 
continues to rotate for a few seconds after the 
engine is shut off. Never place any part of the body 
in the blade area until you are sure the blade has 
stopped rotating.

Never operate mower without proper guards, grass 
catcher, plates or other safety protective devices in 
place.

Muffler and engine become hot and can cause a 
burn. Do not touch.

Only use accessories approved for this machine by 
the manufacturer. Read, understand, and follow all 
instructions provided with the approved accessory.

If situations occur which are not covered in this 
manual, use care and good judgment. Contact your 
dealer for assistance.

SLOPE OPERATION

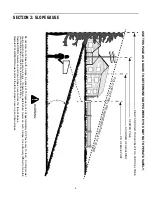
For your safety, use the slope gauge included as part of 
this manual to measure slopes before operating this 
unit on a sloped or hilly area. If the slope is greater than 
15 degrees as shown on the slope gauge, do not 
operate this unit on that area or serious injury could 
result.

DO:

Mow across the face of slopes; never up and down. 
Exercise extreme caution when changing direction 
on slopes.

Watch for holes, ruts, hidden objects, or bumps. 
Tall grass can hide obstacles.

Always be sure of your footing. A slip and fall can 
cause serious personal injury. If you feel you are 
losing your balance release the blade control 
handle immediately and the blade will stop in less 
than 3 seconds.

ON MODELS WITH CASTER WHEELS: Lock both 
front wheels so they do not pivot while mowing on 
the face of slopes. To turn the mower, depress the 
handle and raise the front wheels slightly.

DO  NOT:

Do not mow near drop-offs, ditches or 
embankments. The operator could lose footing or 
balance.

Do not mow slopes greater than 15 degrees as 
shown on the slope gauge.

Do not mow on wet grass. Reduced footing could 
cause slipping.

ON MOWERS WITH CASTER WHEELS: Mow on 
slopes with casters unlocked since the mower has 
a tendency to drift down hill.

CHILDREN

Tragic accidents can occur if the operator is not 
alert to the presence of children. Children are often 
attracted to the mower and the mowing activity. 
Never assume that children will remain where you 
last saw them.

Keep children out of the mowing area and under the 
watchful care of a responsible adult other than the 
operator.

Be alert and turn mower off if a child enters the 
area.

Before and while moving backwards, look behind 
and down for small children or other objects.

Never allow children under age 14 to operate the 
mower. Children 14 years of age and above should 
read and understand the operation instructions and 
safety rules in this manual.

Use extreme care when approaching blind corners, 
shrubs, trees, or other objects that may obscure 
your vision of a child or hazard.

SERVICE

Use extreme care in handling gasoline and other 
fuels. They are extremely flammable and the 
vapors are explosive.

Use only an approved gasoline container.

Never remove gas cap or add fuel while the engine 
is running. Allow engine to cool at least two minutes 
before refueling.

Replace gasoline cap securely and wipe off any 
spilled gasoline before starting the engine as it may 
cause a fire or explosion.

Extinguish all cigarettes, cigars, pipes and other 
sources of ignition.

Never refuel machine indoors because flammable 
vapors will accumulate in the area.

Never store the machine or fuel container inside 
where there is an open flame or spark such as a 
gas water heater, space heater, or furnace.

Never run an engine inside a closed area.

To reduce fire hazard, keep mower free of grass, 
leaves, or other debris build-up. Clean up oil or fuel 
spillage. Allow mower to cool at least 5 minutes 
before storing.

Summary of Contents for 950-959 Series

Page 1: ...xhaust system is equipped with a spark arrester meeting applicable local or state laws if any If a spark arrester is used it should be maintained in effective working order by the operator In the State of California the above is required by law Section 4442 of the California Public Resources Code Other states may have similar laws Federal laws apply on federal lands A spark arrester for the muffle...

Page 2: ...om our Customer Support Department or an authorized dealer You can locate the model number by standing behind the unit in the operating position and looking down at the rear of the deck A sample model plate is explained below For future reference please copy the model number and the serial number of the equipment in the space below CALLING CUSTOMER SUPPORT If you have difficulty assembling this pr...

Page 3: ...ction and cause serious personal injury to the operator or any others allowed in the area Thoroughly inspect the area where the equipment is to be used Remove all stones sticks wire bones toys and other foreign objects which could be picked up and thrown by the mower in any direction and cause serious personal injury to the operator or any others allowed in the area Plan your mowing pattern to avo...

Page 4: ... MODELS WITH CASTER WHEELS Lock both front wheels so they do not pivot while mowing on the face of slopes To turn the mower depress the handle and raise the front wheels slightly DO NOT Do not mow near drop offs ditches or embankments The operator could lose footing or balance Do not mow slopes greater than 15 degrees as shown on the slope gauge Do not mow on wet grass Reduced footing could cause ...

Page 5: ... wire from the spark plug and thoroughly inspect the mower for any damage Repair the damage before starting and operating the mower Never attempt to make a wheel or cutting height adjustment while the engine is running Grass catcher components are subject to wear damage and deterioration which could expose moving parts or allow objects to be thrown For safety protection frequently check components...

Page 6: ...ELY Do not mow on inclines with a slope in excess of 15 degrees a rise of approximately 2 1 2 feet every 10 feet A riding mower could overturn and cause serious injury If operating a walk behind mower on such a slope it is extremely difficult to maintain your footing and you could slip resulting in serious injury Operate RIDING mowers up and down slopes never across the face of slopes Operate WALK...

Page 7: ...and lay carton down flat Remove packing material Roll or slide unit out of carton Check carton thoroughly for loose parts Figure 3 Disconnect Spark Plug Wire Before setting up your lawn mower disconnect the spark plug wire from the spark plug and ground it against the engine by attaching rubber boot to a bolt or metal clip to the grounding post on the engine See Figure 4 Figure 4 PUSH REMOVE MANUA...

Page 8: ... in the fuel tank or OIL in the engine Be certain to service engine with gasoline and oil as instructed in the separate engine manual before operating your mower NOTE Reference to right or left hand side of the mower is observed from the operating position Setting Up Your Lawn Mower Follow steps 1 through 10 to set up your lawn mower Step 1 Lift upper handle Align it with lower handle Step 2 Tight...

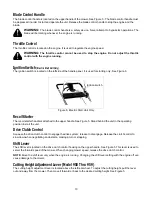
Page 9: ... holding the rope guide to the upper handle Step 8 Squeeze the blade control handle against the upper handle and pull out starter rope slowly Step 9 Thread starter rope into rope guide Step 10 Tighten wing nut Here Rope Guide Wing Nut Look here Starter Rope Blade Control Handle Upper Handle for rope guide placement Blade Control Handle Drive Clutch Control Model 959 adjusts all 4 wheels Model 969 ...

Page 10: ...t Only Recoil Starter The recoil starter handle is attached to the upper handle See Figure 5 Stand behind the unit in the operating position to start the unit Drive Clutch Control Squeeze the drive clutch control to engage the drive system release to disengage Release the clutch control to slow down when negotiating an obstacle making a turn or stopping Shift Lever The shift lever is located on th...

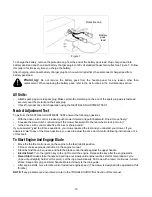
Page 11: ...s in smaller holes to allow casters to rotate freely Engine Controls See the engine manual for the location and function of the controls located on the engine SECTION 6 OPERATING YOUR LAWN MOWER Warning Keep hands and feet away from the chute area on the cutting deck See Section 4 The operation of any lawn mower can result in foreign objects being thrown into the eyes which can result in severe ey...

Page 12: ...rol and pull the mower backward Do the rear wheels lock not turn Is the drive clutch control cable free of kinks or sharp bends If you answered yes to all three questions your mower passed the test and you can start your mower If you answered no to any of the three questions you need to adjust the drive clutch control following instructions on 14 of this book To Start Engine And Engage Blade Move ...

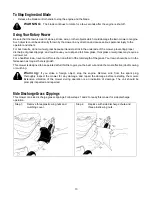
Page 13: ...ower cut For a healthier lawn never cut off more than one third of the total length of the grass Your lawn should be cut in the fall season as long as there is growth This mower is designed to be operated at full throttle to give you the best cut and do the most effective job of mowing or mulching Warning If you strike a foreign object stop the engine Remove wire from the spark plug thoroughly ins...

Page 14: ...s in the handle over the weld pins in the handle mounting bracket Reassemble the upper handle to the lower handle Place the hairpin clips in the inner holes in the weld pins and attach the starter rope as instructed in the Set Up Instructions Drive Clutch Control Adjustment The drive clutch control adjustment wheel is located in the drive clutch control handle housing and is used to tighten or loo...

Page 15: ...ns carefully Service air cleaner every 25 hours under normal conditions Clean every few hours under extremely dusty conditions Poor engine performance and flooding usually indicates that the air cleaner should be serviced To service the air cleaner refer to the engine manual packed with your unit The spark plug should be cleaned and the gap reset once a season Spark plug replacement is recommended...

Page 16: ...ncorrectly will cause serious damage The positive lead on the wire harness has the smaller connector Connect the positive lead to the positive side of the battery pack then connect the negative side In line Fuse The unit is equipped with an in line fuse If the unit fails to start check the fuse inside the battery cover by turning the end of the fuse holder and removing from the battery cover Repla...

Page 17: ... Place the blade on the adapter Be certain the blade is aligned with and seated onto the blade adapter flanges Place the blade bell support on the blade Make sure the notches on the blade bell support are aligned with the small holes in the blade Replace hex bolt Tighten hex bolt to torque 450 in lbs min 600 in lbs max NOTE To ensure safe operation of your unit the blade bolt must be checked perio...

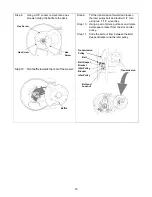
Page 18: ...wrenches Step 10 Using a pair of pliers pull back and rotate belt keeper bracket from the slot on idler pulley Step 11 Slide the belt out from between the Belt Keeper Bracket and the idler pulley Step 12 Pivot baffle towards the rear of the mower Hex Screw Hex Screw Hex Screw Transmission Belt Keeper Bracket Idler Pulley Belt Idler Pulley Bracket Transmission Pulley Bolt and Locknut Baffle ...

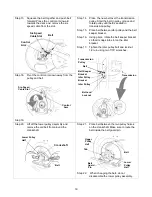
Page 19: ... pulley bolt and locknut 1 2 turn using two 7 16 wrenches Step 18 Pivot the control arm down away from the pulley and belt Step 19 Step 20 Lift off the lower pulley assembly and remove the old belt from around the crankshaft Step 21 Place belt between the two pulley halves on the crankshaft Make sure to route the belt inside the belt guard pin Step 22 When changing the belt do not disassemble the ...

Page 20: ...t guard pin Step 26 Reinstall the bolt securing transmission to rear mower housing Step 27 Pivot the baffle back to its original position and secure with three hex screws earlier removed You will need a 3 8 socket for these screws Step 28 Lightly lubricate the inside of the blade adapter and reinstall spacer wave washer blade adapter assembly and the blade in the correct order Step 29 Tighten the ...

Page 21: ...F SEASON STORAGE The following steps should be taken to prepare lawn mower for storage Clean and lubricate mower thoroughly as described in the lubrication instructions We do not recommend the use of pressure washers or garden hose to clean your unit They may cause damage to electric components spindles pulleys bearings or the engine The use of water will result in shortened life and reduce servic...

Page 22: ...FAST position Connect and tighten spark plug wire Clean fuel line fill tank with clean fresh gasoline Clear vent Drain fuel tank Refill with fresh fuel Clean air cleaner Adjust carburetor Engine overheats Engine oil level low Air flow restricted Carburetor not adjusted properly Fill crankcase with proper oil Remove blower housing and clean Adjust carburetor Occasional skip hesitates at high speed ...

Page 23: ...4 721 0329 Oil Seal 15 618 0253 Upper Housing Assembly 16 736 0616 Thrust Wash 504 x 700 x 030 17 717 1487 Pinion Shaft 10 T 18 736 0314 Thr Wash 3 8 x 70 x 030 19 736 0569 Thr Wash 388 x 625 x 062 20 618 0252 Lower Housing Assembly 21 710 0642 Hx Scr 1 2 20 x 75 22 782 7601A Cable Bracket 23 741 0674 Bearing 24 611 0066 Shaft Assembly 25 721 0325 Plug 26 717 1469 Gear 34 T 27 711 1168 Output Shaf...

Page 24: ...24 Models 950 thru 959 15 8 Pulley Assembly for reference only Transmission and pulley for reference only 72 ...

Page 25: ...750 0807 Spa 385 x 624 x 700 35 750 1056 Shld Spa 385 I D X 715 Lg 36 782 0568 Brkt Ht Adj Spring 37 682 3052 0662 Handle Brkt Assembly R H 38 682 3053 0662 Handle Brkt Assembly L H 39 710 1348 Scr AB 1 4 14 x 500 40 731 1901 Trail Shield 41 732 0842 Trail Shield Wire 42 611 0064 0662 Fr Axle Ass y 43 710 1241 Hx Scr Wash Hd Hi Lo 44 710 1242 Scr Torx Truss Hi Lo 45 714 0104 Cotter Pin 072 x 1 12 ...

Page 26: ...26 Models 960 thru E969 84 8 Pulley Assembly for reference only Transmission and pulley for reference only ...

Page 27: ...1901 Trail Shield 41 732 0842 Trail Shield Wire 42 682 9020A 0662 Caster Ass y R H Not Shown 43 682 9021A 0662 Caster Ass y L H 44 682 9024A 0662 Brkt Ass y Wheel Caster RH 45 710 0260 Carr Bolt 5 16 18 x 62 46 711 1146 Caster Axle 374 Dia x 2 50 47 736 0232 Wave Wash 48 731 1887 Hub Cap Whole Gray 49 734 1857 Wheel 7 x 2 Caster Black 50 712 0397 Wing Nut 1 4 20 Thd 51 734 1837 Wheel 9 x 2 Link Gr...

Page 28: ...28 Model E969 39 40 51 37 29 16 21 18 20 23 22 17 19 24 A 26 25 A 28 27 10 43 14 15 30 2 2 4 7 3 5 1 5 3 9 12 11 42 41 47 55 46 38 50 54 47 44 45 52 13 51 ...

Page 29: ...e 30 749 0907A Lower Handle 37 710 1250 Cur Carr Bolt 5 16 18 x 1 Lg 38 712 0267 Hex Nut 5 16 18 Thd 39 725 1276 Battery Pack 12 Volt 40 731 0891A Battery Tray 41 725 0873 Ignition Switch 42 725 0201 Ignition Key 43 425 1428 725 0298 Fuse Holder Fuse 7 1 2 Amp Not shown 44 725 1206 Plug 45 725 1442 Wire Harness 46 710 0501 Hex Bolt 1 4 20 x 2 Lg 47 736 0270 Bell Wash 1 4 I D 49 782 9012 Lower Batt...

Page 30: ...nk Screw 11 712 0324 Nut 1 4 20 Top lock Nut Insert 13 746 0883 Control Housing 14 746 0912 Control Cable 44 Lg 16 731 0904A Upper Control Housing 17 731 0924 6 Speed Shift Lever 18 713 0397 Gear Insert 19 710 1667A CSunk Tap Scr 10 x 75 L 20 732 0627 Shift Lever Spring 21 16864 6 Spd Rack Cable Brkt 22 731 0905A Lower Control Housing 23 731 0906 Cable Mounting Cap 24 731 0620 Control Lever 25 746...

Page 31: ...0270 Bell Wash 265 X 75 X 062 9 736 0329 Lock Wash 1 4 Reg Duty 10 736 0526 Wave Wash 1 38 x 88 x 029 11 738 0924 Shld Scr 375 x 1 4 14AB 12 750 1070 Slev Spcr 88 ID 1 00 OD x 48 13 750 1071 Slev Spcr 88 ID x 1 13 ID x 12 14 756 0625 Roller Cable 15 782 7574 0662 6 Spd Cable Adj Bracket 16 782 7575 0662 6 Spd Cable Mt Bracket 17 782 7596 6 Sp Control Arm 18 782 7597 6 Sp Pivot Bracket 19 712 0138 ...

Page 32: ... these items b Routine maintenance items such as lubricants filters blade sharpening and tune ups or adjustments such as brake adjustments clutch adjustments or deck adjustments and normal deterioration of the exterior finish due to use or exposure c Log splitter pumps valves and cylinders have a sepa rate one year warranty d White Outdoor Co does not extend any warranty for products sold or expor...

Reviews: