background image

Fitting Kit

EN

K538W

Maintenance

Clean the car roof and surfaces of the
product that will be in contact with the car
roof.

Follow the fitting instructions for fitting the
product to your vehicle. Make sure all steps
are carried out in order.

Set crossbars a minimum distance of
700mm (27 1/2") apart where no other
distance is specified in the fitting
instructions. This is especially important
when carrying long loads.

Check unit is securely attached  whenever
you refit it to the vehicle. If the unit feels
loose, refer to the fitting instructions and
readjust.

Some glass/panoramic roofs and radio
antennae may not be able to be used when
the product is fitted.

Do not modify this product.

Refer to the maximum permitted load
capacity specified in the fitting instructions.
Do not exceed the vehicle manufacturers
roof load rating if it is lower than the
maximum load capacity specified in the
fitting instructions.

Loads should not overhang the sides of the
product and be evenly distributed with the
lowest possible centre of gravity.

Long loads should be secured with non-
elastic straps to the front and rear of the
vehicle.

Objects with pointed ends (e.g. ski poles)
should be carried with the pointed ends to
the rear of the vehicle.

Remove all loose or removable objects
from the load prior to loading.

Make sure all loads are securely fastened
with non-elastic straps. Check regularly
during longer journeys.

A loaded roof rack system can alter the
performance of your vehicle. Be especially
aware of the effects of side winds,
changing of direction, and braking
performance. Avoid rapid acceleration and
deceleration. Drive carefully.

Note that the total height of the vehicle
increases when upright loads are carried.

Products should be locked during transport
if they have locks fitted.

10

Summary of Contents for K538W

Page 1: ...tting Kit EN Fitting Instructions for Basic Carrier CZ Pokyny pro montáž základních nosičů HU Felszerelési útmutató a tetőcsomagtartóhoz SK Pokyny pre montáž základných nosičov x 2 x 2 x 4 x 4 Revision No 4D 1 ...

Page 2: ...ube 5dr MPV 09 CN 40 kgs 88 lbs 40 kgs 88 lbs Cube 5dr MPV 09 14 NZ 40 kgs 88 lbs 40 kgs 88 lbs Cube 5dr MPV 09 14 US 40 kgs 88 lbs 40 kgs 88 lbs Cube 5dr MPV 09 14 EU 40 kgs 88 lbs 40 kgs 88 lbs Cube 5dr MPV 09 14 AU 40 kgs 88 lbs 40 kgs 88 lbs 2 ...

Page 3: ...ckage and check Contact your dealer if any parts are missing or damaged This kit fits type A B C and D These instructions show type A crossbar fitted They also apply to type B C and D NOTE Clamp images in these instructions may not be representative of the clamps in this kit 3 ...

Page 4: ...move covers Use hex screwdriver to reverse adjusting screw 10 turns Press adjusting screw and pull crossbar legs out Refer to the crossbar instructions for crossbar adjustment method Ensure each end of the crossbar is adjusted equally 4 ...

Page 5: ...ove locking screw Apply protective strip as shown Trim if required It is important to put the clamps in the correct position on the vehicle Letters refer to the part numbers stamped on clamps Clamp Part Number A 744A B 745A 5 ...

Page 6: ... NOTE clamps may have labels showing their positions on the vehicle For example Front Right Refit locking screw so that it goes through the hole in the clamp Do not begin to tighten the locking screw Fit rubber pad supplied with crossbar to foot 6 ...

Page 7: ...the rear of this manual for information relating specifically to your vehicle Place crossbar on vehicle Minimum recommended spacing between the bars is 700mm 27 1 2 unless otherwise stated Adjust the legs on the crossbar so that they are positioned equally from the ends of the crossbar and the clamps engage firmly on the body work of the vehicle 7 ...

Page 8: ...Fitting Kit EN K538W Tighten adjusting screw to 5 Nm 3 7 ft lb hand tight Tighten locking screw on both legs evenly Check crossbar is securely attached to the vehicle 8 ...

Page 9: ...Fitting Kit EN K538W Use keys to fit and lock covers CAUTION Recheck all fasteners immediately after a load is applied to the crossbars Regularly check screws are tight 9 ...

Page 10: ...icle manufacturers roof load rating if it is lower than the maximum load capacity specified in the fitting instructions Loads should not overhang the sides of the product and be evenly distributed with the lowest possible centre of gravity Long loads should be secured with non elastic straps to the front and rear of the vehicle Objects with pointed ends e g ski poles should be carried with the poi...

Page 11: ...drive into a car wash with the roof rack system fitted Lubricate locks and adjusting screws at regular intervals Remove the products from the vehicle when not in use Make sure all loose parts are stored safely Yakima Products Inc 15025 SW Koll Pkwy Beaverton OR 97006 6056 USA www whispbar com www whispbar ca 11 ...

Page 12: ...je Chybí li některý díl anebo je poškozen kontaktujte svého prodejce Tento kit je vhodný pro typy nosičů A B C a D Tento manuál zobrazuje montáž pro typ A Rovněž platí i pro typ B C a D Poznámka Zobrazení spony v tomto návodě nemusí přesně odpovídat sponám dodávaným v tomto kitu 12 ...

Page 13: ...ujte kryty patek Šestihranným šroubovákem uvolněte nastavovací šroub cca o 10 otáček Zatlačte nastavovací šroub dolů a potáhněte patku směrem ven Pro nastavení správné délky sledujte montážní manuál nosičů Nastavte oba konce tyče souměrně 13 ...

Page 14: ...traňte dotahovací šroub Aplikujte ochrannou pásku podle ředlohy Přizpůsobte je li to nevyhnutelné Je důležité aby spony byly na vozidle ve správné pozici Písmena odkazují na čísla vyražená na sponě Spona číslo A 744A B 745A 14 ...

Page 15: ...u Poznámka Spony mohou být označeny pro konkrétní umístění na vozidle například Front Right Pravá přední Opět přimontujte dotahovací šroub tak aby procházel skrz díru ve sponě Zatím jej nedotahujte Nasaďte gumové podložky dodávané s nosiči na patky nosiče 15 ...

Page 16: ...es okraj střechy pod dveře Podívejte se do přílohy 1 pro informace týkající se konkrétně Vašeho vozidla Položte tyč na střechu vozidla Minimální doporučená vzdálenost mezi tyčemi je 700mm není li uvedeno jinak Nastavte patky na tyči tak aby byly na obou koncích tyče stejně vzdálené a spony pevně uchyťte na karosérii vozidla 16 ...

Page 17: ...Fitting Kit CZ K538W Nastavovací šrouby dotáhněte silou 5 Nm 3 7 ft lb Dotahovací šrouby utáhněte na obou patkách rovnoměrně Zkontrolujte nosič zda je na vozidle pevně přichycen 17 ...

Page 18: ...Fitting Kit CZ K538W Pomocí klíče namontujte a zamkněte kryty na patkách UPOZORNĚNÍ Ihned po zatížení opět zkontrolujte všechny upevňovací prvky aplikované na střešním nosiči 18 ...

Page 19: ...jte maximální zatížení střechy povolené výrobcem auta ani v případě kdy je nižší než přípustné zatížení nosičů Náklad by neměl přesahovat nosiče do stran měl by být rozmístěn rovnoměrně a těžiště by mělo být co nejníže Přepravované dlouhé objekty musí být upevněny neelastickými popruhy k přední i zadní části vozidla Objekty se špičatými konci lyže by měli být přepravovány špišatým koncem dozadu Od...

Page 20: ...brém stavu Nikdy nejezděte do automyčky s namontovaným střešním nosičem Pravidelně promazávejte zámky a šrouby Odmontujte produkty z vozidla pokud je právě nepoužíváte Ujistěte se že jsou všechny díly nosičů bezpečně odložené Yakima Products Inc 15025 SW Koll Pkwy Beaverton OR 97006 6056 USA www whispbar eu 20 ...

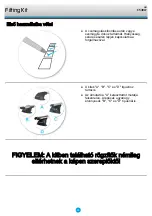
Page 21: ...oz tartalmát Hiányosság sérülés esetén lépjen kapcsolatba a forgalmazóval A kitek A B C és D típushoz tartozik Az útmutató a A kereszttartót mutatja felszerelve A lépések ugyanúgy érvényesek B C és D típusnál is FIGYELEM A kitben található rögzítők némileg eltérhetnek a képen szereplőktől 21 ...

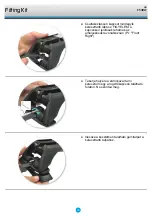
Page 22: ...álja a kulcsot Imbuszfejű csavarhúzó segítségével tekerjen 10 fordulatot kifelé Nyomja be az állítócsavart és húzza ki a kereszttartó lábait A beállítás menetét megtalálja az útmutatóban Ügyeljen arra hogy a kereszttartó lábai megegyező módon álljanak 22 ...

Page 23: ...rt Használja a védőszalagot a képen látható módon Szabja méretre ha szükséges Fontos hogy minden rögzítő megfelelően helyezkedjen el az autón A betűkhöz tartozó számjelölések a rögzítőkön találhatóak Rögzítőkapocs alkatrészszám A 744A B 745A 23 ...

Page 24: ...rtó lábhoz FIGYELEM a kapcsokon jelölések lehetnek az elhelyezésükre vonatkozóan Pl Front Right Tekerje helyére a zárócsavart ami keresztül megy a rögzítőkapcson található furaton Ne szorítsa meg Illessze a készletben található gumitalpat a kereszttartó talpához 24 ...

Page 25: ...rjük tekintse meg az útmutató végén található leírásban Helyezze el a kereszttartókat az autón A két kereszttartók között javasolt minimális távolság 700 mm amennyiben ez nincs másképpen megállapítva Állítsa megfelelő állásba a kereszttartó végén lévő lábakat úgy hogy azok egyenlő távolságra legyenek a kereszttartó széleitől így a kapcsok pontosan illeszkednek az autó karosszériájához 25 ...

Page 26: ...ting Kit HU K538W 5 Nm 3 7 ft lb erővel húzza meg az állítócsavart Húzza meg a zárócsavarokat mindkét oldalon azonos erősséggel Győződjön meg róla hogy a kereszttartók megfelelően rögzülnek e az autóhoz 26 ...

Page 27: ...Fitting Kit HU K538W A takaróelemek le és felszereléséhez illetve zárásához használjon kulcsot FIGYELEM Rendszeresen ellenőrizze a csavarok szorosságát 27 ...

Page 28: ... az útmutatóban található maximális terhelhetőségre vonatkozó adatokra Ha az autó gyártója kevesebb terhelhetőséget enged meg mint amit az útmutatóban talál az kisebb értéket vegye figyelembe Ügyeljen rá hogy a szállítandó terhek ne haladják meg nagy mértékben a tetőcsomagtartó teljes szélességét Igyekezzen egyenletesen eloszlatni a szállítandó csomagokat a lehető legalacsonyabb tömegközpontú elre...

Page 29: ...árva azon eszközöket melyek rendelkeznek zárral Ellenőrizze az alkatrészeket elhasználódás illetve meghibásodás esetén cserélje azokat Igyekezzen tisztán és gondosan karbantartani a terméket Ne mosassa autóját gépi autómosóban ha a tetőcsomagtartó fel van szerelve Gondoskodjon a zárak és állítócsavarok időnkénti kenéséről Amennyiben egyáltalán nem használja a termék ek et úgy lehetőség szerint sze...

Page 30: ...ontaktujte svojho predajcu ak niektorý diel chýba alebo je poškodený Tento kit je vhodný pre typy nosičov A B C a D Tento manuál zobrazuje montáž pre typ A Rovnako platí aj pre typ B C aj D Poznámka Zobrazenia spony v tomto návode nemusia presne zodpovedať sponám dodávaným v tomto kite 30 ...

Page 31: ...tujte kryty pätiek Šesťhranným skrutkovačom uvoľnite nastavovaciu skrutku o 10 otáčok Zatlačte nastavovaciu skrutku a potiahnite pätku smerom von Pre nastavenie správnej dĺžky pozrite montážny manuál nosičov Nastavte oba konce tyče súmerne 31 ...

Page 32: ...tráňte doťahovaciu skrutku Aplikujte ochrannú pásku podľa predlohy Prispôsobte ak je nevyhnutné Je dôležité aby spony boli v správnej pozícii na vozidle Písmená odkazujú na čísla vyrazené na spone Spona číslo A 744A B 745A 32 ...

Page 33: ...oznámka Spony môžu byť označené pre konkrétne umiestnenie na vozidle napríklad Front Right Pravá Predná Primontujte opäť doťahovaciu skrutku tak aby prechádzala cez dieru v spone Zatiaľ ju nedoťahujte Nasaďte gumené podložky dodávané s nosičmi na pätky nosiča 33 ...

Page 34: ... cez okraj strechy pod dvere Pozrite prílohu 1 pre informácie týkajúce sa konkrétne Vášho vozidla Položte tyč na strechu vozidla Minimálna odporúčaná vzdialenosť medzi tyčami je 700mm ak nie je uvedené inak Nastavte pätky na tyči tak aby boli rovnako vzdialené na oboch koncoch tyče a spony pevne uchyťte na karosériu vozidla 34 ...

Page 35: ...Fitting Kit SK K538W Dotiahnite nastavovacie skrutky silou 5 Nm 3 7 ft lb Utiahnite doťahovacie skrutky rovnomerne na oboch pätkách Skontrolujte nosič či je pevne pripevnený na vozidle 35 ...

Page 36: ...Fitting Kit SK K538W Pomocou kľúča namontujte a zamknite kryty na pätkách UPOZORNENIE Pravidelne kontrolujte správnosť dotiahnutia skrutiek 36 ...

Page 37: ...kračujte maximálne zaťaženie strechy povolené výrobcom auta ani v prípade keď je nižšie ako prípustné zaťaženie nosičov Náklad by nemal presahovať nosiče do strán mal by byť rozmiestnený rovnomerne a ťažisko by malo byť čo najnižšie Prepravované dlhé objekty musia byť upevnené neelastickými popruhmi k prednej aj zadnej časti vozidla Objekty so špicatými koncami lyže mali by byť prepravované špicat...

Page 38: ...v dobrom stave Nikdy nevchádzajte do autoumyvárky s namontovaným strešným nosičom Pravidelne namažte zámky a skrutky Odmontujte produkty z vozidla ak ich práve nepoužívate Uistite sa že všetky diely nosičov sú bezpečne odložené Yakima Products Inc 15025 SW Koll Pkwy Beaverton OR 97006 6056 USA www whispbar sk 38 ...

Page 39: ...mm 650mm 1100mm 1065mm 3 15 16ths 25 9 16ths 43 5 16ths 41 15 16ths Cube 5dr MPV 09 14 US 100mm 650mm 1100mm 1065mm 3 15 16ths 25 9 16ths 43 5 16ths 41 15 16ths Cube 5dr MPV 09 14 EU 100mm 650mm 1100mm 1065mm 3 15 16ths 25 9 16ths 43 5 16ths 41 15 16ths Cube 5dr MPV 09 14 AU 100mm 650mm 1100mm 1065mm 3 15 16ths 25 9 16ths 43 5 16ths 41 15 16ths 39 ...

Page 40: ...s believed to be defective the original retail purchaser should contact the Whispbar dealer from whom it purchased the product who will give the original retail purchaser instructions on how to proceed If the original retail purchaser is unable to contact the Whispbar dealer or the dealer is not able to remedy the defect the original retail purchaser should contact Yakima by e mail at yakwarranty ...

Page 41: ...ranty cover defects loss or damage resulting from accidents unlawful use of the vehicle or defects inconsistencies in the vehicle on which the product or component is fitted Liability for direct indirect special punitive incidental exemplary contractual or consequential damage or loss arising from defects faulty materials or design omissions or negligence or workmanship in the product or its compo...

Page 42: ... those instructions and of returning the product to Yakima or the Whispbar dealer will be borne by you Following receipt of the product and purchase invoice or receipt Yakima or the Whispbar dealer must inspect the product to determine whether the claim falls within the warranty If 4 1 the claim falls within the warranty Yakima will remedy any defects in materials or workmanship becoming apparent ...

Reviews: