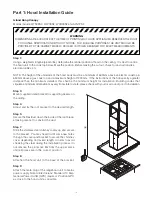
Part 1: Hood Installation Guide
Island Hung Canopy
Models include W7S09S2, W7V09S2, W7B09S2 and A7N12S2
Step 1:
Using a weighted stringline (plumb line), determine the central position of hood on the ceiling. It is best to centre
the hood unit to the cook top below. Mark the position. Before making the cut out, check for obstructions like
electrical cables, etc.
NOTE: The height of the underside of the hood body must be a minimum of 600mm above an electric cooktop &
650mm above a gas cook top and a maximum height of 1200mm. If the instructions of the hob specify a greater
distance than the minimum detailed, this shall be the minimum height for installation. Building codes that
stipulate a minimum dimenstion may vary from state to state, please check with your local council prior to installation.
Step 3:
Mount supplied island bracket to supporting beams on
the ceiling.
Step 4:
Adjust and fix the roof bracket to the desired length.
Step 5:
Secure the FlexiDuct down the inside of the roof brack-
et taking care not to constrict the duct.
Step 7:
Slide the stainless steel chimney covers up and secure
to the bracket. You may need to drill some new holes
through the cover and bracket to secure the chimney
cover depending on desired length. In order to avoid
streaking the steel during the installation process do
not remove the protective film from the upper piece
until all pieces are in the correct position.
Step 8:
Attached the hood unit to the base of the bracket.
Step 9:
Attach the male plug of the rangehood unit to mains
power supply. Note to Electricians: Standard 10 Amp
General Power Outlet (GPO) required. Position GPO
as close to the hood unit as possible.
WARNING
DIMENSIONS ARE ACCURATE AT THE TIME OF PRINTING BUT HAUS APPLIANCES RESERVES THE RIGHT
TO CHANGE SPECIFICATIONS WITHOUT NOTICE. FOR BUILDING PURPOSES THE UNIT SHOULD BE
PROVIDED TO THE CABINET MAKER / BUILDER / KITCHEN DESIGNER FOR EXACT MEASUREMENTS.
10


