background image

13

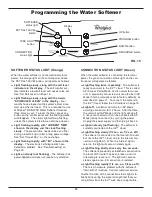
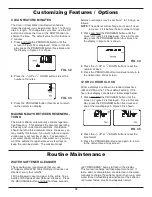
Programming the Water Softener

FIG. 18

2

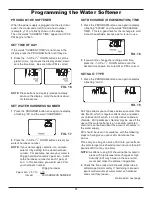
. If you want to change the recharge start time,

press the 

r

UP or 

s

DOWN buttons until the

desired time shows.  Be sure AM or PM is correct.

SET SALT TYPE

1

. Press the PROGRAM button once again to display

a flashing “nACL”.

2

. Press the 

r

UP or 

s

DOWN buttons to set your

water’s hardness number.

NOTE:

If your water supply contains iron, compen-

sate for it by adding to the water hardness

number.  For example, assume your water is

20 gpg hard and contains 2 ppm iron.  Add 5

to the hardness number for each 1 ppm of

iron.  In this example, you would use 30 for

your hardness number.

                                           20 gpg hardness

      2 ppm iron x 5 = 10    +10

                    (times)            30 HARDNESS NUMBER

FIG. 19

FIG. 17

FIG. 16

PROGRAM THE SOFTENER

When the power supply is plugged into the electrical

outlet, the model code (LLCS) and a test number

(example: y10), are briefly shown in the display.

Then the words “CURRENT TIME” appear and 12:00

PM begins to flash.

SET TIME OF DAY

If the words “CURRENT TIME" do not show in the

display, press the PROGRAM button until they do.

1

. Press the 

r

UP or 

s

DOWN buttons to set the

present time.  Up moves the display ahead; down

sets the time back.  Be sure AM or PM is correct.

NOTE:

Press buttons and quickly release to slowly

advance the display.  Hold the buttons down

for fast advance.

SET WATER HARDNESS NUMBER

1

. Press the PROGRAM button once again to display

a flashing “25” and the word “HARDNESS”.

SET RECHARGE (REGENERATION) TIME

1

. Press the PROGRAM button once again to display

a flashing “2:00AM” and the words “RECHARGE

TIME”.  This is a good time for the recharge to start

in most households, because water is not in use.

Salt Type allows you to choose between sodium chlo-

ride (NaCl), which is regular softener salt, or potassi-

um chloride (KCl), which is an alternative to sodium

chloride.  KCl (potassium chloride) may be used if the

user of the water softener is on a sodium restricted

diet and is concerned about the amount of sodium in

the water supply.
KCl should be used in accordance with the following

steps to help give you years of maintenance free

service.
Place only one bag at a time of KCl into your softener

(the salt storage tank should contain no more than 60

pounds of KCl at any one time).

NOTE: 

A softener using KCl should not be located in

areas with high temperature changes or high

humidity (KCl may harden in these environ-

ments and make the softener inoperable).

2

. Check the brine tank and brinewell (black tube in

salt storage tank) monthly. If hardening is present,

pour small amounts of warm water on hardened

areas until they loosen.

continued on next page

Summary of Contents for WHESCS

Page 1: ... when installing operating or maintaining your water softener call our toll free number 1 866 986 3223 Monday Friday 8 AM 7 PM EST or visit www whirlpoolwatersofteners com When you call please be prepared to provide the model and serial number of your product found on the rating decal typically located on the rim below the salt lid hinges System tested and certified by NSF International against NS...

Page 2: ...communications However there is no guarantee that interference will not occur in a particular installation If this equipment does cause harmful interference to radio or television reception which can be determined by turning the equipment off and on the user is encouraged to try to correct the interference by one or more of the following measures Reorient or relocate the receiving antenna Increase...

Page 3: ...te 10 gpm Amount of High Capacity Ion Exchange Resin 1 27 cu ft Pressure Drop at Rated Service Flow 12 5 psig Water Supply Max Hardness 150 gpg Water Supply Max Clear Water Iron 12 ppm Water Pressure Limits minimum maximum 20 125 psi Water Temperature Limits minimum maximum 40 120 F Minimum Water Supply Flow Rate 3 gpm Intermittent Flow 30 PSI 17 5 gpm Maximum Drain Flow Rate 2 0 gpm Salt Storage ...

Page 4: ...all Toll Free 1 866 986 3223 Monday Friday 8 am 7 pm EST or visit www whirlpoolwatersofteners com When you call please be prepared to provide the model and serial number found on the rating decal typically located on the rim below the salt lid hinges Before You Start The water softener requires a minimum water flow of 3 gallons per minute at the inlet Maximum allowable inlet water pressure is 125 ...

Page 5: ...m a faucet because it has oxidized before reaching the home It appears as small cloudy yellow orange or reddish suspended particles After the water stands for a period of time the particles settle to the bottom of the container Generally these irons are removed from water by filtra tion Chlorination is also recommended for bacterial iron Colloidal and inorganically bound iron is of ferric or fer r...

Page 6: ...To condition all water in the home install the water softener close to the water supply inlet and upstream of all other plumbing connections except outside water pipes Outside faucets should remain on hard water to avoid wasting conditioned water and salt A nearby drain is needed to carry away regenera tion discharge drain water Use a floor drain laundry tub sump standpipe or other options check y...

Page 7: ... but still have water in house pipes Pipe fittings must be 3 4 minimum Use Copper pipe Threaded pipe PEX Crosslinked Polyethylene pipe CPVC plastic pipe Other pipe approved for use with potable water IMPORTANT Do not solder with plumbing attached to installation adaptors and single bypass valve Soldering heat will damage the adaptors and valve FIG 6 FIG 7 SINGLE BYPASS VALVE Pull out for Service S...

Page 8: ...ubricated O ring Conditioned Water Hard Water Main Water Pipe Water Softener Valve Valve Drain Elbow Valve Drain Hose Do not connect the water softener valve drain tubing to the salt storage tank overflow hose Floor Drain Overflow Drain Elbow Salt Storage Tank Overflow Hose Secure Valve Drain Hose in place over Floor Drain 1 NPT Threaded Adaptor 1 1 2 air gap Dimensions FIG 8 39 1 2 47 7 8 3 3 4 4...

Page 9: ...back or other injury TURN OFF WATER SUPPLY 1 Close the main water supply valve located near the well pump or water meter 2 Open all faucets to drain all water from house pipes NOTE Be sure not to drain water from the water heater as damage to the water heater ele ments could result INSTALL THE BRINE TANK OVERFLOW ELBOW Install the brine tank overflow grommet and elbow in the 13 16 diameter hole in...

Page 10: ...nk over flow elbow and secure in place with a hose clamp 2 Route the hose to the floor drain or other suitable drain point no higher than the drain fitting on the salt storage tank This is a gravity drain If the tank overfills with water the excess water flows to the drain point Cut the drain line to the desired length and route it neatly out of the way IMPORTANT For proper operation of the water ...

Page 11: ...r add about three gallons of clean water into the salt storage tank 2 Add salt to the storage tank Use nugget pellet or coarse solar salts with less than 1 impurities PLUG IN THE POWER SUPPLY During installation the water softener wiring may be moved or jostled from place Be sure all leadwire con nectors are secure on the back of the electronic board and be sure all wiring is away from the valve g...

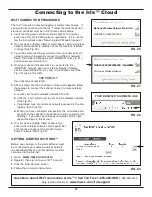
Page 12: ...S LIGHT Green When the water softener is connected to electrical power the green connection status light on the con trol panel will operate as follows Light flashing twice repeatedly The softener is ready to connect to the Iris cloud This is called AP Access Point Mode and is normal for a new unit A previously connected unit can also be in AP Mode if it was manually reset to factory defaults as de...

Page 13: ...ess buttons and quickly release to slowly advance the display Hold the buttons down for fast advance SET WATER HARDNESS NUMBER 1 Press the PROGRAM button once again to display a flashing 25 and the word HARDNESS SET RECHARGE REGENERATION TIME 1 Press the PROGRAM button once again to display a flashing 2 00AM and the words RECHARGE TIME This is a good time for the recharge to start in most househol...

Page 14: ...the PROGRAM button to enter the selection 4 Press the PROGRAM button once again to return to normal operating display Questions about installing or operating your water softener Call Toll Free 1 866 986 3223 Monday Friday 8 AM 7 PM EST or visit www whirlpoolwatersofteners com When you call please be prepared to provide the model and serial number found on the rating decal typically located on the ...

Page 15: ...r in home wireless network a Locate your home s wireless network in the list b Click the Join button next to your home s wireless network See Fig 23 c If prompted type your wireless network password in the dia log box then click OK d When you have connected successfully the connection sta tus light on the softener s control panel will be on steady not flashing If you don t get a steady connection ...

Page 16: ... until the recharge is completed will show in the display during all cycles except for the Fill cycle NOTE Avoid using hot water while the softener is regenerating because the water heater will refill with bypass hard water RECHARGE SCHEDULED If you do not want to start an immediate recharge but would like to schedule an extra recharge at the next preset recharge time do the following 1 Press and ...

Page 17: ...softener will oper ate at salt efficiencies of 4000 grains of hardness per pound of salt or higher May recharge more often using smaller salt dosage and less water The sof tener is shipped with this feature set OFF 1 Press and hold the PROGRAM button until the screen in Figure 29 is displayed Once in this dis play press the PROGRAM button once and one of the two displays in Figure 30 is shown FIG ...

Page 18: ...GRAM button three times and the display in Figure 33 is shown FIG 33 2 Press the r UP or s DOWN buttons to set the time format 3 Press the PROGRAM button once again to return to the normal time of day screen FIG 34 FIG 35 3 Press the PROGRAM button three times to return to the normal run display MAXIMUM DAYS BETWEEN REGENERA TIONS The water softener automatically controls regenera tion frequency T...

Page 19: ... is not recharged and hard water will result If the storage tank is full of salt it is difficult to tell if you have a salt bridge A bridge may be underneath loose salt Take a broom handle or like tool and hold it next to the water softener Measure the distance from the floor to the rim of the water softener Then gently push the broom handle straight down into the salt If a hard object is felt bef...

Page 20: ...e valve motor brine tank fill brine draw regeneration flow rates and other controller functions Always make the initial checks and the manual initiated diagnostics NOTE The electronic control display must show a steady time not flashing If an error code shows first press the PROGRAM button to enter the diagnostic display 1 Press the RECHARGE button and hold in for 3 seconds RECHARGE begins to flas...

Page 21: ...rom the drain hose Check that the drain can adequately handle the flow and vol ume An obstructed flow indicates a plugged top distribu tor backwash flow plug or drain hose 4 Press the RECHARGE button to move the soften er s valve into the fast rinse position Again look for a fast drain flow Allow the softener to rinse for a few minutes to flush out any brine that may remain in the resin tank from ...

Page 22: ......

Page 23: ......

Page 24: ......

Page 25: ......

Page 26: ......

Reviews: