background image

4

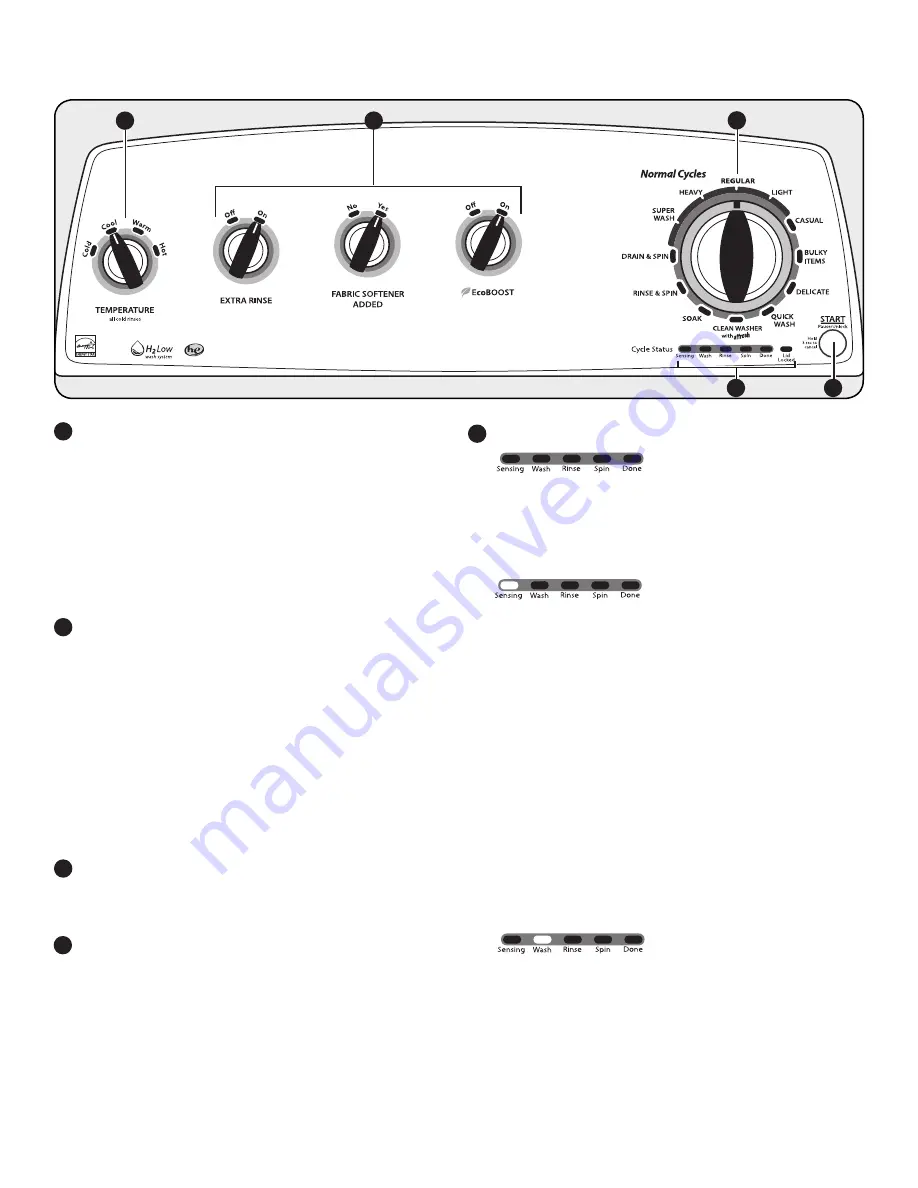
CONTROL PANEL AND FEATURES

TEMPERATURE 

Temperature Control senses and maintains uniform water 

temperatures by regulating incoming hot and cold water. 
Select a wash temperature based on the type of fabric 

and soils being washed. For best results and following the 

garment label instructions, use the warmest wash water safe 

for your fabric.  
 

•  

Warm and hot water will be cooler than what your previous 

washer provided.

•  

Even in a cool water wash, some warm water may be 

added to the washer to maintain a minimum temperature.   

CYCLE OPTIONS

The following options may be added to most cycle.  

See “Cycle Guide” for additional details. 

EXTRA RINSE

This option can be used to automatically add a second 

rinse to most cycles.

FABRIC SOFTENER

This option must be set to “Yes” if using fabric softener  

during a cycle. 

ECOBOOST™ option 

The EcoBOOST™ option allows you to increase your 

energy savings on your wash cycles. When this option is 

used, the wash cycle will use slightly cooler wash water 

than the selected temperature. 

WASH CYCLE KNOB

Use the Wash Cycle knob to select available cycles on your 

washer. Turn the knob to select a cycle for your laundry  

load. See “Cycle Guide” for detailed descriptions of cycles.

START/PAUSE/UNLOCK BUTTON

Press to start the selected cycle; press again to pause the 

cycle and unlock the lid. 

NOTE:

 If the washer is spinning, it may take several  

minutes to unlock the lid. Press and hold 3 sec to cancel  

a cycle.

1

2

3

4

5

CYCLE STATUS LIGHTS INDICATOR

The Cycle Status Lights show the progress of a cycle.  

At each stage of the process, you may notice sounds or 

pauses that are different from traditional washers.

SENSING

When the START/Pause/Unlock button is pressed, the  

washer will first perform a self-test on the lid lock  

mechanism. You will hear a click, the basket will make a 

slight turn, and the lid will unlock briefly before locking again. 

 Once the lid has locked the second time, the washer will use 

short, slow spins to estimate the load size. These sensing 

spins may take 2 to 3 minutes before water is added to the 

load and you may hear the hum of these spins. If the sensing 

light is on, then washer is working properly. You will hear 

the motor turn the basket in short pulses to thoroughly wet 

the load. The washer will then move the load briefly, pause 

to allow water to soak in to the load, and resume adding 

water. This process may repeat until the correct amount of 

water has been added for the load. You may also hear water 

flowing through the dispenser, adding detergent to the load. 

 NOTE: 

Avoid opening lid during sensing. The sensing 

process will start over when the washer is restarted. The 

sensing light may also come on during the Soak and Wash 

portions of the cycle. This is normal. 

WASH 

You will hear the motor and washplate moving the load. 

Unlike traditional washers, the load is not covered with water.  

Low-water cleaning means concentrated cleaning. Rather 

than diluting detergent as done in an agitator-style washer, 

this washer delivers the detergent directly to the soils. The 

motor sounds may change at different stages in the cycle. 

The wash time is determined by the selected soil level.

2

3

5

4

1

Summary of Contents for W10469645B

Page 1: ...INTENANCE 10 TROUBLESHOOTING 12 WARRANTY 17 ASSISTANCE OR SERVICE BACK COVER Table des matières SÉCURITÉ DE LA LAVEUSE 18 QUOI DE NEUF SOUS LE COUVERCLE 19 TABLEAU DE COMMANDE ET CARACTÉRISTIQUES 20 GUIDE DE PROGRAMMES 22 UTILISATION DE LA LAVEUSE 24 ENTRETIEN DE LA LAVEUSE 27 DÉPANNAGE 29 GARANTIE 35 ASSISTANCE OU SERVICE COUVERTURE ARRIÈRE GUIDE D UTILISATION ET D ENTRETIEN DE LA LAVEUSE HAUTE E...

Page 2: ...2 WASHER SAFETY ...

Page 3: ...s and reduced rinsing performance It may also result in component failures and noticeable mold or mildew HE detergents are made to produce the right amount of suds for the best performance Follow the manufacturer s instructions to determine the amount of detergent to use Normal Sounds You Can Expect At different stages of the wash cycle you may hear sounds and noises that are different from those ...

Page 4: ... The Cycle Status Lights show the progress of a cycle At each stage of the process you may notice sounds or pauses that are different from traditional washers SENSING When the START Pause Unlock button is pressed the washer will first perform a self test on the lid lock mechanism You will hear a click the basket will make a slight turn and the lid will unlock briefly before locking again Once the ...

Page 5: ... light will come on Remove the load promptly for best results LID LOCKED To allow for proper load sensing and spinning the lid will lock and the Lid Locked light will turn on This light indicates that the lid is locked and cannot be opened If you need to open the lid press START Pause Unlock The lid will unlock once the washer movement has stopped This may take several minutes if the load was spin...

Page 6: ...es casual business clothes permanent press and blends Use this cycle for normally soiled cottons and mixed fabric loads This cycle features a spray rinse Use this cycle to wash large items such as jackets and small comforters The washer will fill with enough water to wet down the load before the wash portion of the cycle begins and uses a higher water level than other cycles Do not tightly pack ba...

Page 7: ... Turn knits inside out to avoid pilling Separate lint takers from lint givers Synthetics knits and corduroy fabrics will pick up lint from towels rugs and chenille fabrics Always read and follow fabric care label instructions to avoid damage to your garments 1 Sort and prepare your laundry Add a measured amount of HE detergent into the basket IMPORTANT Use only High Efficiency detergents The packa...

Page 8: ...d the measured recommended amount of liquid fabric softener Do not allow liquid fabric softener to spill splash drip or run into the basket or on load Do not use more than the recommended amount Close the lid and press the START Pause Unlock button again to start the washer IMPORTANT Fabric Softener Added option must be selected to Yes to ensure proper distribution of the fabric softener during th...

Page 9: ...etal hooks zippers and snaps Unlocking the lid to add garments If you need to open the lid to add 1 or 2 missed garments Press START Pause Unlock the lid will unlock once the washer movement has stopped This may take several minutes if the load was spinning at high speed Then close lid and press START Pause Unlock again to restart the cycle If lid is left open for more than 10 minutes the water wi...

Page 10: ... exterior 1 Use a soft damp cloth or sponge to wipe up any spills 2 Use all purpose surface cleaner if needed IMPORTANT To avoid damaging the washer s finish do not use abrasive products Replace inlet hoses after 5 years of use to reduce the risk of hose failure Periodically inspect and replace inlet hoses if bulges kinks cuts wear or leaks are found When replacing your inlet hoses mark the date o...

Page 11: ...sher 4 Unplug power cord 5 Place inlet hoses and drain hose inside washer basket 6 Drape power cord over edge and into washer basket 7 Place packing tray from original shipping materials back inside washer If you do not have packing tray place heavy blankets or towels into basket opening Close lid and place tape over lid and down front of washer Keep lid taped until washer is placed in new locatio...

Page 12: ... humming It is normal to hear the pump making a continuous humming sound with periodic gurgling or surging as final amounts of water are removed during the spin drain cycles Washer may be draining water TROUBLESHOOTING Check the following for proper installation or see Using Your Washer section Washer may not be level Washer not level Water may splash off basket if washer is not level Check that l...

Page 13: ...nsure there is power to outlet Reset a tripped circuit breaker Replace any blown fuses NOTE If problems continue contact an electrician Check proper electrical supply Washer may be tightly packed Remove several items rearrange load evenly in basket and add detergent Close lid and press Start Pause Unlock Do not add more than 1 or 2 additional items after cycle has started to avoid tightly packing ...

Page 14: ...eing washed Add only 1 or 2 garments after washer has started Using a cycle with a low spin speed Cycles with lower spin speeds remove less water than cycles with high spin speeds Use the recommended cycle speed spin for your garment To remove extra water in the load select Drain Spin Load may need to be rearranged to allow even distribution of the load in the basket The washer may be tightly pack...

Page 15: ... wash only a few items Use Super Wash and Heavy cycle for tough cleaning See the Cycle Guide to match your load with the best cycle Use dispenser to avoid chlorine bleach Load dispenser before starting a cycle Do not add products directly onto load Wash like colors together and remove promptly after the cycle is complete to avoid dye transfer Washer not performing as expected cont Load is tangling...

Page 16: ...ge can occur if washer is tightly packed Liquid chlorine bleach may have been added incorrectly Do not pour liquid chlorine bleach directly onto load Wipe up bleach spills Undiluted bleach will damage fabrics Do not use more than recommended by manufacturer Do not place load items on top of bleach dispenser when loading and unloading washer Garment care instructions may not have been followed Alwa...

Page 17: ...accessible location or is not installed in accordance with Whirlpool published installation instructions 10 Replacement parts or repair labor on major appliances with original model serial numbers that have been removed altered or cannot be easily determined DISCLAIMER OF IMPLIED WARRANTIES IMPLIED WARRANTIES INCLUDING ANY IMPLIED WARRANTY OF MERCHANTABILITY OR IMPLIED WARRANTY OF FITNESS FOR A PA...

Page 18: ...18 SÉCURITÉ DE LA LAVEUSE ...

Page 19: ... réduira la performance de rinçage Ceci peut aussi entraîner des défaillances des composants et une moisissure perceptible Les détergents HE sont conçus pour produire la quantité de mousse adéquate pour le meilleur rendement Suivre les recommandations du fabricant pour déterminer la quantité de détergent à utiliser Sons normaux prévisibles Au cours des différents stades du programme de lavage vous...

Page 20: ...ions de programmes détaillées 1 2 3 4 5 BOUTON START PAUSE UNLOCK mise en marche pause déverrouillage Appuyer sur ce bouton pour démarrer le programme sélectionné puis appuyer de nouveau pour suspendre le programme et déverrouiller le couvercle REMARQUE Si la laveuse tourne le couvercle peut mettre quelques minutes à se déverrouiller Appuyer pendant 3 secondes pour annuler un programme TÉMOINS LUM...

Page 21: ...ORAGE La laveuse essore la charge à des vitesses augmentant graduellement pour une bonne extraction de l eau en fonction du programme et de la vitesse d essorage sélectionnés DONE TERMINÉ Une fois le programme terminé ce témoin s allume Retirer la charge rapidement pour un résultat optimal LID LOCK VERROUILLAGE DU COUVERCLE Pour permettre une bonne détection de la charge et un bon essorage le couv...

Page 22: ...utilise un rinçage par vaporisation Utiliser ce programme pour laver de gros articles tels que des vestes et de petites couettes La laveuse se remplit des suffisamment d eau pour mouiller la charge avant que l étape de lavage du programme ne commence Ce programme utilise plus d eau que les autres programmes Ne pas surcharger le panier Utiliser ce programme pour les articles très sales ou robustes ...

Page 23: ... un programme après une coupure de courant Élevée Pas de vêtements dans la laveuse Clean Washer with Affresh Nettoyage de la laveuse avec Affresh Utiliser ce programme une fois par mois pour que l intérieur de la laveuse reste frais et propre L association de niveaux d eau plus élevés et le produit de nettoyage de la laveuse AFFRESH permet de laver soigneusement l intérieur de la laveuse Pour de m...

Page 24: ...tergent HE dans le panier IMPORTANT Utiliser uniquement des détergents Haute efficacité L emballage portera la mention HE ou High Efficiency haute efficacité Un lavage avec faible consommation d eau produit un excès de mousse avec un détergent non HE ordinaire Il est probable que l utilisation d un détergent ordinaire prolongera la durée des programmes et réduira la performance de rinçage Ceci peu...

Page 25: ... d assouplissant pour tissu Ne pas renverser faire éclabousser égoutter ou couler de l assouplissant pour tissu liquide dans le panier ou sur la charge de linge Ne pas utiliser plus que la quantité recommandée Fermer le couvercle et appuyer sur START Pause Unlock mise en marche pause déverrouillage pour mettre la laveuse en marche IMPORTANT L option Fabric Softener Added ajout d assouplissant pour...

Page 26: ...que celle que fournissait votre laveuse précédente Fraîche Il se peut que de l eau chaude soit ajoutée pour favoriser l élimination de la saleté et aider à dissoudre les détergents Froide De l eau tiède est ajoutée pour favoriser l élimination de la saleté et aider à dissoudre les détergents Froide du robinet Ceci correspond à la température à votre robinet Tissus suggérés Blancs et couleurs clair...

Page 27: ...on pour réduire le risque de défaillance intempestive Inspecter périodiquement les tuyaux les remplacer en cas de renflement de déformation de coupure et d usure ou si une fuite se manifeste Lorsque vous remplacez les tuyaux d arrivée d eau noter la date de remplacement au marqueur indélébile sur l étiquette TUYAUX D ARRIVÉE D EAU NETTOYAGE DE LA LAVEUSE Votre laveuse doit rester aussi propre et f...

Page 28: ...mmandée suivante Remise en marche de la laveuse 1 Vidanger les canalisations d eau et les tuyaux Reconnecter les tuyaux d arrivée d eau Ouvrir les deux robinets d eau 2 Brancher la laveuse ou reconnecter la source de courant électrique 3 Faire exécuter à la laveuse le programme BULKY ITEMS articles volumineux pour nettoyer la laveuse et éliminer l antigel le cas échéant Utiliser uniquement un déte...

Page 29: ...en dehors du panier si la laveuse n est pas d aplomb Vérifier que la charge n est pas déséquilibrée ou trop tassée Les tuyaux de remplissage ne sont pas solidement fixés Serrer le raccord du tuyau de remplissage S assurer que les quatre rondelles d étanchéité plates des tuyaux de remplissage d eau sont correctement installées Raccord du tuyau de vidange Tirer le tuyau de vidange de la caisse de la...

Page 30: ...Brancher le cordon d alimentation dans une prise à 3 alvéoles reliée à la terre Ne pas utiliser de câble de rallonge Vérifier que la prise est alimentée Remettre en marche un disjoncteur qui serait ouvert Remplacer tout fusible grillé REMARQUE Si le problème persiste appeler un électricien Fonctionnement normal de la laveuse Le couvercle doit être fermé pour que la laveuse puisse fonctionner La la...

Page 31: ... allumé indiquant que la laveuse n était pas en mesure d extraire l eau par pompage en 10 minutes Inspecter le circuit de plomberie pour vérifier que le tuyau de vidange est correctement installé Le tuyau de vidange se prolonge dans le tuyau rigide de rejet à l égout au delà de 4 5 114 mm Vérifier que le tuyau de vidange est correctement installé Utiliser la bride de retenue pour tuyau de vidange ...

Page 32: ... instructions du détergent en fonction de la taille et du niveau de saleté de la charge La laveuse n a pas été chargée tel que recommandé La laveuse effectuera un rinçage moins performant si la charge est bien tassée Charger les vêtements sans les tasser et de façon uniforme le long de la paroi du panier La laveuse ne rincera pas bien si les vêtements sont tassés Charger la laveuse uniquement avec...

Page 33: ...et une température de lavage plus chaude pour améliorer le nettoyage Si l on utilise le programme Quick Wash lavage rapide ne laver que quelques articles Utiliser le programme Super Wash super lavage et Heavy Cycle programme intense pour un nettoyage puissant Voir le Guide de programmes pour utiliser le programme qui correspond le mieux à la charge utilisée La laveuse détecte la taille de la charg...

Page 34: ...e blanchiment lorsqu on charge et décharge la laveuse Les instructions de soin des vêtements n ont peut être pas été suivies Toujours lire et suivre les instructions d entretien du fabricant indiquées sur l étiquette du vêtement Charger les vêtements sans les tasser et de façon uniforme le long de la paroi du panier Charger la machine uniquement avec des articles secs Utiliser le programme conçu p...

Page 35: ...s installé conformément aux instructions d installation fournies par Whirlpool 10 Les pièces de rechange ou la main d œuvre pour les gros appareils ménagers dont les numéros de série et de modèle originaux ont été enlevés modifiés ou qui ne peuvent pas être facilement identifiés CLAUSE D EXONÉRATION DE RESPONSABILITÉ AU TITRE DES GARANTIES IMPLICITES LES GARANTIES IMPLICITES Y COMPRIS LES GARANTIE...

Page 36: ...d maintenance procedures Accessory and repair parts sales Referrals to local dealers repair parts distributors and service companies Whirlpool designated service technicians are trained to fulfill the product warranty and provide after warranty service anywhere in the United States and Canada AssistAnce oU service Avant de faire un appel pour assistance ou service veuillez vérifier la section Dépa...

Reviews: