background image

16

WHIRLPOOL CORPORATION MAJOR APPLIANCE WARRANTY

LIMITED WARRANTY

For one year from the date of purchase, when this major appliance is operated and maintained according to instructions attached to or 
furnished with the product, Whirlpool Corporation or Whirlpool Canada LP (hereafter “Whirlpool”) will pay for Factory Specified Parts 
and repair labor to correct defects in materials or workmanship. Service must be provided by a Whirlpool designated service company. 
This limited warranty is valid only in the United States or Canada and applies only when the major appliance is used in the country in 
which it was purchased. Outside the 50 United States and Canada, this limited warranty does not apply. Proof of original purchase date 
is required to obtain service under this limited warranty. 

ITEMS EXCLUDED FROM WARRANTY

This limited warranty does not cover:

1. Service calls to correct the installation of your major appliance, to instruct you on how to use your major appliance, to replace or 

repair house fuses, or to correct house wiring or plumbing. 

2. Service calls to repair or replace appliance light bulbs, air filters or water filters. Consumable parts are excluded from warranty 

coverage. 

3. Repairs when your major appliance is used for other than normal, single-family household use or when it is used in a manner that is 

contrary to published user or operator instructions and/or installation instructions. 

4. Damage resulting from accident, alteration, misuse, abuse, fire, flood, acts of God, improper installation, installation not in 

accordance with electrical or plumbing codes, or use of consumables or cleaning products not approved by Whirlpool. 

5. Cosmetic damage, including scratches, dents, chips or other damage to the finish of your major appliance, unless such damage 

results from defects in materials or workmanship and is reported to Whirlpool within 30 days from the date of purchase. 

6. Any food loss due to refrigerator or freezer product failures. 

7. Costs associated with the removal from your home of your major appliance for repairs. This major appliance is designed to be 

repaired in the home and only in-home service is covered by this warranty. 

8. Repairs to parts or systems resulting from unauthorized modifications made to the appliance. 

9. Expenses for travel and transportation for product service if your major appliance is located in a remote area where service by an 

authorized Whirlpool servicer is not available. 

10. The removal and reinstallation of your major appliance if it is installed in an inaccessible location or is not installed in accordance 

with published installation instructions. 

11. Major appliances with original model/serial numbers that have been removed, altered or cannot be easily determined. This warranty 

is void if the factory applied serial number has been altered or removed from your major appliance. 

The cost of repair or replacement under these excluded circumstances shall be borne by the customer. 

DISCLAIMER OF IMPLIED WARRANTIES; LIMITATION OF REMEDIES

CUSTOMER'S SOLE AND EXCLUSIVE REMEDY UNDER THIS LIMITED WARRANTY SHALL BE PRODUCT REPAIR AS PROVIDED 
HEREIN. IMPLIED WARRANTIES, INCLUDING WARRANTIES OF MERCHANTABILITY OR FITNESS FOR A PARTICULAR PURPOSE, 
ARE LIMITED TO ONE YEAR OR THE SHORTEST PERIOD ALLOWED BY LAW. WHIRLPOOL SHALL NOT BE LIABLE FOR 
INCIDENTAL OR CONSEQUENTIAL DAMAGES. SOME STATES AND PROVINCES DO NOT ALLOW THE EXCLUSION OR LIMITATION 
OF INCIDENTAL OR CONSEQUENTIAL DAMAGES, OR LIMITATIONS ON THE DURATION OF IMPLIED WARRANTIES OF 
MERCHANTABILITY OR FITNESS, SO THESE EXCLUSIONS OR LIMITATIONS MAY NOT APPLY TO YOU. THIS WARRANTY GIVES 
YOU SPECIFIC LEGAL RIGHTS, AND YOU MAY ALSO HAVE OTHER RIGHTS WHICH VARY FROM STATE TO STATE OR PROVINCE 
TO PROVINCE. 


If outside the 50 United States and Canada, contact your authorized Whirlpool dealer to determine if another warranty applies. 

If you need service, first see the “Troubleshooting” section of the Use & Care Guide. After checking “Troubleshooting,” you may find 
additional help by checking the “Assistance or Service” section or by calling Whirlpool. In the U.S.A., call 1-800-253-1301. In Canada, 
call 1-800-807-6777

6/12

Keep this book and your sales slip together for future 
reference. You must provide proof of purchase or installation 
date for in-warranty service.

Write down the following information about your major appliance 
to better help you obtain assistance or service if you ever need it. 
You will need to know your complete model number and serial 
number. You can find this information on the model and serial 
number label located on the product.

Dealer name____________________________________________________

Address ________________________________________________________

Phone number __________________________________________________

Model number __________________________________________________

Serial number __________________________________________________

Purchase date __________________________________________________

Summary of Contents for UXI6536BS

Page 1: ...ebsite at www whirlpool ca HOTTE DE CUISINIÈRE CONFIGURÉE EN ÎLOT 36 91 4 CM Instructionsd installationetGuided utilisationetd entretien Au Canada pour assistance installation ou service composer le 1 800 807 6777 ou visiter notre site Web à www whirlpool ca Table of Contents Table des matières 2 IMPORTANT READ AND SAVE THESE INSTRUCTIONS FOR RESIDENTIAL USE ONLY IMPORTANT LIRE ET CONSERVER CES IN...

Page 2: ...the U S A 15 In Canada 15 Accessories 15 WARRANTY 16 TABLE DES MATIÈRES SÉCURITÉ DE LA HOTTE DE CUISINIÈRE 17 EXIGENCES D INSTALLATION 19 Outils et pièces 19 Exigences d emplacement 19 Exigences concernant l évacuation 20 Spécifications électriques 21 INSTRUCTIONS D INSTALLATION 22 Préparation de l emplacement 22 Assemblage de la hotte 23 Installation de la hotte 24 Raccordement électrique 24 Inst...

Page 3: ...e instructions are not followed Your safety and the safety of others are very important We have provided many important safety messages in this manual and on your appliance Always read and obey all safety messages This is the safety alert symbol This symbol alerts you to potential hazards that can kill or hurt you and others All safety messages will follow the safety alert symbol and either the wo...

Page 4: ...zardous or explosive materials and vapors CAUTION To reduce risk of fire and to properly exhaust air be sure to duct air outside do not vent exhaust air into spaces within walls or ceilings attics or into crawl spaces or garages WARNING TO REDUCE THE RISK OF FIRE USE ONLY METAL DUCTWORK WARNING TO REDUCE THE RISK OF A RANGE TOP GREASE FIRE Never leave surface units unattended at high settings Boil...

Page 5: ...ve a qualified technician install the range hood It is the installer s responsibility to comply with installation clearances specified on the model serial rating plate The model serial rating plate is located behind the left filter on the rear wall of the vent hood Canopy hood location should be away from strong draft areas such as windows doors and strong heating vents Cabinet opening dimensions ...

Page 6: ...ws if more than 1 elbow is used Do not install 2 elbows together Use vent clamps to seal all joints in the vent system Use caulking to seal exterior wall or roof opening around the cap The size of the vent should be uniform Cold Weather Installations An additional back draft damper should be installed to minimize backward cold air flow and a thermal break should be installed to minimize conduction...

Page 7: ...f codes permit and a separate ground wire is used it is recommended that a qualified electrician determine that the ground path is adequate A copy of the above code standards can be obtained from National Fire Protection Association 1 Batterymarch Park Quincy MA 02169 7471 CSA International 8501 East Pleasant Valley Road Cleveland OH 44131 5575 A 120 volt 60 Hz AC only 15 amp fused electrical circ...

Page 8: ... cooking surface 2 Tape template in place on the ceiling at the marked centerline The line for the front of the range hood should be parallel to the front of the cooktop 3 Use a pencil to mark the mounting screws wire access and duct hole locations on the ceiling NOTE Mounting hole locations should be into a ceiling support structure capable of holding 80 lbs 36 6 kg Remove the template 4 Drill 4 ...

Page 9: ...ide the deflector 1 2 5 cm minimum 3 Install vent between the transition and the deflector NOTE To make vent installation easier temporarily remove the deflector from the chimney support bracket and replace after vent section is in place 4 Seal all connections with vent clamps Continue with Range Hood Installation in this section Range Hood Installation 1 Using 2 or more people lift the range hood...

Page 10: ...sockets 11 Reconnect power InstallDuctCovers NOTE Remove the film from the vertical duct cover supports and the duct covers 1 Attach the vertical duct cover supports using 8 4 x 8 mm screws A Knockout B Terminal box C Terminal box cover A Home power supply cable B UL listed or CSA approved strain relief C Black wires D UL listed wire connectors E White wires F Green or bare and yellow green ground...

Page 11: ...ers 4 places CompleteInstallation 1 For non vented recirculating installations only install charcoal filters onto the metal filters See the Range Hood Care section 2 Install metal filters See the Range Hood Care section 3 Check the operation of the range hood blower and light See the Range Hood Use section If range hood does not operate check to see whether a circuit breaker has tripped or a house...

Page 12: ...s both lights Press once for On and again for Off Operating the blower The Blower Speed buttons turn the blower on and control the blower speed and sound level for quiet operation The speed can be changed anytime during fan operation by pressing the desired blower speed button The Blower Off button turns the blower Off A Duct cover holes B Duct cover C Control panel D Glass canopy E Halogen lamps ...

Page 13: ...tallation Filters The charcoal filter is not washable It should last up to 6 months with normal use Replace with Charcoal Filter Kit Number W10412939 To replace charcoal filter 1 Remove metal grease filter from range hood See Metal Grease Filters in this section 2 Bend spring clips away from metal grease filter 3 Place charcoal filter into top side of metal filter 4 Bend spring clips back into pla...

Page 14: ...eed No connection Brown Yellow L LA L 1 L 2 L 3 Position Function Switch Operation High Speed Med Speed Brown Black Brown Red Brown White Motor Characteristics Power Supply Frequency Power Absorption 120 VAC 60 Hz 240 Watts Motor Resistance Ohms Blue Black Blue Gray Blue Red Blue White Room Temp 37 7 73 4 F 23 C 45 1 30 3 28 8 Push Button Switch Y G W BK W BK ...

Page 15: ...ur area you can also look in your telephone directory Yellow Pages For further assistance If you need further assistance you can write to Whirlpool Corporation with any questions or concerns at Whirlpool Brand Home Appliances Customer eXperience Center 553 Benson Road Benton Harbor MI 49022 2692 Please include a daytime phone number in your correspondence InCanada Call the Whirlpool Canada LP Cust...

Page 16: ...ice by an authorized Whirlpool servicer is not available 10 The removal and reinstallation of your major appliance if it is installed in an inaccessible location or is not installed in accordance with published installation instructions 11 Major appliances with original model serial numbers that have been removed altered or cannot be easily determined This warranty is void if the factory applied s...

Page 17: ...as de non respect des instructions Votre sécurité et celle des autres est très importante Nous donnons de nombreux messages de sécurité importants dans ce manuel et sur votre appareil ménager Assurez vous de toujours lire tous les messages de sécurité et de vous y conformer AVERTISSEMENT DANGER Voici le symbole d alerte de sécurité Ce symbole d alerte de sécurité vous signale les dangers potentiel...

Page 18: ...die et évacuer adéquatement les gaz veiller à acheminer l air aspiré par un conduit jusqu à l extérieur ne pas décharger l air aspiré dans un espace vide du bâtiment comme une cavité murale un plafond un grenier un vide sanitaire ou un garage AVERTISSEMENT POUR RÉDUIRE LE RISQUE D INCENDIE UTILISER UNIQUEMENT DES CONDUITS MÉTALLIQUES AVERTISSEMENT POUR MINIMISER LE RISQUE D UN FEU DE GRAISSE SUR L...

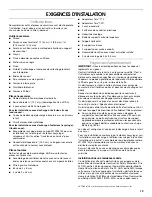
Page 19: ... à un technicien qualifié C est à l installateur qu incombe la responsabilité de respecter les distances de séparation spécifiées sur la plaque signalétique de l appareil La plaque signalétique de l appareil est située derrière le filtre de gauche sur la paroi arrière de la hotte On doit toujours installer la hotte à distance des sources de courant d air fort fenêtres portes et bouches de chauffag...

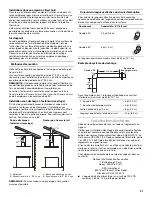
Page 20: ...inium très mince Le système d évacuation doit comporter un clapet Si la bouche de décharge murale ou par le toit comporte un clapet ne pas utiliser le clapet fourni avec la hotte de cuisinière Pour un fonctionnement efficace et silencieux Utiliser des sections droites ou minimiser le nombre de coudes autant que possible Ne pas utiliser plus de trois coudes à 90 Veiller à ce qu il y ait une section...

Page 21: ...tte dotée d un filtre à charbon actif et du déflecteur Les fumées et vapeurs sont recyclées à travers la grille supérieure Pour commander voir la section Assistance ou service REMARQUE Pour les maisons à deux étages l évacuation murale est possible Calcul de la longueur effective du circuit d évacuation Pour calculer la longueur effective du circuit d évacuation nécessaire additionner les longueur...

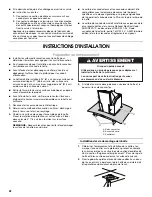
Page 22: ...tte doit être installée à 24 61 cm min des surfaces de cuisson électriques 27 68 6 cm min des surfaces de cuisson au gaz et à un maximum suggéré de 36 91 4 cm au dessus de la surface de cuisson Retirer le film protecteur des surfaces métalliques au besoin avant d assembler le produit Avant d installer la hotte vérifier que la hauteur libre sous plafond et la hauteur maximum disponible sous la hott...

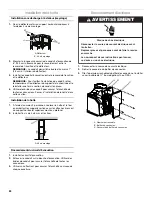
Page 23: ...voir complètement terminé l installation 3 Pour les installations avec décharge à l extérieur uniquement À l aide d une scie sauteuse ou scie à guichet découper un trou de 6 16 5 cm de diamètre pour le conduit d évacuation 4 Fixer le support horizontal supérieur à l aide des 4 vis à bois de 5 x 45 mm REMARQUE Les vis du support horizontal supérieur doivent être vissées dans une structure de soutie...

Page 24: ... hotte et la fixer en emboîtant les supports verticaux sur les attaches à ressort du support horizontal supérieur monté au plafond 2 Installer 16 vis de 4 x 8 mm et les fixer Raccordement du circuit d évacuation 1 Installer le circuit d évacuation 2 Enfoncer le conduit sur la bouche d évacuation Utiliser des brides de conduit pour assurer l étanchéité de toutes les connexions 3 Utiliser un calfeut...

Page 25: ...boîtier de connexion 8 Serrer la vis du serre câble 9 Installer le couvercle du boîtier de connexion 10 Vérifier que chaque ampoule est bien insérée dans sa douille 11 Reconnecter la source de courant électrique A Câble d alimentation électrique du domicile B Serre câble homologation UL ou CSA C Conducteurs noirs D Connecteurs de fils homologation UL E Conducteurs blancs F Conducteurs verts ou nus...

Page 26: ...astique à chaque angle supérieur et inférieur de la section inférieure des cache conduits 4 emplacements Acheverl installation 1 Pour les installations sans décharge à l extérieur recyclage uniquement installer les filtres à charbon sur les filtres métalliques Voir la section Entretien de la hotte 2 Installer les filtres métalliques Voir la section Entretien de la hotte 3 Contrôler le fonctionneme...

Page 27: ...uton pour allumer la lampe puis une nouvelle fois pour l éteindre Utilisation du ventilateur Les boutons de vitesse du ventilateur activent le ventilateur et contrôlent la vitesse du ventilateur et le niveau sonore pour un fonctionnement silencieux On peut modifier la vitesse à tout moment pendant le fonctionnement du ventilateur en appuyant sur le bouton correspondant à la vitesse souhaitée Le bo...

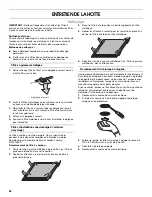
Page 28: ...mois dans des conditions d utilisation normales Remplacer par l ensemble de filtre à charbon numéro W10412939 Remplacement du filtre à charbon 1 Retirer le filtre à graisse métallique de la hotte Voir Filtres à graisse métalliques dans cette section 2 Déplier les attaches à ressort pour les écarter du filtre à graisse métallique 3 Placer le filtre à charbon dans la partie supérieure du filtre méta...

Page 29: ...L N Off arrêt Lampes Vitesse basse Pas de connexion Marron Jaune L LA L 1 L 2 L 3 Position Fonction Fonctionnement du commutateur Vitesse élevée Vitesse moyenne Marron Noir Marron Rouge Marron Blanc Caractéristiques de moteur Alimentation électrique Fréquence Puissance absorbée 120 VCA 60 Hz 240 Watts Résistance moteur Ohms Bleu Noir Bleu Gris Bleu Rouge Bleu Blanc Temp ambiante 37 7 73 4 F 23 C 4...

Page 30: ... d appareils électroménagers Consignes d utilisation et d entretien Ventes d accessoires et de pièces de rechange Références aux marchands locaux aux distributeurs de pièces de rechange et aux compagnies de service Les techniciens de service désignés par Whirlpool Canada LP sont formés pour remplir la garantie des produits et fournir un service après la garantie partout au Canada Pour plus d assis...

Page 31: ...iés au transport du gros appareil ménager du domicile pour réparation Ce gros appareil ménager est conçu pour être réparé à domicile et seul le service à domicile est couvert par la présente garantie 8 Les réparations aux pièces ou systèmes résultant d une modification non autorisée faite à l appareil 9 Les frais de transport pour le service d un produit si votre gros appareil est situé dans une r...

Page 32: ...renseignements sur la plaque signalétique située sur le produit Nom du marchand ______________________________________________ Adresse ________________________________________________________ Numéro de téléphone ___________________________________________ Numéro de modèle______________________________________________ Numéro de série ________________________________________________ Date d achat____...

Reviews: