background image

15

Complete Conversion

1. Refer to the “Make Gas Connection” section for properly 

connecting the range to the gas supply.

2. Turn the manual shutoff valve in the gas supply line to the 

open position.

3. Refer to the “Electronic Ignition System” section for proper 

burner ingestion, operation and burner flame adjustments.

IMPORTANT: You may have to adjust the “LO” setting for 
each cooktop burner.

Checking for proper cooktop and oven burner flames is very 
important. The small inner cone should have a very distinct 
blue flame ¼" to ½" (0.64 cm to 0.13 cm) long. The outer 
cone is not as distinct as the inner cone. LP gas flames have 
a slightly yellow tip.

4. Close the broiler door and press the CANCEL/OFF pad.

5. Refer to the “Complete Installation” section to complete this 

procedure.

Natural Gas Conversion

1. Turn manual shutoff valve to the “closed” position.

2. Unplug range or disconnect power.

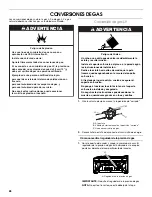
To Convert Gas Pressure Regulator

1. Open broiler door and remove broiler pan. The gas pressure 

regulator is located in the back right hand corner of the broiler 
compartment.

IMPORTANT: Do not remove the gas pressure regulator.

NOTE: Do not remove the spring beneath the cap.

2. Remove the cap from the gas pressure regulator using a flat-

blade screwdriver.

NOTE: Make sure sealing washer remains in the same 
position.

3. To convert to Natural gas, unscrew the plastic adjustment 

screw by hand, turn it over, and screw it in again.

4. Reinstall the cap.

A. To range
B. Manual shutoff valve “closed” position

C. Gas supply line

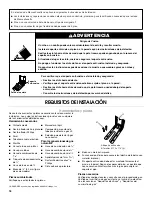
WARNING

Tip Over Hazard

A child or adult can tip the range and be killed.

Install anti-tip bracket to floor or wall per installation 
instructions.

Slide range back so rear range foot is engaged in the 
slot of the anti-tip bracket.

Re-engage anti-tip bracket if range is moved.

Do not operate range without anti-tip bracket installed 
and engaged.

Failure to follow these instructions can result in death 
or serious burns to children and adults.

A

B

C

A. Gas pressure regulator

A. Cap

Inlet pressure 
to LP gas

Inlet pressure 
to Natural gas

A. Cap
B. Sealing washer

C. Adjustment screw

A

A

C

A

B

180º

Summary of Contents for SF216LXSQ

Page 1: ...OS DE INSTALACIÓN 18 Herramientas y piezas 18 Requisitos de ubicación 19 Requisitos eléctricos 20 Requisitos del suministro de gas 21 INSTRUCCIONES DE INSTALACIÓN 22 Desempaque la estufa 22 Instalación del soporte anti vuelco 22 Conexión del suministro de gas 23 Verifique que el soporte anti vuelco esté instalado y enganchado 25 Nivelación de la estufa 25 Sistema de encendido electrónico 25 Comple...

Page 2: ... property damage personal injury or death Do not store or use gasoline or other flammable vapors and liquids in the vicinity of this or any other appliance WHAT TO DO IF YOU SMELL GAS Do not try to light any appliance Do not touch any electrical switch Do not use any phone in your building Immediately call your gas supplier from a neighbor s phone Follow the gas supplier s instructions If you cann...

Page 3: ...ange and be killed Install anti tip bracket to floor or wall per installation instructions Slide range back so rear range foot is engaged in the slot of the anti tip bracket Re engage anti tip bracket if range is moved Do not operate range without anti tip bracket installed and engaged Failure to follow these instructions can result in death or serious burns to children and adults Anti Tip Bracket...

Page 4: ...ilable See Gas Supply Requirements section Contact a qualified floor covering installer to check that the floor covering can withstand at least 200 F 93 C Use an insulated pad or 0 64 cm plywood under range if installing range over carpeting IMPORTANT To avoid damage to your cabinets check with your builder or cabinet supplier to make sure that the materials used will not discolor delaminate or su...

Page 5: ...rcuit breaker is also recommended It is recommended that a separate circuit serving only this range be provided This range is equipped with a power supply cord having a 3 prong ground plug To minimize possible shock hazard the cord must be plugged into a grounded 3 prong outlet Electronic ignition systems operate within wide voltage limits but proper grounding and polarity are necessary Check that...

Page 6: ...g 1 3 cm or 1 9 cm I D flexible metal appliance connector may be used for connecting range to the gas supply line A 1 3 cm male pipe thread is needed for connection to the female pipe threads of the inlet to the appliance pressure regulator Do not kink or damage the flexible metal tubing when moving the range Rigid pipe connection The rigid pipe connection requires a combination of pipe fittings t...

Page 7: ... support the range when it is laid on its back 5 Using 2 or more people firmly grasp the range and gently lay it on its back on the cardboard corners 6 Pull cardboard bottom firmly to remove 7 Use an adjustable wrench to loosen the leveling legs Adjust the leveling legs to the correct height Leveling legs can be loosened to add up to a maximum of 1 2 5 cm A minimum of 0 5 cm is needed to engage th...

Page 8: ...ge to the existing gas line Your connections may be different according to the supply line type size and location 1 Apply pipe joint compound made for use with LP gas to all pipe thread connections 2 Using a pipe wrench to tighten connect the gas supply to the range Typical flexible connection 1 Apply pipe joint compound made for use with LP gas to the smaller thread ends of the flexible connector...

Page 9: ...l show a leak Correct any leak found 5 Remove cooktop burner caps and grates from parts package Align notches in burner caps with pins in burner base Burner caps should be level when properly positioned If burner caps are not properly positioned surface burners will not light Place burners burner caps and grates on the cooktop 6 Plug into a grounded 3 prong outlet A Pressure regulator connection f...

Page 10: ...ide for contact information 6 Repeat steps 1 and 2 to ensure that the range foot is engaged in the anti tip bracket If the rear of the range lifts more than 1 3 cm off the floor without resistance the anti tip bracket may not be installed correctly Do not operate the range without anti tip bracket installed and engaged Please reference the Assistance or Service section of the Use and Care Guide or...

Page 11: ...roil burner and oven burner are the same burner Check the broil function as follows 1 Press the BROIL pad 525 will appear in the display The BROIL indicator will light 2 Press the START ENTER pad The TEMP and ON indicators will appear The oven burner should light in 20 40 seconds this delay is normal The oven valve requires a certain time before it will open and allow gas to flow To avoid damaging...

Page 12: ...ed by shipping material Dry thoroughly with a soft cloth For more information see the Range Care section of the Use and Care Guide or User Instructions 6 Read the Use and Care Guide or User Instructions 7 Turn on surface burners and oven See the Use and Care Guide or User Instructions for specific instruction on range operation If range does not operate check the following Household fuse is intact...

Page 13: ...ctions If connected to LP have a qualified person make sure gas pressure does not exceed 14 36 cm water column Examples of a qualified person include licensed heating personnel authorized gas company personnel and authorized service personnel Failure to do so can result in death explosion or fire A To range B Manual shutoff valve closed position C Gas supply line A Gas pressure regulator WARNING T...

Page 14: ...urner caps and burner grates To Convert Oven Burner 1 Open the oven door and remove oven racks oven tray flame spreader and set aside 2 Lift oven burner The orifice spud is behind the oven burner air shutter 3 Locate LP gas orifice spud stamped 56 in the bag containing literature supplied with the range 4 Use a 7 mm combination wrench and remove the Natural gas orifice spud 5 Install the number 56...

Page 15: ...ve broiler pan The gas pressure regulator is located in the back right hand corner of the broiler compartment IMPORTANT Do not remove the gas pressure regulator NOTE Do not remove the spring beneath the cap 2 Remove the cap from the gas pressure regulator using a flat blade screwdriver NOTE Make sure sealing washer remains in the same position 3 To convert to Natural gas unscrew the plastic adjust...

Page 16: ...as oven burner spud in plastic parts bag along with LP gas cooktop burner spuds for future use and keep with the bag containing literature 7 Reinstall oven burner 8 Reinstall oven racks oven tray and flame spreader CompleteConversion 1 Refer to the Make Gas Connection section for properly connecting the range to the gas supply 2 Turn the manual shutoff valve in the gas supply line to the open posi...

Page 17: ...solina u otros líquidos y vapores inflamables cerca de este u otro aparato electrodoméstico PASOS QUE USTED DEBE SEGUIR SI HUELE A GAS No trate de encender ningún aparato electrodoméstico No toque ningún interruptor eléctrico No use ningún teléfono en su casa o edificio Llame inmediatamente a su proveedor de gas desde el teléfono de un vecino Siga las instrucciones de su proveedor de gas Si usted ...

Page 18: ...i vuelco al piso o a la pared según las instrucciones de instalación Deslice la estufa hacia atrás de modo que la pata trasera quede enganchada en la ranura del soporte anti vuelco Si traslada de lugar la estufa vuelva a asegurar el soporte anti vuelco No ponga a funcionar la estufa sin tener el soporte anti vuelco instalado y asegurado No seguir estas instrucciones puede ocasionar la muerte o que...

Page 19: ...r por lo menos 200 F 93 C Use una almohadilla aislante o una madera laminada de 0 64 cm debajo de la estufa si va a instalar la estufa sobre una alfombra IMPORTANTE Para evitar daños a sus armarios verifique con el constructor o distribuidor de armarios para asegurarse de que los materiales que se usen no se descoloren astillen ni sufran ningún otro tipo de daño Este horno ha sido diseñado de acue...

Page 20: ...ión a tierra Para reducir al mínimo el peligro de posibles choques eléctricos el cable debe ser enchufado en un contacto de pared de tres terminales conectado a tierra Los sistemas de encendido electrónico funcionan dentro de amplios límites de voltaje pero se debe tener la conexión a tierra y polaridad correctas Verifique que el contacto tenga una capacidad para 120 voltios y que esté debidamente...

Page 21: ...sean resistentes a la acción del gas LP No utilice cinta TEFLON Conector flexible de metal del aparato Si los códigos locales lo permiten puede usarse un conector de metal flexible para aparatos nuevo con diseño certificado de CSA de 4 a 5 pies 122 a 152 4 cm de largo diámetro interno de 1 3 cm ó 1 9 cm para conectar la estufa a la línea de suministro de gas Se necesita una rosca macho para tuberí...

Page 22: ...el horno 4 Para colocar la estufa sobre su parte posterior tome los 4 esquinales de cartón de la caja Apile un esquinal de cartón sobre el otro Repita con los otros 2 esquinales Colóquelos a lo largo sobre el piso detrás de la estufa para protegerla cuando se coloque sobre su parte posterior 5 Con la ayuda de 2 o más personas agarre la estufa con firmeza y colóquela suavemente sobre su parte poste...

Page 23: ...degas Conexión típica de la tubería rígida Se debe usar una combinación de tubos de unión para conectar la estufa a la línea de suministro de gas existente Sus conexiones pueden ser distintas de acuerdo con el tipo de línea de suministro tamaño y ubicación 1 Aplique compuesto para unión de tubería fabricado para usarse con el gas LP en todas las conexiones con rosca de tubería 2 Utilizando una lla...

Page 24: ...ión de fugas que no sea corrosiva Se observarán burbujas si hay fuga Tape cualquier fuga que encuentre 5 Saque las tapas de los quemadores de la superficie de cocción y las parrillas del paquete de piezas Alinee las muescas que están en las tapas de los quemadores con los pasadores de la base del quemador Las tapas del quemador deberán estar niveladas cuando se colocan en la posición correcta Si l...

Page 25: ... se levanta más de 1 3 cm del piso sin sentir resistencia es posible que el soporte anti vuelco no se haya instalado correctamente No ponga a funcionar la estufa sin tener el soporte anti vuelco instalado y asegurado Para contactar al servicio técnico consulte la sección Ayuda o servicio técnico en el Manual de uso y cuidado la portada o la sección Garantía de las Instrucciones para el usuario Niv...

Page 26: ...e 350 F El quemador del asador y el del horno son el mismo Verifique que el asador funcione de la siguiente manera 1 Presione el botón BROIL Asar Aparecerá 525 en la pantalla Se encenderá la luz indicadora de BROIL Asar 2 Presione el botón START ENTER Inicio Ingreso Aparecerán los indicadores TEMP Temperatura y ON Encendido El quemador del horno deberá encenderse en 20 a 40 segundos este retraso e...

Page 27: ...nformación vea la sección Cuidado de la estufa del Manual de uso y cuidado o de las Instrucciones para el usuario 6 Lea el Manual de uso y cuidado o las Instrucciones para el usuario 7 Encienda los quemadores y el horno Vea el Manual de uso y cuidado o las Instrucciones para el usuario para obtener instrucciones específicas sobre el funcionamiento de la estufa Si la estufa no funciona revise lo si...

Page 28: ...exceder una columna de agua de 36 cm 14 y debe ser verificada por una persona calificada Ejemplos de una persona calificada incluyen personal de servicio del sistema de calefacción con licencia personal autorizado de la compañía de gas y personal autorizado para dar servicio No seguir estas instrucciones puede ocasionar la muerte explosión o incendio A A la estufa B Válvula de cierre manual en la ...

Page 29: ...año y la ubicación de la espita siguen siendo los mismos 5 Coloque las espitas de los orificios de gas natural en la bolsa de piezas para usarlas en el futuro y guárdela en la bolsa con material impreso 6 Vuelva a instalar los quemadores las tapas y las parrillas de los mismos Cómo convertir el quemador del horno 1 Abra la puerta del horno y saque las parrillas charola y esparcidor de llama del ho...

Page 30: ...s del gas L P tienen una punta de color ligeramente amarillo 4 Cierre la puerta del asador y presione el botón de CANCEL OFF Anulado Apagado 5 Consulte la sección Complete la instalación para terminar este procedimiento Conversióndegasnatural 1 Gire la válvula de cierre manual a la posición de cerrada 2 Desenchufe la estufa o desconecte el suministro de energía Cómo convertir el regulador de la pr...

Page 31: ...otencia o 3 quemadores estándar 1 quemador de potencia y 1 quemador central El tamaño y la ubicación de la espita siguen siendo los mismos 5 Coloque las espitas de los orificios de gas LP en la bolsa de piezas para usarlos en el futuro y guarde esa bolsa con la bolsa de material impreso 6 Vuelva a instalar los quemadores las tapas y las parrillas de los mismos Cómo convertir el quemador del horno ...

Page 32: ...rre manual en la línea de suministro de gas a la posición abierta 3 Vea la sección Verifique el funcionamiento para los ajustes apropiados de encendido funcionamiento y llama del quemador IMPORTANTE Tal vez tenga que modificar el ajuste LO Bajo para cada quemador de la superficie de cocción Es muy importante verificar la llama adecuada del quemador de la superficie de cocción y del horno El cono p...

Reviews: