5
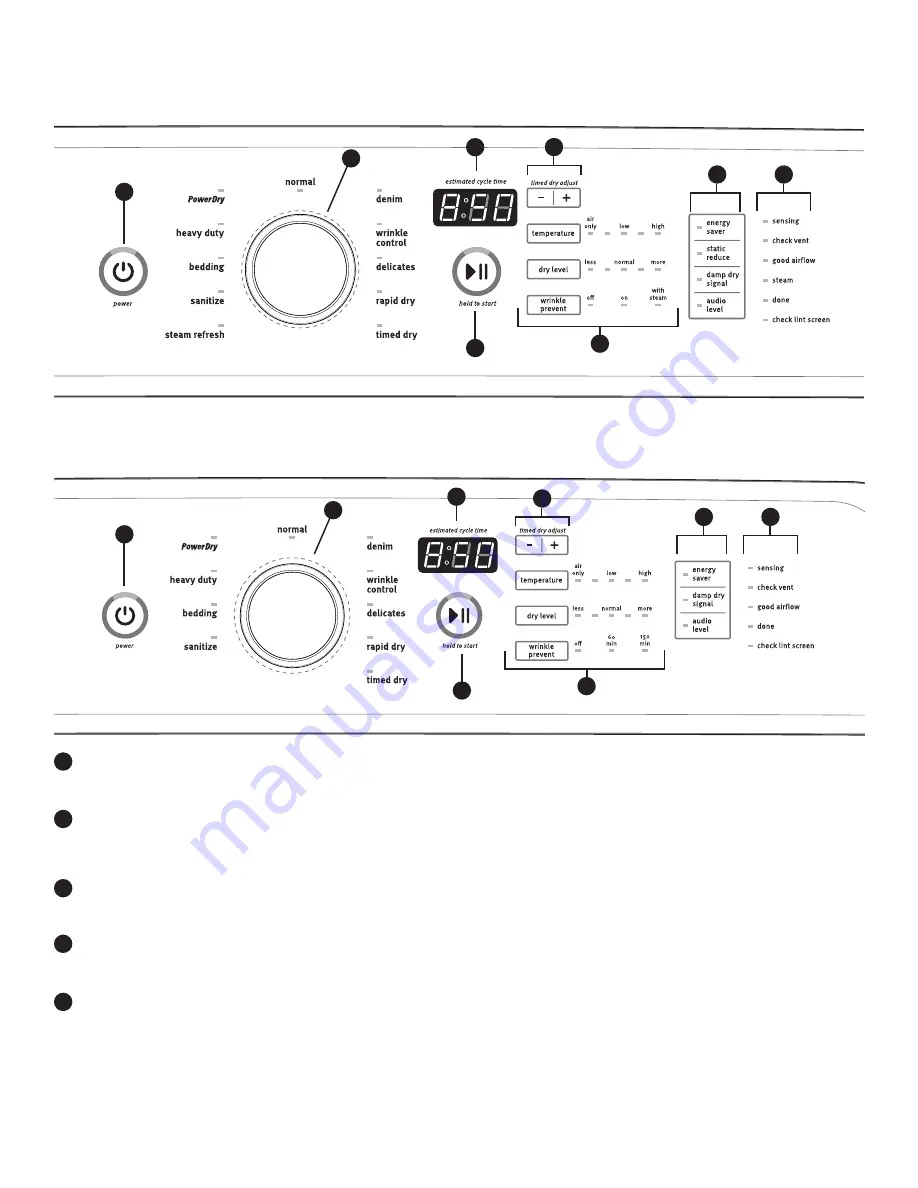
CONTROL PANEL AND FEATURES
Not all features and cycles are available on all models.
POWER
Touch to turn the dryer on and off. Touch to stop/cancel
a cycle at any time.
CYCLE CONTROL KNOB
Use your dryer’s cycle control knob to select available cycles
on your dryer. Turn the knob to select a cycle for your laundry
load. See “Cycle Guide” for detailed descriptions of cycles.
START/PAUSE
Touch and hold until the LED comes on to start a cycle
or touch once while a cycle is in process to pause it.
TIMED DRY ADJUST
Use “
+”
and “
–”
with Timed Cycles to increase or
decrease the length of a Timed Dry or Rapid Dry cycle.
LED DISPLAY AND SETTINGS
When you select a cycle, its default settings will light up and
the Estimated Time Remaining (for Sensor Cycles) or actual
time remaining (for Timed Cycles) will be displayed.
1
2
3
Steam Model
Non-Steam Model
Touch the setting names next to the display to adjust settings.
See “Cycle Guide” for available settings on each cycle. Not
all settings are available with all cycles.
Temperature
When using Timed Cycles, you may select a dry
temperature based on the type of load you are drying.
Use the warmest setting safe for the garments in the load.
Follow garment label instructions.
NOTE:
Sensor Cycles allow temperature adjustment. At
most, 3 of available temperatures (not including Air Only)
are allowed.
Dry Level
You may adjust the Dry Level on Sensor Cycles (except
for the Sanitize cycle), if desired.
NOTE:
Dryness level is for use with Sensor Cycles only.
Wrinkle Prevent
If you will be unable to remove a load immediately, touch
Wrinkle Prevent to add up to 150 minutes of periodic
tumbling to help reduce wrinkling. On some cycles, you
may select the “With Steam” setting to add a short steam
cycle after 60 minutes to help smooth out wrinkles.
NOTE:
If you open the dryer door prior to the end of the
Wrinkle Prevent, the dryer will go into Pause mode. You
will need to touch Power to turn off or touch Start/Pause
to continue Wrinkle Prevent.
4
NOTE:
The control panel features a sensitive surface that responds to a light touch of your finger. To ensure your selections are registered,
touch the control panel with your finger tip, not your fingernail. When selecting a setting or option, simply touch its name.
3
2
1
5
4
6
7
3
2
1
5
4
6
7
5
5
5


