background image

21

GB

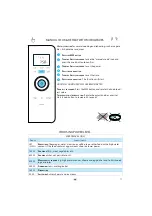
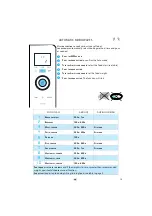
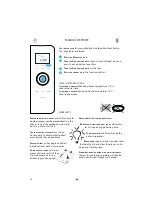
AUTOMATIC FORCED AIR

  P

RESS


THE

 F

ORCED


AIR


BUTTON


.

  P

RES

S


THE

 K

NOB

 B

UTTON


to confirm the 

Auto

 Mode.

  T

UR

N


THE

 A

DJUSTABLE


KN

OB


 to select the food class.

  P

RESS


THE


KNOB


BUTTON

  T

URN


THE

 A

DJUSTABLE


KNOB


to set the food weight.

  P

RESS


THE


KNOB


BUTTON

 The function will start.

T

HERE


IS


PREHEATING


STAGE


before cooking start for some food class. 

D

URING

 the preheating process, PRE- HEAT is alternately displayed.

U

SE


THIS


FUNCTION


 for baking of cake mix, cookies, muffi

  ns and rolls.

A

LWAYS


PLACE


THE


FOOD


 on the low wire rack.

E

NSURE


THAT


THE


UTENSILS


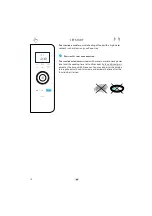
 used are microwave safe and ovenproof 

when you use this function.

FOOD CLASS

AMOUNT

HINTS

q1

C

AKE


MIX

400-800

G

U

SE


microwave safe and ovenproof cake dish.

2

C

OOKIES


600

G

U

SE


crisp plate as baking plate, eventually covered with bak-

ing paper.

 A

DD


food when the oven prompts you to do so.

3

M

UFFINS


600

G

U

SE


crisp plate as baking plate and place paper moulds on 

the plate.

 A

DD


food


when the oven prompts you to do so.

4

R

OLLS


PRE


BAKED


FROZEN

300

G

Add when oven is preheated.

5

R

OLLS


PRE


BAKED

300

G

For vacuum-packed rolls. Add when oven is preheated.

F

OR


FOOD


NOT


LISTED


IN


THIS


TABLE


  and if the weight is lesser or greater than recommended weight, 

you should choose manual function.

Summary of Contents for JQ 278

Page 1: ...1 GB JQ 278 www whirlpool com ...

Page 2: ...9 Pause or stop cooking 10 Set lock 10 Weight sensor COOKING FUNCTION 11 manual cook reheat with microwaves 12 jet start 13 Automatic microwaves 14 manual defrost 15 6th sense defrost 16 manual grill 17 Automatic grill 18 manual crisp 19 6th sense crisp 20 manual forced air 21 Automatic forced air 22 combi grill 23 combi fan 24 favourite TROUBLE SHOOTING GUIDE 25 trouble shooting guide ENVIRONMENT...

Page 3: ...E if it has a damaged mains cord or plug if it is not working properly or if it has been damaged or dropped Do not immerse the mains cord or plug in water Keep the cord away from hot surfaces Electrical shock fire or other hazards may result DO NOT REMOVE THE MICROWAVE INLET PROTEC TION PLATES located on the side of the oven cavi ty wall They prevent grease food particles from en tering the microw...

Page 4: ...EAVE THE OVEN UNATTENDED es pecially when using paper plas tic or other combustible materials in the cooking process Paper can char or burn and some plastics can melt if used when heating foods Do not leave the oven unattended if you are using a lot of fat or oil since they can overheat and cause a fire IF MATERIAL INSIDE OUTSIDE THE OVEN SHOULD IGNITE OR SMOKE IS EMITTED keep oven door closed and ...

Page 5: ... allow standing for a short time stirring again before carefully re moving the container from the oven CAREFUL ALWAYS REFER to a micro wave cookbook for de tails Especially if cooking or reheating food that contains alcohol AFTER HEATING BABY FOOD or liquids in a baby bot tle or in a baby food jar always stir and check the temperature before serving This will ensure that the heat is evenly distrib...

Page 6: ...that the turntable is able to turn freely before starting the oven If the turntable isn t able to turn freely you should use a small er vessel or the TurnTable stop function see Large vessels THERE ARE a number of accessories available on the market Before you buy ensure they are suitable for microwave use LARGE VESSELS USE THE TURNTABLE STOP button when cook ing with vessels that is so large that...

Page 7: ...ld detergent to clean the interior surfaces front and rear of the door and the door opening DO NOT ALLOW GREASE or food particles to build up around the door FOR STUBBORN STAINS boil a cup of water in the oven for 2 or 3 minutes Steam will soften the marks ADDING SOME LEMON JUICE to a cup of water plac ing this on the turntable and boiling for a few minutes can eliminate odors inside the oven IF T...

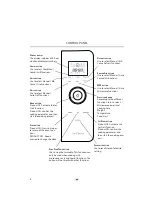
Page 8: ...st functions MW BUTTON Use to select Manual Auto Microwave functions ADJUSTABLE KNOB According to the different functions turn to select Microwave power level Cooking time Weight Temperature Food class KNOB BUTTON Product OFF activate the Jet Start function Product ON confirm the cooking parameter and then start the cooking process FAVOURITE BUTTON Use to recall stored favourite setting STOP TURNT...

Page 9: ... TURN Continue the cooking process End result may not be optimal in this case WHEN REQUIRED THE FOLLOWING STEPS SHOULD BE TAKEN Open the door Add Stir or turn the food Close the door and restart by pressing the Knob button SOME FOOD CLASSES REQUIRE the food to be added turned or stirred during cooking varies between models In these cases the oven will stop and prompt you to perform the needed acti...

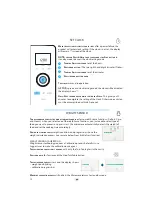
Page 10: ...top TurnTable button THE CALIBRATION PROCESS starts and the display shows weight icon blinking calibration progress bar WHEN THE CALIBRATION PROCESS is finished the Microwave returns to stand by mode SET CLOCK WHEN THE APPLIANCE IS FIRST PLUGGED IN or after a power failure the product will enter clock setting If the clock is not set the display will remain instead of the clock NOTE YOU CAN PRESS H...

Page 11: ...ess the knob button to confirm TURN THE ADJUSTABLE KNOB to set the power PRESS THE KNOB BUTTON TURN THE ADJUSTABLE KNOB to set the time PRESS THE KNOB BUTTON The function will start MICROWAVES ONLY POWER SUGGESTED USE JET 950 W REHEATING of beverages water clear soups coffee tea or other food with a high water content If the food contains egg or cream choose a lower power 750 W COOKING of fish mea...

Page 12: ...ART PRESS THE JET START OR KNOB BUTTON THIS FUNCTION AUTOMATICALLY STARTS with maximum microwave power level and the cooking time set to 30 seconds Each additional press increases the time with 30 seconds You may also alter the time by turning the adjust knob to increase or decrease the time after the function has started ...

Page 13: ...ing method time and pow er needed FOOD CLASS AMOUNT DURING COOKING q1 BAKED POTATOES 200G 1KG 2 BEVERAGE 150G 600G 3 MEAT FROZEN 200G 500G STIR FOOD 4 PASTA FROZEN 250G 550G STIR FOOD 5 POPCORN 100G 6 RICE FROZEN 300G 650G STIR FOOD 7 SOUP FROZEN 250G 1KG STIR FOOD 8 VEGETABLES CANNED 200G 600G 9 VEGETABLES FRESH 200G 800G 10 VEGETABLES FROZEN 150G 600G FOR FOOD NOT LISTED IN THIS TABLE and if the...

Page 14: ...IN PLASTIC BAGS plastic films or card board packages can be placed directly in the oven as long as the package has no metal parts e g metal twist ties THE SHAPE OF THE PACKAGE alters the de frosting time Shallow packets defrost more quickly than a deep block SEPARATE PIECES as they begin to defrost Individual slices defrost more easily SHIELD AREAS OF FOOD with small pieces of aluminum foil if the...

Page 15: ...ESULT we recommend to defrost directly on the glass turn table If needed it is possible to use a container of light plastic suit able for microwave FOOD CLASS AMOUNT HINTS q1 FISH 100G 1 5KG Whole steaks or fillets 2 MEAT 100G 2KG Minced meat cutlets steaks or roasts 3 POULTRY 100G 2 5KG Chicken whole pieces or fillets 4 VEGETABLES 100G 1 5KG Mixed vegetables peas broccoli etc FOR FOOD NOT LISTED ...

Page 16: ... manual mode icon and press the knob button to confirm TURN THE ADJUSTABLE KNOB to set the time PRESS THE KNOB BUTTON The function will start DO NOT LEAVE THE OVEN DOOR OPEN for long periods when the Grill is in operation as this will cause a drop in temperature ENSURE THAT THE UTENSILS used are heat resistant when you use this function DO NOT USE PLASTIC utensils when grilling They will melt Item...

Page 17: ...OQUE MONSIEUR 60 120G MAKE double sandwiches filled with ham and cheese and place in the centre of grid turn the sandwiches when oven prompts you to do so TURN FOOD 2 SAUSAGES 100 400G PLACE in the centre of grid turn the sausages when oven prompts you to do so TURN FOOD 3 TOAST 40 80G PLACE in the centre of grid turn the toasts when oven prompts you to do so TURN FOOD FOR FOOD NOT LISTED IN THIS ...

Page 18: ...D THE CRISP PLATE become very hot when using this function PRESS THE CRISP BUTTON TURN THE ADJUSTABLE KNOB to see the manual mode icon and press the knob button to confirm TURN THE ADJUSTABLE KNOB to set the time PRESS THE KNOB BUTTON The function will start IT IS NOT POSSIBLE TO CHANGE OR SWITCH the Power level or Grill on off when using the Crisp function ONLY USE the supplied Crisp plate with t...

Page 19: ...orrect result when using this function USE OVEN MITTENS OR THE SPECIAL CRISP HANDLE supplied when removing the hot Crisp plate FOOD CLASS AMOUNT ACCESSORIES TO USE DURING COOKING q1 CHICKEN NUGGETS WINGS 250 500G USE CRISP PLATE TURN FOOD 2 CORDON BLEU 1 4 PIECES INSERT THE EMPTY CRISP PLATE TO PREHEAT ADD FOOD WHEN ADD FOOD IS DISPLAYED TURN FOOD 3 FISH STICKS 250 500G INSERT THE EMPTY CRISP PLAT...

Page 20: ... will start USE THE LOW WIRE RACK to put food on to allow the air to circulate properly around the food USE THE CRISP PLATE as a baking plate when you bake small items like cookies and muffins Place the plate on the low wire rack ENSURE THAT THE UTENSILS used are ovenproof when you use this function THERE IS PREHEATING STAGE before cooking start ONCE THE COOKING PROCESS HAS BEEN STARTED TO ADJUST ...

Page 21: ...re rack ENSURE THAT THE UTENSILS used are microwave safe and ovenproof when you use this function FOOD CLASS AMOUNT HINTS q1 CAKE MIX 400 800G USE microwave safe and ovenproof cake dish 2 COOKIES 600G USE crisp plate as baking plate eventually covered with bak ing paper ADD food when the oven prompts you to do so 3 MUFFINS 600G USE crisp plate as baking plate and place paper moulds on the plate AD...

Page 22: ...s Jet Start knob button to increase 30 seconds CHOOSING POWER LEVEL DO NOT LEAVE THE OVEN DOOR OPEN for long periods when the Grill is in operation as this will cause a drop in temperature IF YOU COOK LARGE GRATINS which require stopped turntable rotation then turn the dish after approximately half the cooking time This is necessary for getting colour on the whole top surface ENSURE THAT THE UTENS...

Page 23: ...function will start USE THE LOW WIRE RACK to put food on to allow the air to circulate properly around the food USE THIS FUNCTION TO cook loads food that are thicker in dimension that require browning on the surface such as roast meats poultry jacket potatoes frozen convenience foods cakes pastry fish and puddings ENSURE THAT THE UTENSILS used are microwave safe and ovenproof when you use this fun...

Page 24: ...AVOURITE FUNCTION is to store whatever setting that is currently displayed HOW TO STORE A SETTING SELECT any manual function PROGRAM your settings KEEP PRESSING THE FAVOURITE button before start the cooking to store in the favourite the selected cycle with the current pa rameters HOW TO USE A STORED SETTING Simply press the favourite button to recall the last saved setting ...

Page 25: ... against exposure to microwave energy DO NOT REMOVE ANY COVER ENVIRONMENTAL HINTS THE PACKING BOX may be fully re cycled as confirmed by the re cycling symbol Follow lo cal disposal regulations Keep potentially hazardous pack aging plastic bags polysty rene etc out of the reach of chil dren THIS APPLIANCE is marked according to the Euro pean directive 2002 96 EC on Waste Electrical and Electronic ...

Page 26: ...26 GB ...

Page 27: ...27 GB ...

Page 28: ...wing for this oven Test Amount Approx time Power level Container 12 3 1 1000 G 12 13 MIN 750 W PYREX 3 226 12 3 2 475 G 5 7 MIN 750 W PYREX 3 827 12 3 3 900 G 14 16 MIN 750 W PYREX 3 838 12 3 4 1100 G 18 20 MIN GRILL 650 W PYREX 3 827 12 3 5 700 G 24 26 MIN FA 200 C 90 W PYREX 3 827 12 3 6 1200 G 35 38 MIN FA 200 C 350 W PIE PLATE 13 3 500 G 11 13 MIN 160 W PLASTIC PLATE Whirlpool is a registered ...

Reviews: