background image

12

TROUBLESHOOTING

Try the solutions suggested here first in order to avoid the cost of an unnecessary service call.

Ice Maker Operation

Your ice maker will not operate

Is the power cord plugged in? Plug into a grounded 3 prong 
outlet.

Is the control set to ON? Be sure that the control is set to 
ON.

Has a household fuse blown, or has a circuit breaker 
tripped? 
Replace the fuse or reset the circuit breaker. If the 
problem continues, call an electrician.

Is the room temperature cooler than normal? Room 
temperature must be above 55°F (13°C). Otherwise, bin 
thermostat may sense cold room temperature and shut off 
even though the bin is not full of ice. Also, unit may not restart 
once it does shut off.

Does the green light come on when the Clean button is 
pushed? 
The ice maker is receiving power but may need 
cleaning. See “Cleaning.”

Does the ice maker have a drain pump? If there was a large 
amount of water added to the ice maker, wait a few minutes 
for the drain pump to clear. If there is still water in the bin, 
check to see whether the drain hose is kinked.

Ice maker seems noisy

Is water being circulated through the ice maker? This is 
normal operation. Water is added once per ice-making cycle.

Is the water in the reservoir overflowing? This is normal. 
This overflow helps to purge minerals that were removed from 
the water during the ice making process. 

Is there a “whooshing” sound? Check the following things:

Make sure that the water supply is hooked up and turned 
on.

Make sure that the drain cap is tight and the water drain 
pan pump is securely attached to the water pan.

Is there ice between the evaporator plate and the cutting 
grid?
 Check that the ice maker is level. See “Leveling.” If the 
ice maker is level, and the problem persists, run a cleaning 
cycle. See “Cleaning.” 

Ice Production

Ice maker runs but produces no ice

Is the control set to ON? Be sure that the control is set to 
ON.

Is the water supply connected? Make sure the water supply 
is properly connected and turned on.

Is the drain cap securely in place? If the drain cap is loose, 
water will empty from the water pan, and you will have either 
thin ice or no ice. Tighten the drain cap.   

Is there debris in the drain tube? Clean the drain tube.

Is there a kink in the drain line? Be sure that there are no 
kinks in the line. 

Is the service light flashing on and off continually? Call for 
service.

Ice maker runs but produces very little ice

Is the room temperature hotter than normal? Room 
temperatures of more than 90°F (32°C) will normally reduce 
ice production.

Is the condenser dirty? Dirt or lint may be blocking the 
airflow through the condenser. See “Condenser” in the 
“Cleaning” section.

Is there scale buildup in the ice maker? If there is white 
scale buildup in the ice maker’s water or freezing system, you 
should clean the ice maker. See “Interior Components” in the 
“Cleaning” section.

Electrical Shock Hazard

Plug into a grounded 3 prong outlet.

Do not remove ground prong.

Do not use an adapter.

Do not use an extension cord.

Failure to follow these instructions can result in death, 
fire, or electrical shock.

WARNING

WARNING

Electrical Shock Hazard

Disconnect power before servicing.

Replace all parts and panels before operating.

Failure to do so can result in death or electrical shock.

Summary of Contents for GI15NDXTB2

Page 1: ...e installation or service call 1 800 807 6777 or visit our website at www whirlpool com or www whirlpoolappliances ca MACHINE À GLAÇONS Guided utilisation etd entretien Au Canada pour assistance installation ou service appeler le 1 800 807 6777 ou visitez notre site web à www whirlpoolappliances ca Table of Contents Table des matières 2 W10136155B ...

Page 2: ... À GLAÇONS 21 Fonctionnement de la machine à glaçons 21 Utilisation des commandes 22 ENTRETIEN DE LA MACHINE À GLAÇONS 22 Nettoyage 22 Précautions à prendre avant les vacances ou un déménagement 24 DÉPANNAGE 25 Fonctionnement de la machine à glaçons 25 Production de glaçons 25 Qualité des glaçons 26 Problèmes de plomberie 26 ASSISTANCE OU SERVICE 26 GARANTIE 27 ICE MAKER SAFETY You can be killed o...

Page 3: ...C Best results are obtained between 70 F 21 C and 90 F 32 C This unit must be installed in an area sheltered from the elements such as wind rain water spray or drip When installing the ice maker under a counter follow the recommended opening dimensions shown Place electrical and plumbing fixtures in the recommended location as shown NOTES Be sure the power supply cord is not pinched between the ic...

Page 4: ...e osmosis system is desired only a whole house capacity reverse osmosis system capable of maintaining the steady water supply required by the ice maker is recommended Faucet capacity reverse osmosis systems are not able to maintain the steady water supply required by the ice maker If the water pressure to the reverse osmosis system is less than 40 to 60 psi 276 to 414 kPa Check to see whether the ...

Page 5: ...ch Do not overtighten 4 Place the free end of the tubing into a container or sink and turn on main water supply and flush out tubing until water is clear Turn off shutoff valve on the water pipe NOTE Always drain the water line before making the final connection to the inlet of the water valve to avoid possible water valve malfunction 5 Bend the copper tubing to meet the water line inlet which is ...

Page 6: ...equate follow these steps to properly place the ice maker 1 Plug into a grounded 3 prong outlet 2 Style 1 For gravity drain system push the ice maker into position so that the ice maker drain tube is positioned over the PVC drain reducer See Gravity Drain System earlier in this section Style 2 For drain pump system connect the drain pump outlet hose to the drain See Drain Pump System earlier in th...

Page 7: ...ite side of the ice maker and tighten screws 3 Remove the plastic hinge pin sleeve from the old bottom hinge and replace it on the new bottom hinge pin 4 Remove the old bottom hinge screws and hinge Replace the screws in the empty hinge holes 5 Remove the screws from the top of the opposite side of the ice maker cabinet Turn the hinge upside down so that the hinge pin points down Place the hinge o...

Page 8: ... and the system will rinse itself before starting to make ice The rinsing process takes about 5 minutes Under normal operating conditions the ice maker will cycle at preset temperatures The ice level sensor located in the ice storage bin will monitor the ice levels IMPORTANT If the water supply to the ice maker is turned off be sure to set the ice maker control to OFF The ice maker is designed to ...

Page 9: ...r harsh cleaners Do not use chlorine bleach on stainless steel surfaces Ice Maker System Minerals that are removed from water during the freezing cycle will eventually form a hard scaly deposit in the water system Cleaning the system regularly helps remove the mineral scale buildup How often you need to clean the system depends upon how hard your water is With hard water of 15 to 20 grains gal 4 t...

Page 10: ...e water will empty from the water pan and you will have either thin ice or no ice 4 Remove the two screws that hold the cutter grid cover in place and remove the cutter grid cover 5 Unplug the wiring harness from the left side of the cutter grid 6 Unplug the ice level sensor from the right side of the cutter grid Pull the ice level sensor down and forward away from the cutter grid 7 Remove the rig...

Page 11: ...rid cover and the two screws 15 Plug in ice maker or reconnect power VacationandMovingCare To shut down the ice maker 1 Unplug ice maker or disconnect power 2 Remove all ice from storage bin 3 Shut off the water supply 4 Remove the two screws in the lower access panel and the two screws from the base grille area of the front panel support Pull forward to remove the lower access panel 5 Disconnect ...

Page 12: ... drain pan pump is securely attached to the water pan Is there ice between the evaporator plate and the cutting grid Check that the ice maker is level See Leveling If the ice maker is level and the problem persists run a cleaning cycle See Cleaning IceProduction Ice maker runs but produces no ice Is the control set to ON Be sure that the control is set to ON Is the water supply connected Make sure...

Page 13: ...SP replacement parts FSP replacement parts will fit right and work right because they are made with the same precision used to build every new WHIRLPOOL appliance To locate FSP replacement parts in your area call our Customer eXperience Center telephone number or your nearest designated service center IntheU S A Call the Customer eXperience Center toll free 1 800 253 1301 Our consultants provide a...

Page 14: ...ice by an authorized Whirlpool servicer is not available 10 The removal and reinstallation of your major appliance if it is installed in an inaccessible location or is not installed in accordance with published installation instructions 11 Major appliances with original model serial numbers that have been removed altered or cannot be easily determined This warranty is void if the factory applied s...

Page 15: ...sent comment réduire le risque de blessure et ce qui peut se produire en cas de non respect des instructions Votre sécurité et celle des autres est très importante Nous donnons de nombreux messages de sécurité importants dans ce manuel et sur votre appareil ménager Assurez vous de toujours lire tous les messages de sécurité et de vous y conformer AVERTISSEMENT DANGER Voici le symbole d alerte de s...

Page 16: ... circuit spécial à la machine à glaçons Utiliser une boîte où l alimentation ne peut pas être coupée à l aide d un commutateur ou d un interrupteur à tirage IMPORTANT Si ce produit est connecté à une prise dotée d un disjoncteur de fuite à la terre un déclenchement intempestif peut se produire et causer une perte de refroidissement La qualité des glaçons peut en être affectée Si un déclenchement i...

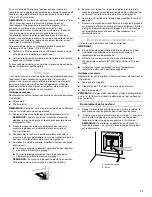
Page 17: ...rs le haut sur la partie supérieure avant de la machine à glaçons pour repérer les vis de nivellement qui se trouvent sur le fond avant de la machine à glaçons 4 Au moyen d une clé à molette modifier la hauteur des pieds comme suit Tourner le pied de nivellement vers la droite pour abaisser ce côté de la machine à glaçons Tourner le pied de nivellement vers la gauche pour soulever ce côté de la ma...

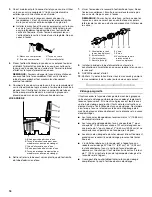
Page 18: ...on en eau pour réduire la tension sur le raccord 9 OUVRIR le robinet d arrêt 10 Vérifier s il y a des fuites Serrer tous les raccords y compris les raccordements de la valve ou les écrous qui coulent Raccordementauconduitd évacuation Vidange par gravité Il faut raccorder le tuyau de vidange de la machine à glaçons à votre drain de vidange conformément aux codes et règlements locaux et provinciaux ...

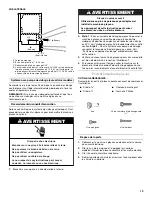
Page 19: ...été faits Portedelamachineàglaçons OUTILLAGE NÉCESSAIRE Rassembler les outils et pièces nécessaires avant de commencer l installation Dépose de la porte 1 Débrancher la machine à glaçons ou déconnecter la source de courant électrique 2 Ôter les vis de la poignée et la poignée sur certains modèles Garder les pièces ensemble et les mettre de côté 3 Tirer l axe de la charnière supérieure 4 Retirer la...

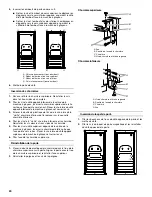
Page 20: ...ler les vis dans les trous vides de la charnière 5 Ôter les vis du côté supérieur opposé de la caisse de la machine à glaçons Inverser la charnière de telle sorte que l axe pointe vers le bas Placer la charnière du côté opposé supérieur de la machine à glaçons et serrer les vis 6 Ôter l axe de la charnière supérieure Réinstallation de la porte 1 Placer la douille de plastique de la charnière dans ...

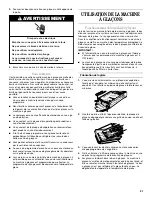
Page 21: ...À GLAÇONS Fonctionnementdelamachineàglaçons Lors de la mise en marche initiale de la machine à glaçons le bac d eau se remplira et le système se rincera avant de commencer à fabriquer de la glace Le rinçage prend environ cinq minutes Dans les conditions de fonctionnement normales la machine à glaçons se mettra en marche à des températures préréglées Le détecteur de niveau de glace dans le bac à gl...

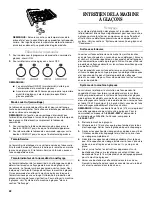
Page 22: ...uisse fonctionner au maximum de son efficacité et afin d éviter une défaillance prématurée des composants du système Voir les sections Système de la machine à glaçons et Condenseur Surfaces extérieures Laver les surfaces extérieures en émail et les joints étanches avec de l eau chaude et un savon doux ou un détergent Essuyer et sécher L utilisation régulière d un bon produit de nettoyage et de cir...

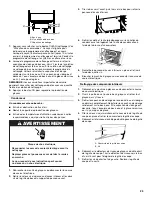
Page 23: ...le bas pour retirer le panneau d accès inférieur 4 Retirer la saleté et la charpie déposées sur les ailettes du condenseur et du logement de l unité de condensation à l aide de la brosse d un aspirateur 5 Remettre le panneau d accès inférieur en place et le fixer à l aide des quatre vis 6 Brancher la machine à glaçons ou reconnecter la source de courant électrique Nettoyage des composants intérieu...

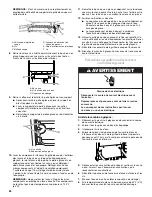
Page 24: ...u il n y aura pas de glace Le tuyau provenant du bac à eau est inséré dans l ouverture de vidange du bac d entreposage 13 Glisser la grille de coupe en place et la fixer en remettant la vis du côté droit et la cale d espacement en plastique Serrer ensuite la vis du côté gauche Reconnecter les faisceaux de la grille de coupe et du détecteur de niveau de glaçons 14 Réinstaller le couvercle de la gri...

Page 25: ...a machine à glaçons attendre quelques minutes pour que la pompe de vidange évacue l eau S il y a de l eau stagnante dans le bac vérifier pour voir si le tuyau d évacuation est déformé La machine à glaçons semble bruyante De l eau circule t elle dans la machine à glaçons Ceci est le fonctionnement normal L eau est ajoutée une fois par cycle de fabrication des glaçons L eau dans le réservoir déborde...

Page 26: ... peuvent pas réparer les problèmes de plomberie à l extérieur de la machine à glaçons Appeler un plombier agréé et qualifié ASSISTANCE OU SERVICE Avant de téléphoner pour assistance ou service veuillez vérifier la section Dépannage Cette vérification peut vous faire économiser le coût d une visite de réparation Si vous avez encore besoin d aide suivre les instructions ci dessous Lors d un appel ve...

Page 27: ...Whirlpool autorisé n est pas disponible 10 La dépose et la réinstallation de votre gros appareil si celui ci est installé dans un endroit inaccessible ou n est pas installé conformément aux instructions d installation fournies 11 Les gros appareils ménagers dont les numéros de série et de modèle originaux ont été enlevés modifiés ou qui ne peuvent pas être facilement identifiés La présente garanti...

Page 28: ...Tous droits réservés Registered Trademark TM Trademark of Whirlpool U S A Whirlpool Canada LP Licensee in Canada Marque déposée TM Marque de commerce de Whirlpool U S A emploi sous licence par Whirlpool Canada LP au Canada 6 08 Printed in U S A Imprimé aux É U ...

Reviews: