background image

Programming cooking

 A cooking mode must be selected before

programming can take place.

Programming the cooking duration

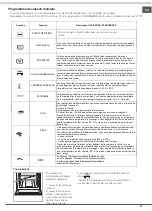
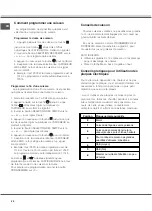
1. Press the 

 button several times until the 

icon and the three digits on the DISPLAY begin to
flash.

2. Turn the TIMER KNOB towards “+” and “-” to
adjust the duration.
3. Press the 

 button again to confirm;

4. When the set time has elapsed, the text END
appears on the DISPLAY, the oven will stop cooking
and a buzzer sounds.
• For example: it is 9:00 a.m. and a time of 1 hour

and 15 minutes is programmed. The programme
will stop automatically at 10:15 a.m.

Setting the end time for a cooking mode

 A cooking duration must be set before the cooking

end time can be scheduled.

1. Follow steps 1 to 3 to set the duration as detailed
above.
2. Next, press the 

 button until the 

 icon and

the two digits on the DISPLAY begin to flash.
3. Turn the TIMER KNOB towards “+” and “-” to
adjust the hour value.
4. Press the 

 button again until the other two

digits on the DISPLAY begin to flash.
5. Turn the TIMER KNOB towards “+” and “-” to
adjust the minute value.
6. Press the 

 button again to confirm.

7. When the set time has elapsed, the text END
appears on the DISPLAY, the oven will stop cooking
and a buzzer sounds.
• For example: it is 9:00 a.m. and a time of 1 hour

and 15 minutes is programmed, while the end
time is set to 12:30. The programme will start
automatically at 11:15 a.m.

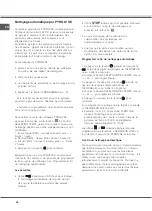
Programming has been set when the 

 and 

buttons are illuminated. The DISPLAY shows the
cooking end time and the cooking duration
alternately.
To cancel programming, turn the SELECTOR knob to
the “0” position.

Practical cooking advice

 Do not place racks in position 1 and 5 during fan-

assisted cooking. This is because excessive direct
heat can burn temperature sensitive foods.

 In the SPIT ROAST, BARBECUE and ROASTING

cooking modes, place the dripping pan in position 1
to collect cooking residues (fat and/or grease).

MULTILEVEL
• Use positions 2 and 4, placing the food which

requires more heat on 2.

• Place the dripping pan on the bottom and the rack

on top.

GB

35

Practical advice on using the electric

hotplates

To avoid heat loss and damage to the hotplates, use
pans with a flat base, whose diameter is no less
than that of the hotplate itself.

 Before using the hotplates for the first time, you

should heat them at maximum temperature for
approximately 4 minutes, without placing any pans
on them. During this initial stage, their protective
coating hardens and reaches its maximum
resistance.

Setting Normal or Fast Plate

0

1


2


3

   !  
 

4

5

6

"    


Summary of Contents for AXMT 6434/IX

Page 1: ...AXMT 6434 IX AXMT 6434 WH ...

Page 2: ...d use 32 Cooking modes 34 Using the hob 32 Care and maintenance 38 9 FR Français Mode d emploi CUISINIERE ET FOUR Sommaire Mode d emploi 1 Description de l appareil Vue d ensemble 14 Description de l appareil Tableau de bord 14 Installation 15 Mise en marche et utilisation 19 Utilisation du plan de cuisson 21 Utilisation du four 19 Nettoyage et entretien 25 CONSIGNES DE SÉCURITÉ 3 SAFETY INSTRUCTI...

Page 3: ...T DANGER DANGER Les bébés 0 3 ans et les jeunes enfants 3 8 ans doivent être tenus à l écart de l appareil à moins d être surveillés en permanence L appareil et ses parties accessibles deviennent chauds pendant l utilisation Par conséquent les jeunes enfants doivent être tenus à l écart Ne laissez l appareil entrer en contact avec des tissus ou d autres matériaux inflammables que lorsque tous les ...

Page 4: ...le lorsque le brûleur est allumé zdj USAGE PRÉVU DE L APPAREILPRODUCT Le présent appareil a été conçu à des fins domestiques uniquement Toute utilisation à des fins autres que celles prévues est interdite chauffage de pièces par exemple Tout usage à des fins professionnelles est interdit Le fabricant décline toute responsabilité pour un usage inapproprié ou un réglage incorrect des commandes Cet a...

Page 5: ...jection AVERTISSEMENT Les conditions de réglage de cet appareil sont marquées sur l étiquette ou la plaque signalétique AVERTISSEMENT Cet appareil n est pas relié à un dispositif d évacuation des produits de combustion Il doit être installé et relié conformément aux réglementations d installation en vigueur Une attention particulière doit être accordée aux exigences pertinentes concernant la venti...

Page 6: ... ou appui Si l appareil est installé sur un four encastré qui est équipé de la fonction d auto nettoyage pyrolyse évitez d utiliser l appareil lorsque la fonction d auto nettoyage est en marche Après utilisation éteignez l élément de cuisson à l aide de son bouton de commande tout en évitant de vous appuyer contre le détecteur de casserole S il vous est difficile de tourner les boutons du brûleur ...

Page 7: ...MBALLAGE Lors de la mise au rebut de l appareil rendez le inutilisable en coupant le câble d alimentation et en démontant les portes et les grilles si présente afin que les enfants ne puissent y grimper facilement et se coincer à l intérieur Cet appareil est fabriqué avec des matériaux recyclables ou réutilisables Mettez le au rebut conformément à la réglementation d élimination des déchets locaux...

Page 8: ...s le livret de garantie votre adresse complète votre numéro de téléphone Pour les réparations contactez un service après vente autorisé indiqué dans la garantie Si des travaux sont effectués par des techniciens ne relevant pas des centres de service après vente autorisés du fabricant deman dez un reçu précisant le travail effectué et assurez vous que les pièces de rechange sont d origine Le non re...

Page 9: ...all not be made by childern without supervision The appliance and its accessible parts become hot during use young children should be kept away Do not allow the appliance to come into contact with cloths or other flammable materials until all the components have cooled down completely During and after use do not touch the heating elements or interior surface of the appliance risk of burns Do not t...

Page 10: ...s offices and other working environments Farm houses By clients in hotels motels and other residential environments Bed and breakfast type environments Do not use the appliance outdoors CAUTION The appliance is not intended to be operated by means of an external timer or separate remote controlled supply system Do not store explosive or flammable substances such as aerosol cans and do not place or...

Page 11: ... must pass thorugh an area where there are no obstructions and where it is possible to inspect it on all its length The appliance should be connected to the main gas supply or to gas cylinder in compliance with the current National regulations Before carry out the connection make sure that the appliance is compatible with the gas supply you wish to use If this is not the case follow the instructio...

Page 12: ...of a hood above the cooktop please refer to the hood instructions for the correct distance WARNING The protective rubber feet on the grids represent a chocking hazard for young children After removing the grids please ensure that all the feet are correctly fitted Remove any liquid from the lid before opening it Do not operate the hob while the oven is operating Self Cleaning function Pyrolysis CLE...

Page 13: ... and n 66 2014 in conformity to the European standard EN 60350 1 AFTER SALES SERVICE Before calling the After Sales Service 1 See if you can eliminate the problem on your own see Troubleshooting Guide 2 Switch the appliance off and on again to see if the problem persists If the fault persists after the above checks contact your nearest After Sales Service Specify the type of fault exact type and m...

Page 14: ...s Description de l appareil Vue d ensemble FR 1 Icône PROGRAMME BASSE TEMPERATURE 3 Indicateur de Préchauffage 4 Voyant PORTE VERROUILLEE 5 Icône STOP 6 Icône DUREE 7 Icône FIN DE CUISSON 8 Icône MINUTEUR 9 Icône HORLOGE 10 Chiffres TEMPS et TEMPERATURE FR Description de l appareil Tableau de bord F R 1 Bouton PROGRAMMES 2 Bouton THERMOSTAT TEMPS SELECTION 3 Touche PYROLYSE 4 AFFICHEUR 5 Touche se...

Page 15: ...allume l appareil voir figures Les gaz de pétrole liquéfiés plus lourds que l air se déposent et stagnent dans le bas Les locaux qui contiennent des bouteilles de G P L doivent donc prévoir des ouvertures vers l extérieur afin de permettre l évacuation du gaz par le bas en cas de fuites accidentelles Ne pas installer ou entreposer de bouteilles de GPL vides ou partiellement pleines dans des locaux...

Page 16: ...successifs S assurer auparavant que l appareil est bien réglé pour le type de gaz d alimentation utilisé voir étiquette sur le couvercle autrement voir ci dessous Si l alimentation s effectue avec du gaz liquide en bouteille utiliser des régulateurs de pression conformes à la réglementation en vigueur dans le pays mises à jour comprises Pour simplifier le raccordement l alimentation du gaz est ori...

Page 17: ...ues des brûleurs et des injecteurs 3 remonter les différentes parties en effectuant les opérations dans le sens inverse Réglage des minima des brûleurs du plan de cuisson 1 placer le robinet sur la position minimum 2 enlever le bouton et tourner la vis de réglage positionnée à l intérieur ou sur le côté de la tige du robinet jusqu à obtenir une petite flamme régulière En cas de gaz liquides il fau...

Page 18: ...Réd mm mm mm Ultra Rapide Grand R 100 3 30 0 7 41 90 240 236 135 314 Semi Rapide Moyen S 75 1 90 0 4 30 69 138 136 104 181 Auxiliaire Petit A 55 1 00 0 4 30 50 73 71 78 95 Pressions d alimentation Nominale mbar Minimum mbar Maximum mbar 28 30 20 35 37 25 45 20 17 25 à 15 C et 1013 mbar gaz sec Propane P C S 50 37 MJ Kg Butane P C S 49 47 MJ Kg Naturel P C S 37 78 MJ m3 18 FR S UR A ø 180 AXMT 6434...

Page 19: ...s des brûleurs et des injecteurs Pour les modèles équipés d une grille de réduction n utiliser cette dernière que pour le brûleur auxiliaire en cas d utilisation de casseroles ayant moins de 12 cm de diamètre Plaques électriques Pour procéder au réglage tournez la manette correspondante dans le sens des aiguilles d une montre ou dans le sens inverse en choisissant une des 6 positions possibles Pos...

Page 20: ...our 1 Pour sélectionner le programme de cuisson souhaité tourner la manette PROGRAMMES 2 Le four se place en phase de préchauffage l indicateur préchauffage s allume Pour modifier la température tourner le bouton THERMOSTAT 3 L extinction de l indicateur de préchauffage et le déclenchement du signal sonore indiquent la fin du préchauffage il est temps d enfourner les plats 4 En cours de cuisson il...

Page 21: ...s aliments à l intérieur du four pendant qu ils sont encore froids Vous pouvez également placer le plat dans un four préchauffé Vous ne pourrez régler la durée qu entre 10 et 10 minutes PAIN Pour obtenir des meilleurs résultats nous vous recommandons de suivre à la lettre les instructions ci dessous Suivez la recette Ne dépassez pas le poids maximal de la lèchefrite Pensez à verser 100 ml d eau fr...

Page 22: ... retentit Exemple il est 9h00 la durée programmée est de 1h15 et l heure de fin de cuisson est fixée à 12h30 Le programme démarre automatiquement à 11h15 Les icônes et éclairées signalent qu une programmation a été lancée L AFFICHEUR affiche à tour de rôle l heure de fin de cuisson et la durée Pour annuler une programmation amener le bouton PROGRAMMES sur 0 Conseils de cuisson Pour les cuissons ve...

Page 23: ... sur l étagère grillagée Grille 1 plateau de dégivrage Focaccia Oui 2 190 250 15 35 Plateau de dégivrage MULTINIVEAU Oui 1 3 190 250 15 35 Grille 3 plaque de cuisson sur l étagère grillagée Grille 1 plateau de dégivrage MULTINIVEAU Oui 1 3 5 190 250 25 40 Grille 5 plaque de cuisson sur l étagère grillagée niveaux de commutation à mi cuisson Grille 3 plaque de cuisson sur l étagère grillagée niveau...

Page 24: ...n Accessoires et observations Tartes gâteau au fromage strudel tarte aux pommes PÂTISSERIE 2 Moule à gâteaux sur l étagère grillagée Gâteau quatre quarts gâteau marbré Pizza épaisse PIZZA 2 Plateau de dégivrage Focaccia Pain PAIN 2 Grille 5 plateau de dégivrage contenant de l eau Grille 2 plaque de cuisson sur l étagère grillagée RECETTES ÉPROUVÉES conformément à IEC 60350 1 Recette Fonction Préch...

Page 25: ...re à l aide d un tournevis 2 Dévisser l ampoule et la remplacer par une autre de même type puissance 25 W culot G9 Remettre le couvercle en place en prenant bien soin de repositionner correctement le joint voir figure Entretien robinets gaz Il peut arriver qu au bout d un certain temps un robinet se bloque ou tourne difficilement Il faut alors le remplacer Cette opération doit être effectuée par u...

Page 26: ...automatique de la porte du four dès que la température a atteint des valeurs élevées l icône indique qu il est possible d annuler à tout moment le cycle de nettoyage par pression sur la touche en cas d anomalie de fonctionnement l alimentation des résistances est automatiquement coupée une fois que la porte est verrouillée aucune modification de sélection de durée et de fin de cycle n est plus pos...

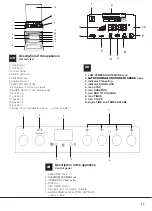
Page 27: ...2 3 4 5 6 6 7 8 9 10 11 12 13 14 15 1 2 3 4 5 6 7 Description of the appliance Control panel G B 1 SELECTOR knob 2 THERMOSTAT TIMER knob 3 PYROLITIC CYCLE button 4 DISPLAY 5 SET TIMER button 6 Indicator light for electric hotplate 7 HOB BURNER and ELECTRIC HOTPLATE control knobs 1 LOW TEMPERATURE MODE icon 2 icons 3 Indicator Preheating 4 indicator DOOR LOCK 5 icon STOP 6 icon DURATION 7 icon END ...

Page 28: ...e floor therefore all rooms containing LPG cylinders must have openings leading outside so that any leaked gas can escape easily LPG cylinders therefore whether partially or completely full must not be installed or stored in rooms or storage areas which are below ground level cellars etc Only the cylinder currently in use should be stored in the room this should also be kept well away from sources...

Page 29: ...ith current national legislation and any subsequent amendments in force after making sure that the appliance is suited to the type of gas with which it will be supplied see the rating sticker on the cover if this is not the case see below When using liquid gas from a cylinder install a pressure regulator which complies with current national regulations and any subsequent amendments in force To mak...

Page 30: ... pin until the flame is small but steady If the appliance is connected to a liquid gas supply the regulatory screw must be fastened as tightly as possible 3 While the burner is lit quickly change the position of the knob from minimum to maximum and vice versa several times checking that the flame is not extinguished The hob burners do not require primary air adjustment After adjusting the applianc...

Page 31: ... mm Ultra rapid Large UR 100 3 30 0 7 41 90 240 236 135 314 Semi rapid Medium S 75 1 90 0 4 30 69 138 136 104 181 Auxiliary Small A 55 1 00 0 4 30 50 73 71 78 95 Supply pressure Nominal mbar Minimum mbar Maximum mbar 28 30 20 35 37 25 45 20 17 25 At 15 C and 1013 mbar dry gas Propane P C S 50 37 MJ kg Butane P C S 49 47 MJ kg Natural P C S 37 78 MJ m3 S UR A ø 180 GB 31 AXMT 6434 IX AXMT 6434 WH ...
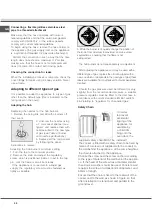
Page 32: ...tify the type of burner please refer to the diagrams contained in the paragraph Burner and nozzle specifications For models equipped with a reducer grid the latter must be used only for the auxiliary burner when pans with a diameter of less than 12 cm are used Electric hotplates The corresponding knob may be turned clockwise or anti clockwise and set to six different positions Setting Normal or Fa...

Page 33: ...sible to Change the cooking mode by turning the SELECTOR knob Change the temperature by turning the THERMOSTAT knob Set the cooking duration and the cooking end time see Cooking modes Stop cooking by turning the SELECTOR knob to the 0 position 5 The cooking time may be modified see Cooking Modes 6 If a blackout occurs while the oven is already in operation an automatic system within the appliance ...

Page 34: ...w cooking at low temperatures The temperature options are 40 65 90 C BAKED CAKES This function is ideal for baking cakes Place the food inside the oven while it is still cold The dish may also be placed in a preheated oven It will only be possible to adjust the duration by 10 10 minutes BREAD To obtain the best results we recommend that you carefully observe the instructions below Follow the recip...

Page 35: ...he oven will stop cooking and a buzzer sounds For example it is 9 00 a m and a time of 1 hour and 15 minutes is programmed while the end time is set to 12 30 The programme will start automatically at 11 15 a m Programming has been set when the and buttons are illuminated The DISPLAY shows the cooking end time and the cooking duration alternately To cancel programming turn the SELECTOR knob to the ...

Page 36: ...190 250 25 40 Shelf 5 oven tray on wire shelf switch levels halfway through cooking Shelf 3 oven tray on wire shelf switch levels halfway through cooking Shelf 1 drip tray Pizze surgelate ROASTING Yes 2 250 10 20 Shelf 2 drip tray griglia Torte salate torta di verdura quiche TRADITIONAL OVEN Yes 2 180 190 40 55 Cake tin on wire shelf MULTILEVEL Yes 1 3 180 190 45 60 Shelf 3 cake tin on wire shelf ...

Page 37: ... 2 Shelf 5 drip tray with water Shelf 2 oven tray on wire shelf TESTED RECIPES in compliance with IEC 60350 1 Recipe Function Preheating Shelf from bottom Temp C Time min Accessories and notes Short bread MULTILEVEL 2 140 30 40 Drip tray MULTILEVEL 1 3 140 30 40 Shelf 3 universal tray Shelf 1 universal tray Small cakes MULTILEVEL 3 160 20 30 Drip tray MULTILEVEL 1 3 160 25 35 Shelf 3 universal tra...

Page 38: ...ht or when they are still hot Inspecting the oven seals Check the door seals around the oven regularly If the seals are damaged please contact your nearest Authorised After sales Service Centre We recommend that the oven is not used until the seals have been replaced Replacing the oven light bulb To replace the oven light bulb 1 Remove the glass cover using a screwdriver 2 Unscrew the light bulb a...

Page 39: ...ices The icon on the display when lit indicates that the oven door was automatically locked as soon as the temperature reached a high value The icon indicates that the cleaning cycle may be cancelled at any time by pressing the button If a malfunction occurs the heating elements will be switched off Once the oven door has been locked you cannot change the duration and cycle end time settings Progr...

Page 40: ...XEROX FABRIANO Indesit Company S P A Viale Aristide Merloni 47 60044 Fabriano AN www whirlp ool com 03 2016 195136677 02 p 40 ...

Reviews: