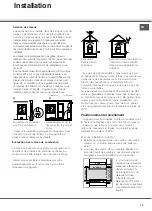
-
The appliance must be disconnected from the power supply before carrying out any installation
operation.
-
During installation, make sure the appliance does not damage the power cable.
-
Only activate the appliance when the installation procedure has been completed.
-
Kitchen units in contact with the appliance must be heat resistant (min 90°C).
-
Carry out all cabinet cutting works before fitting the appliance in the furniture and carefully remove all
wood chips and sawdust.
-
After installation, the bottom of the appliance must no longer be accessible.
-
For correct appliance operation, do not obstruct the minimum gap between the worktop and the
upper edge of the oven.
-
The appliance must not be installed behind a decorative door in order to avoid overheating.
GB
GAS CONNECTION
-
Use pressure regulators suitable for the gas pressure indicated in the instruction.
-
WARNING
: Prior to installation, ensure that the local gas delivery conditions (nature or pressure) are
compatible with the setting of the hob (see the rating plate and injector table).
-
WARNING
: The adjustment condictions for this appliance are stated on the lable (or data plate).
-
WARNING
: This appliance is not connected to a combustion products evacuation device. It shall be
installed and connected in accordance with current installation regulations. Particulat attention shall
be given to the relevant requirements regarding ventilation.
-
WARNING
: These operations must be perfomed by a qualified technician.
-
If the appliances is connected to liquid gas, the regulation screw must be fastned as tightly as
possible.
-
When gas cylinder is adopted, the gas cylinder or gas container must be properly settled (vertical
orientation).
-
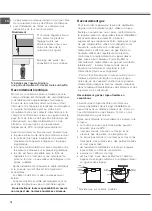
Use only flexible or rigid metal hose for gas connection.
-
IMPORTANT : If a staineless steel hose is used, it must be installed so as not touch any mobile part
of the furniture (e.g.drawer). It must pass thorugh an area where there are no obstructions and where
it is possible to inspect it on all its length.
-
The appliance should be connected to the main gas supply or to gas cylinder in compliance with the
current National regulations. Before carry out the connection, make sure that the appliance is
compatible with the gas supply you wish to use. If this is not the case, follow the instructions indicated
in the paragraph "Adapting to different types of gas".
-
After connection to the gas supply, check for leaks with soapy water. Light up the burners and turn
the knobs from max position 1* to minimum position 2* to check flame stability.
ELECTRICAL WARNINGS
11
-
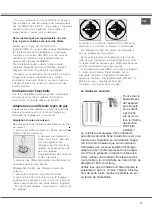
Make sure the voltage specified on the rating plate corresponds to that of your home.
-
The rating plate is on the front edge of the oven (visible when the door is open).
-
For installation to comply with current safety regulations, an omnipolar switch with minimum contact
gap of 3mm is required.
-
Regulation require that the appliance is earthed.
-
For appliances with fitted plug, if the plug is not suitable for you socket outlet, contact a qualified technician.
-
Do not use extension leads, multiple sockets or adapters. Do not connect the appliance to a socket
which can be operated by remote control.
-
The power cable must be long enough for connecting the appliance, once fitted in its housing, to the
main power supply.
-
Do not pull the power supply cable.
-
If the power cable is damaged it must be replaced with an identical one. The power cable must only
be replaced by a qualified technician in compliance with the manufacturer instruction and current
safety regulations. Contact an authorized service center.
-
Do not operate this appliance if it has a damaged mains cord or plug, if it is not working properly, or if
it has been damaged or dropped. Do not immerse the mains cord or plug in water. Keep the cord
away from hot surfaces.
-
The electrical components must not be accessible to the user after installation.
-
Do not touch the appliance with any wet part of the body and do not operate it when barefoot.
Summary of Contents for AXMT 6434/IX
Page 1: ...AXMT 6434 IX AXMT 6434 WH ...

