background image

1187094B

© 2004.
All rights reserved.
Todos los derechos reservados.

5/04

Printed in U.S.A.

Impreso en EE. UU.

Summary of Contents for ACQ082XK1

Page 1: ...s accessories or service call 1 800 253 1301 in the U S A ACONDICIONADOR DE AIRE ManualdeUsoyCuidado Esta guía contiene información útil Léala cuidadosamente antes de usar su acondicionador de aire de habitación Para consultas respecto a características operación desempeño partes accesorios o servicio técnico llame al 1 800 253 1301 en los EE UU Table of Contents Índice 2 1187094B ...

Page 2: ... OR SERVICE 14 Accessories 14 ÍNDICE SEGURIDAD DEL ACONDICIONADOR DE AIRE 15 REQUISITOS DE INSTALACIÓN 15 Herramientas y piezas 15 Requisitos de ubicación 16 Requisitos eléctricos 16 INSTRUCCIONES DE INSTALACIÓN 17 Desempaque 17 Installación del acondicionador de aire 18 Colocación del gabinete del acondicionador de aire 19 Complete la instalación 21 CÓMO USAR SU ACONDICIONADOR DE AIRE 22 Cómo pon...

Page 3: ...safety of others are very important We have provided many important safety messages in this manual and on your appliance Always read and obey all safety messages This is the safety alert symbol This symbol alerts you to potential hazards that can kill or hurt you and others All safety messages will follow the safety alert symbol and either the word DANGER or WARNING These words mean IMPORTANT SAFE...

Page 4: ... minimum to 40 101 6 cm maximum Height 16 41 3 cm minimum Through the wall installation The wall opening measurements should be Height 16 40 6 cm plus twice the thickness of wood used to build frame Width 22 57 5 cm plus twice the thickness of wood used to build frame ElectricalRequirements Ground wire must be connected to ground screw located in lower right corner of air conditioner when air cond...

Page 5: ...e turning on the air conditioner Rub a small amount of liquid dish soap over the adhesive with your fingers Wipe with warm water and dry Do not use sharp instruments rubbing alcohol flammable fluids or abrasive cleaners to remove tape or glue These products can damage the surface of your air conditioner Handle air conditioner with care 1 Remove air conditioner from carton and place on cardboard 2 ...

Page 6: ...inet NOTE This screw is required to correctly attach curtain top to bottom to the air conditioner cabinet 6 While the right hand curtain is still extended insert 8 18 x pan head screws into the top and bottom slots of curtain Screw curtain to the top and bottom holes in air conditioner cabinet NOTE Some curtains may have 2 slots at each end You will be able to see a mounting hole through the corre...

Page 7: ...not block the louvers on the outside of the air conditioner Window installation on some models 1 Center empty cabinet in window Check that lower rail of air conditioner cabinet is behind and against back side of windowsill Maintain a firm hold on the air conditioner cabinet Lower window sash to hold cabinet in place 2 Measure the distance between the right hand side of the cabinet and the inside o...

Page 8: ...xisting holes and 6 8 x wood screws not provided to attach cabinet to frame NOTE Do not overtighten screws or cabinet will distort and provide a poor air seal between cabinet and air conditioner 6 Caulk all outside wall openings around cabinet CompleteInstallation NOTE Handle air conditioner with care 1 Make sure the free end of the ground wire is outside of the cabinet 2 Insert air conditioner in...

Page 9: ...t 3 minutes before turning it back on This prevents the air conditioner from blowing a fuse or tripping a circuit breaker Do not try to operate your air conditioner in the cooling mode when outside temperature is below 65 F 18 C The inside evaporator coil will freeze up and the air conditioner will not operate properly NOTE In the event of a power failure your air conditioner will operate at the p...

Page 10: ...eaches 86 F 30 C Press the down arrow to lower the temperature Each time you press or hold the down arrow the temperature will go down 1 until it reaches 64 F 18 C To change the temperature display from F to C 1 Turn the air conditioner off 2 While the air conditioner is off press and hold down the MODE and FAN SPEED buttons while pressing POWER ON OFF to turn the air conditioner on The air condit...

Page 11: ...rease 1 until it reaches 64 F 18ºC To set the Timer for a 1 to 24 hour delay until the air conditioner turns off the air conditioner must be On 1 Press TIMER Indicator light on the air conditioner will flash 2 Press the plus or minus button to change delay time 1 to 24 hours 3 Press TIMER again or wait 10 seconds Indicator light on the air conditioner will remain on To set Timer to turn on air con...

Page 12: ...ter in place 1 Turn off air conditioner 2 Using the indents in top of filter door pull door down Filter door is not removable 3 Slide air filter up and out to remove from the filter door 4 Use a vacuum cleaner to clean air filter If air filter is very dirty wash it in warm water with a mild detergent Do not wash air filter in the dishwasher or use any chemical cleaners Air dry filter completely be...

Page 13: ...Use exhaust vent fans while cooking or bathing and try not to use heat producing appliances during the hottest part of the day A higher capacity air conditioner may be required depending on the size of the room being cooled Air conditioner cycles on and off too much or does not cool MODE is set to POWER SAVER Use Power Saver only when you are away from home or asleep since the fan does not circula...

Page 14: ...ormation Whenever you call to request service on your appliance you need to know your complete model number and serial number You can find this information on the model and serial number label See Electrical Requirements for model and serial number location Please record the model and serial number information below Also record the purchase date of your appliance and the store s name address and t...

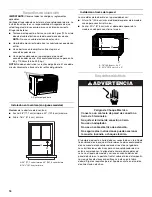
Page 15: ...símbolo de advertencia de seguridad Este símbolo le llama la atención sobre peligros potenciales que pueden ocasionar la muerte o una y de la palabra PELIGRO o ADVERTENCIA Estas palabras significan PELIGRO ADVERTENCIA a usted y a los demás Lea y obedezca siempre todos los mensajes de seguridad Todos los mensajes de seguridad irán a continuación del símbolo de advertencia de seguridad puede morir l...

Page 16: ...das de la abertura en la pared deben ser Altura 16 40 6 cm más el doble del espesor de la madera usada para construir el marco Ancho 22 57 5 cm más el doble del espesor de la madera usada para construir el marco Requisitoseléctricos El alambre de puesta a tierra debe ser conectado a un tornillo de tierra ubicado en la esquina inferior derecha del acondicionador de aire cuando el acondicionador de ...

Page 17: ...lo Frote un poco de detergente líquido para vajillas sobre el adhesivo con los dedos Limpie con agua tibia y seque No use instrumentos filosos alcohol para fricciones líquidos inflamables o productos de limpieza abrasivos para eliminar los restos de cinta o goma Estos productos pueden dañar la superficie de su acondicionador de aire Trate el acondicionador de aire con cuidado 1 Saque el acondicion...

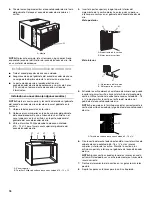
Page 18: ...ondicionador de aire 4 Inserte la parte superior y luego la parte inferior del alojamiento de la cortina derecha en las guías superior e inferior para cortinas en el gabinete del acondicionador de aire Vista posterior Vista inferior 5 Extienda la cortina derecha hacia fuera de manera que pueda insertar el primer tornillo a través del orificio del medio de la cortina Utilice tornillos de cabeza de ...

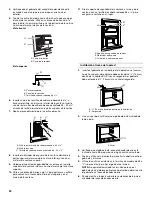
Page 19: ...a 4 Aplique un sellador de madera a la superficie exterior expuesta 5 Inserte el marco en la abertura en la pared Cuadre y nivele el marco 6 Sujete con firmeza el marco a la pared Colocacióndelgabinetedel acondicionadordeaire Trate el acondicionador de aire con cuidado Asegúrese de que el gabinete del acondicionador de aire no se caiga de la abertura durante la instalación o al quitarlo La parte d...

Page 20: ... tornillo de cabeza redonda 8 x para asegurar la ventana en su lugar Instalación a través de la pared 1 Inserte el gabinete en la abertura de la pared con el marco La parte superior del gabinete debe extenderse 13 mm dentro de la habitación Si hay un resguardo el gabinete debe extenderse 13 mm más allá del resguardo 2 Use un nivel para verificar que el gabinete esté nivelado de lado a lado 3 Verif...

Page 21: ...nte inferior del panel con los tornillos del panel delantero Vuelva a colocar las perillas de control en algunos modelos NOTA Haga pasar el cable de alimentación por la muesca en el panel delantero 8 Conecte a un contacto de pared de conexión a tierra de 3 terminales A Alambre verde de conexión a tierra B Tornillo de puesta a tierra ADVERTENCIA Peligro de Peso Excesivo Use dos o más personas para ...

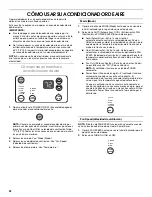
Page 22: ...da la luz del indicador para la posición que usted desea 2 Seleccione AUTO Automático COOL Enfriamiento FAN Ventilación o POWER SAVER Ahorro de energía Auto Automático Enfría la sala mientras automáticamente controla la velocidad de ventilación Usted no puede cambiar la velocidad de ventilación pero puede ajustar la temperatura oprimiendo la flecha hacia arriba o la flecha hacia abajo Cool Enfriam...

Page 23: ...cha hacia arriba o la flecha hacia abajo para cambiar el tiempo de retardo de 1 a 24 horas 4 Oprima de nuevo TIMER ON OFF Temporizador encendido apagado o espere 10 segundos La luz del indicador permanecerá encendida Para programar el temporizador hasta que el acondicionador de aire se encienda cambiando los ajustes previos 1 Encienda el acondicionador de aire 2 Ajuste el MODE a Auto Cool Fan o Po...

Page 24: ...s o menos para cambiar el tiempo de retardo de 1 a 24 horas 3 Oprima de nuevo TIMER o espere 10 segundos La luz del indicador en el acondicionador de aire permanecerá encendida Para programar el temporizador de manera que el acondicionador de aire se encienda manteniendo los ajustes previos 1 Apague el acondicionador de aire 2 Oprima TIMER La luz del indicador en el acondicionador de aire se encen...

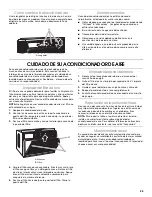
Page 25: ...o las muescas que están en la parte superior de la puerta del filtro empuje la puerta hacia abajo La puerta del filtro no es desmontable 3 Deslice el filtro hacia arriba y hacia el exterior para sacarlo de la puerta del filtro 4 Limpie el filtro usando una aspiradora Si está muy sucio lave el filtro con agua tibia y un detergente suave No lave el filtro de aire en la lavavajillas ni use limpiadore...

Page 26: ...an calor Use ventiladores aspiradores cuando esté cocinando o bañándose y trate de no usar aparatos que generan calor durante las horas más calurosas del día Podría necesitar un acondicionador de aire con más capacidad dependiendo del tamaño de la habitación que se desea enfriar La unidad se enciende y se apaga demasiado o no enfría El MODE está puesto en POWER SAVER Ahorro de energía Utilice el m...

Page 27: ...lo Siempre que llame para solicitar servicio del aparato necesitará saber el número del modelo y el número de serie completos Esta información la encuentra en la placa de número del modelo y número de serie Vea la ubicación del número del modelo y del número de serie en Requisitos eléctricos Por favor anote la información sobre el número del modelo y el número de serie que se incluye abajo Anote t...

Page 28: ...1187094B 2004 All rights reserved Todos los derechos reservados 5 04 Printed in U S A Impreso en EE UU ...

Reviews: